


Use Nano Banana 2.1 on RunDiffusion to explore new materials, finishes and design details in your architectural and interior images. This guide shows you how to describe the change, use reference images and specify the parts of your project to preserve.
Nano Banana 2.1 can generate images and edit supplied images. This guide focuses on editing architecture and interiors, using an existing view to compare material, landscape, lighting and furnishing options.
When to Use Nano Banana 2.1 on RunDiffusion
Edit are the primary use case for Architecture, Interior Design, and Fashion. Changing your existing sketches, renders, models, mock ups into more polished visuals. Typical architecture tasks include facade studies, shading options, courtyard finishes, planting revisions and atmosphere changes. Interior tasks include joinery finishes, furniture substitutions and fixture references and more.
Only Start a new image when new textures, scenes, props or ideas are needed. In most cases you will be using edits to improve existing designs.
Key Takeaways
- Name the image, the target element and the intended change.
- Describe the material or object in concrete visual terms.
- Use a short preservation sentence for the features that matter.
- Give each reference a clear role.
- Review each result before making the next edit.
- Edit Prompt Formula: Source Image + Target Area + Desired Change + Visual Details + Details to Preserve
- Text-to-Image Formula: Subject + Setting + Composition + Materials and Details + Lighting + Style
Quick Answer
For an edit, identify the target and describe its replacement, then state the important features to preserve. For a reference edit, assign each image a clear role and name the detail to transfer.
RunDiffusion Quick Start
Nano Banana 2.1 is available on RunDiffusion. Open the tool directly below, or follow the steps to add it to a project Board.
- Log in to RunDiffusion at app.rundiffusion.com. Create an account if you are new to the platform.

- Open Boards from the left sidebar to organise your project work.

- Click New Board.

- Choose From Scratch.

- Choose a cover and enter a Title for your project. Add an optional description, then click Create.

- Inside the Board, click Add another Tool.

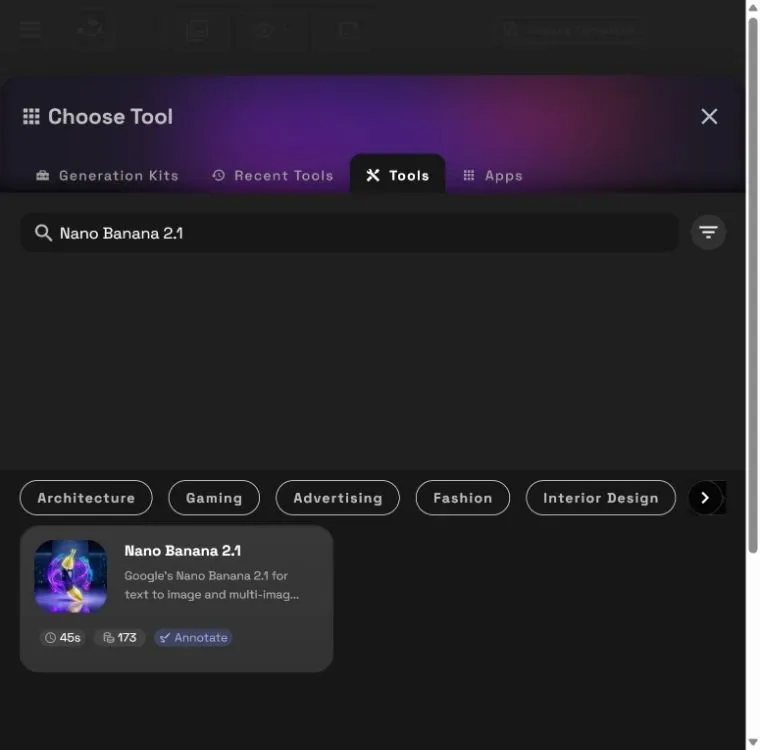
- In Choose Tool, select Tools and search for Nano Banana 2.1. Select the matching tool, then click its card in your Board to open it.
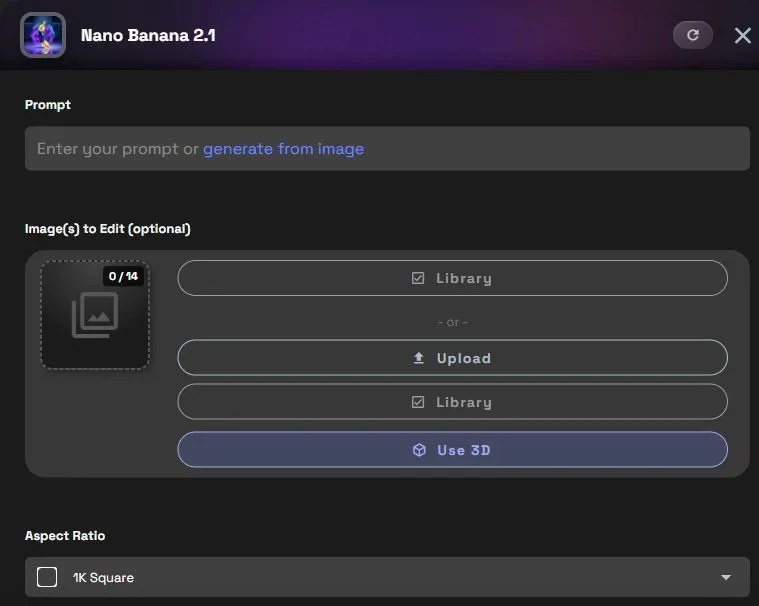
- Under Image(s) to Edit, click Upload to add your project photograph or render, or choose an image from Library. Add any reference images you need. Crop material or upholstery references close enough to show the texture clearly. In Prompt, identify the project image and each reference, describe the intended change, and name the geometry, camera view and other details to preserve.
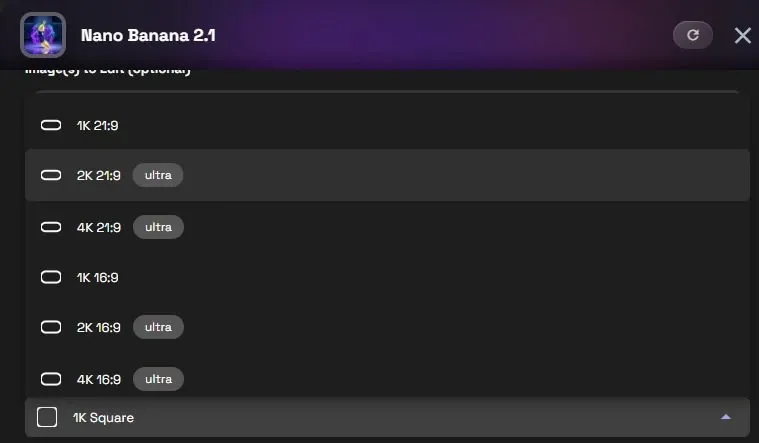
- Open Aspect Ratio and select the output size and proportions. Match the source image proportions when preserving its framing. Review the token cost beside Run, then click Run.
- Open the result and compare it with your source image at full size. Check the requested change, building or room geometry, material scale and lighting. Use the accepted image for the next edit, or return to the original to explore a separate option.
1. Architecture Edit Prompt Structure
A good formula to use when editing images.
Source Image + Target Area + Desired Change + Visual Details + Details to Preserve
Use this order for a focused architectural edit:
- Image and target: identify the image and the part to edit.
- Change: describe the new material, object or condition.
- Preserve: name the features that should remain consistent.
For a material change, include its finish, color and visible construction detail. Describe the ceramic rib direction, metal sheen or tile joints that matter to the design. For planting, identify the bed or boundary. For an object, identify its position relative to a visible element.
Preservation should match the task. A lighting edit needs to change light while retaining the building and materials. A facade study needs to change the selected finish while retaining openings and massing.
2. Architecture Examples
These five edits compare facade finishes, balcony screens, an extension envelope, presentation lighting and signage. Each option starts from its original view so the results can be assessed independently.
2.1. Ribbed Glazed Ceramic Facade
Compare deep aubergine ceramic panels with the original concrete facade while retaining the exposed concrete recesses.
Edit prompt
Using Image 1, replace the flat outer precast facade panels with vertically ribbed glazed ceramic tiles in deep aubergine, with subtle glaze variation and narrow charcoal joints. Retain the exposed concrete balcony soffits and recessed walls. Keep the building volumes, balcony depths, windows, bronze frames, glass balustrades, planting, camera view and morning light unchanged.
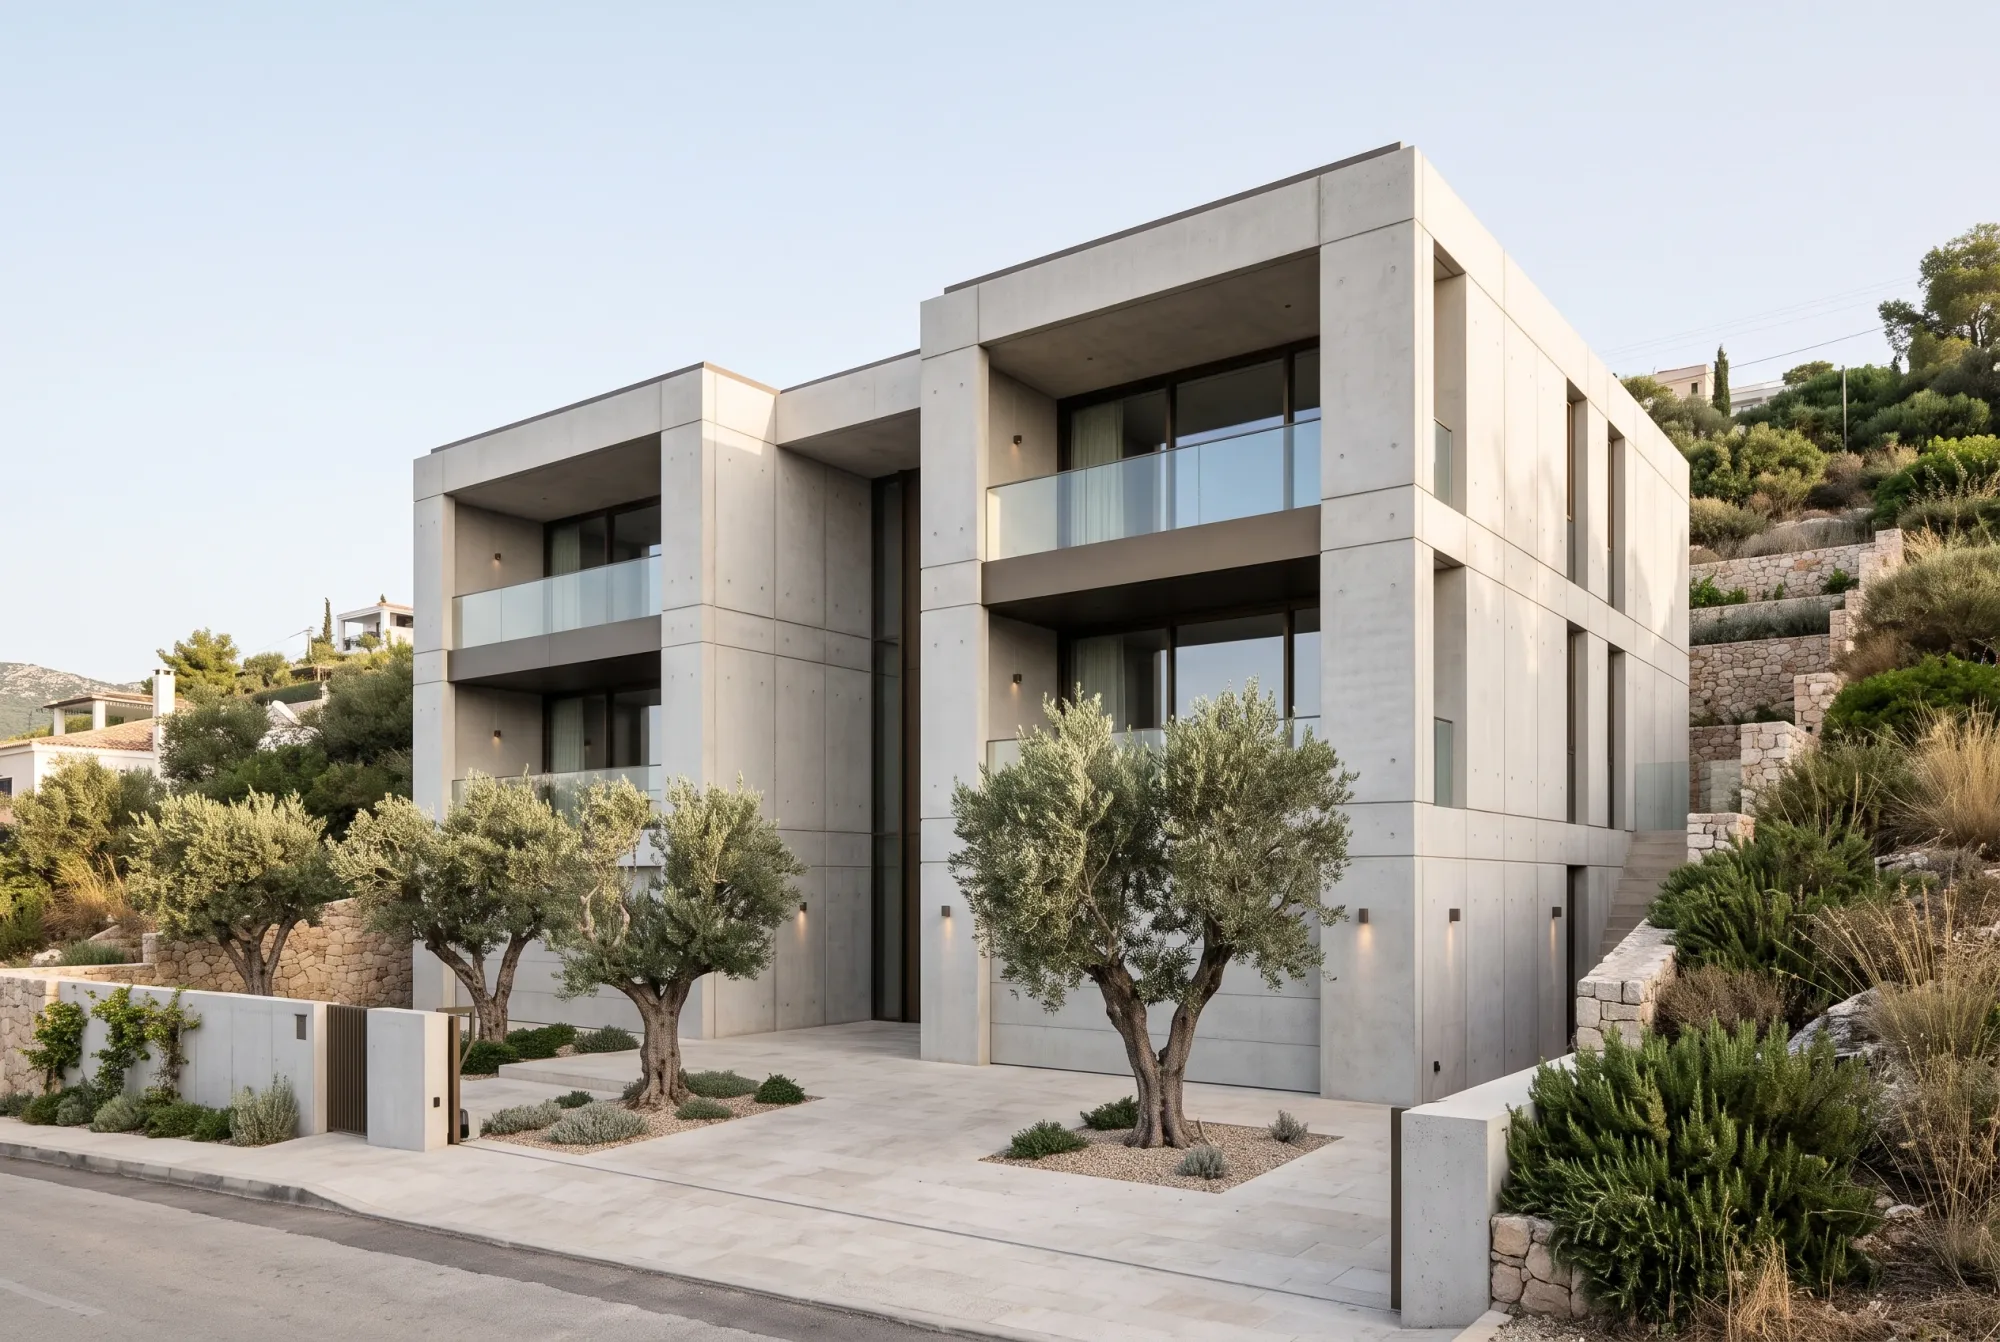
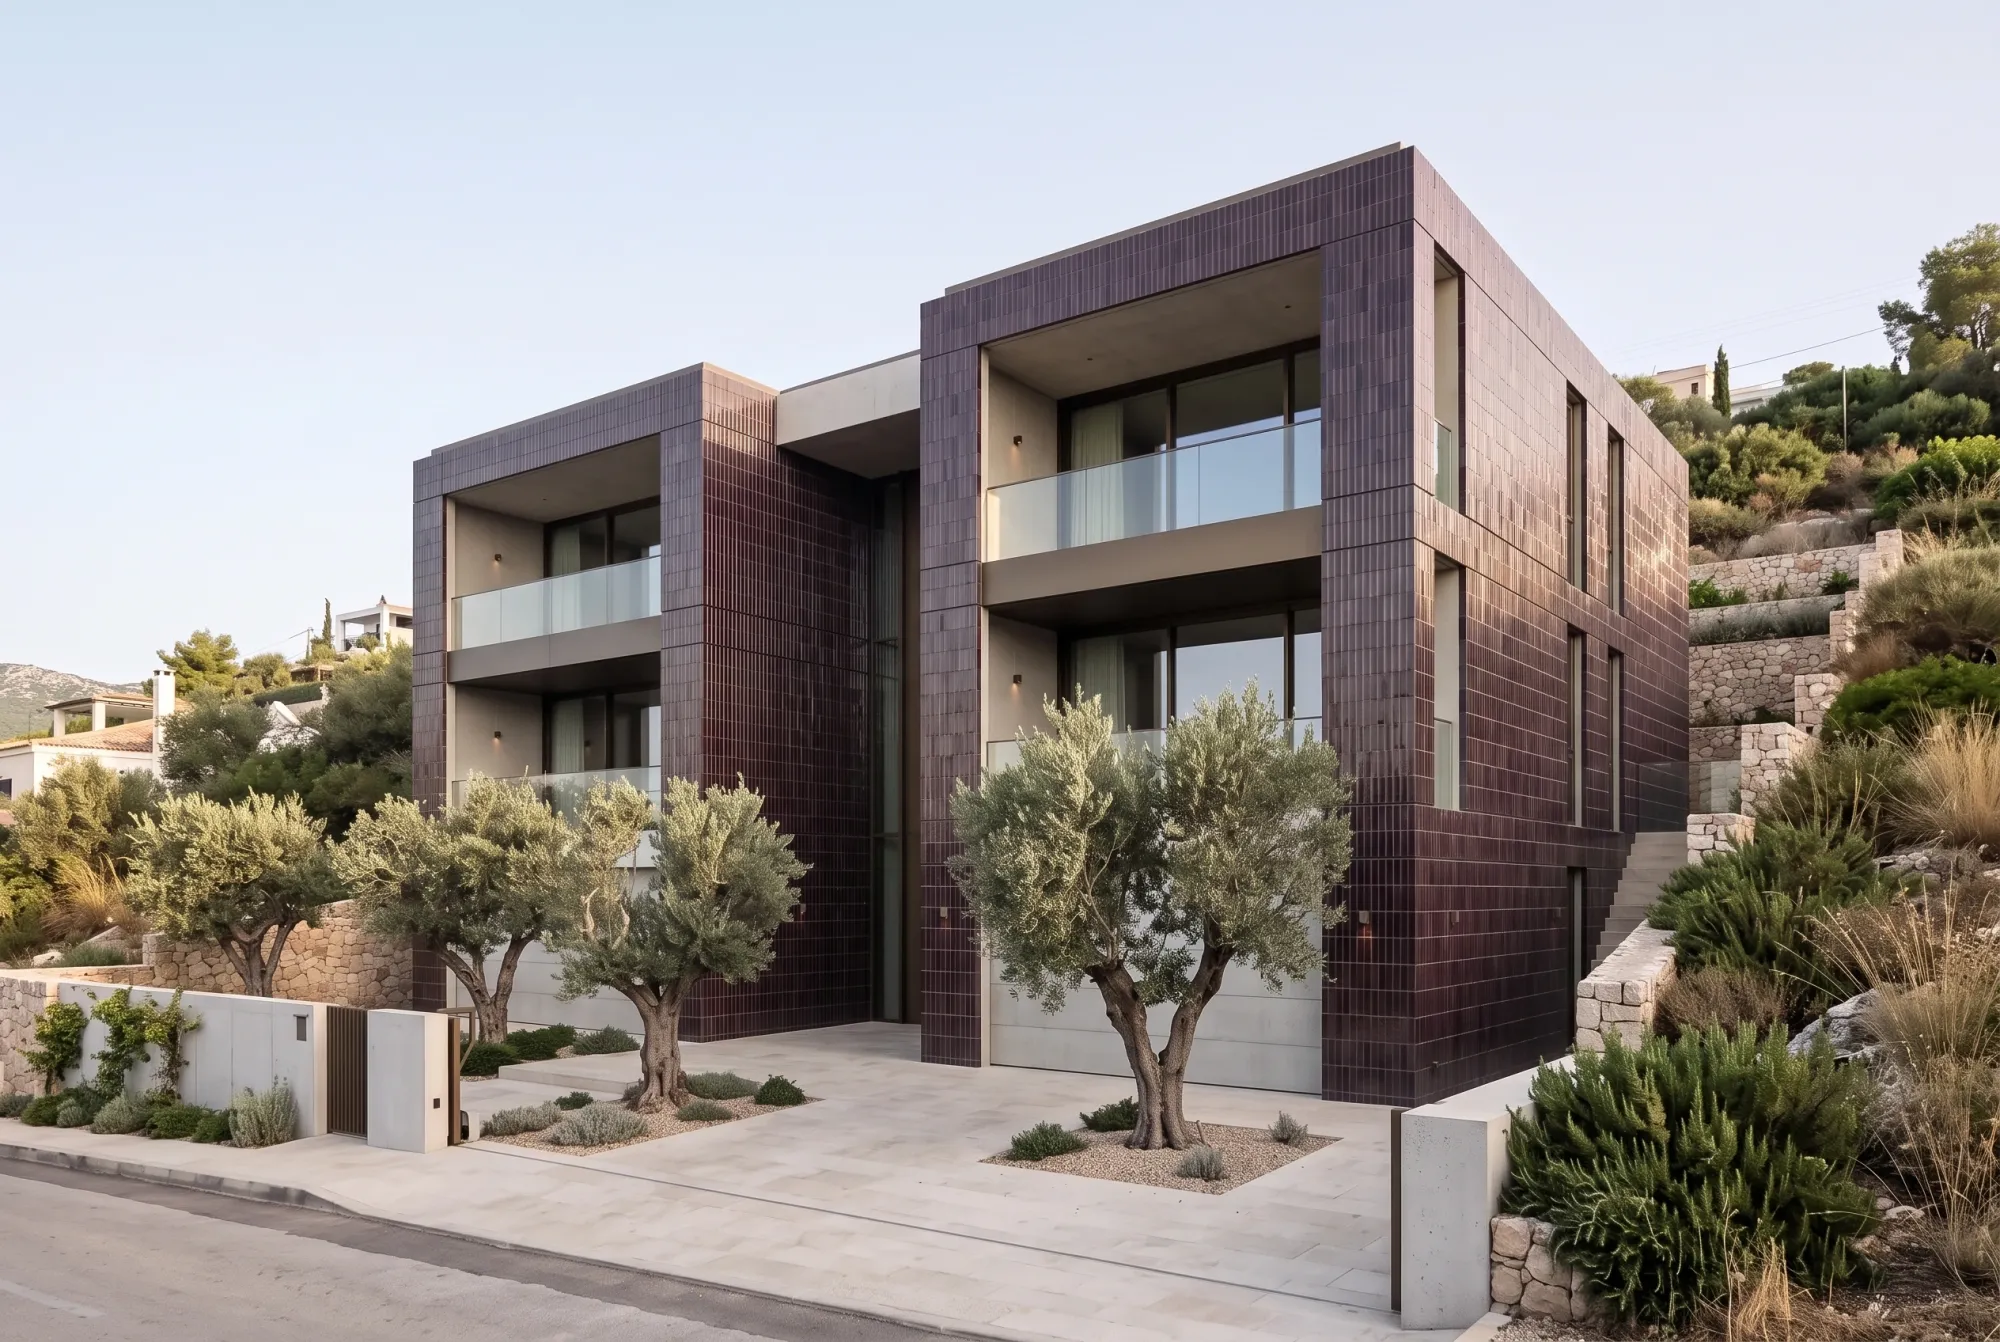
Image 1: starting project view. Edited result: Deep aubergine glazed ceramic facade.
2.2. Perforated Metal Balcony Screens
Explore partly open petrol-blue screens across the two upper balconies, keeping the glazing visible behind them.
Edit prompt
Using Image 1, add flat perforated aluminium sliding screens in dark petrol blue across the two upper balcony openings. Show evenly spaced round perforations and slim horizontal tracks, with each screen partly open to reveal the glazing behind it. Keep the concrete facade, balcony recesses, glass balustrades, windows, entrance, planting, camera view and morning light unchanged.
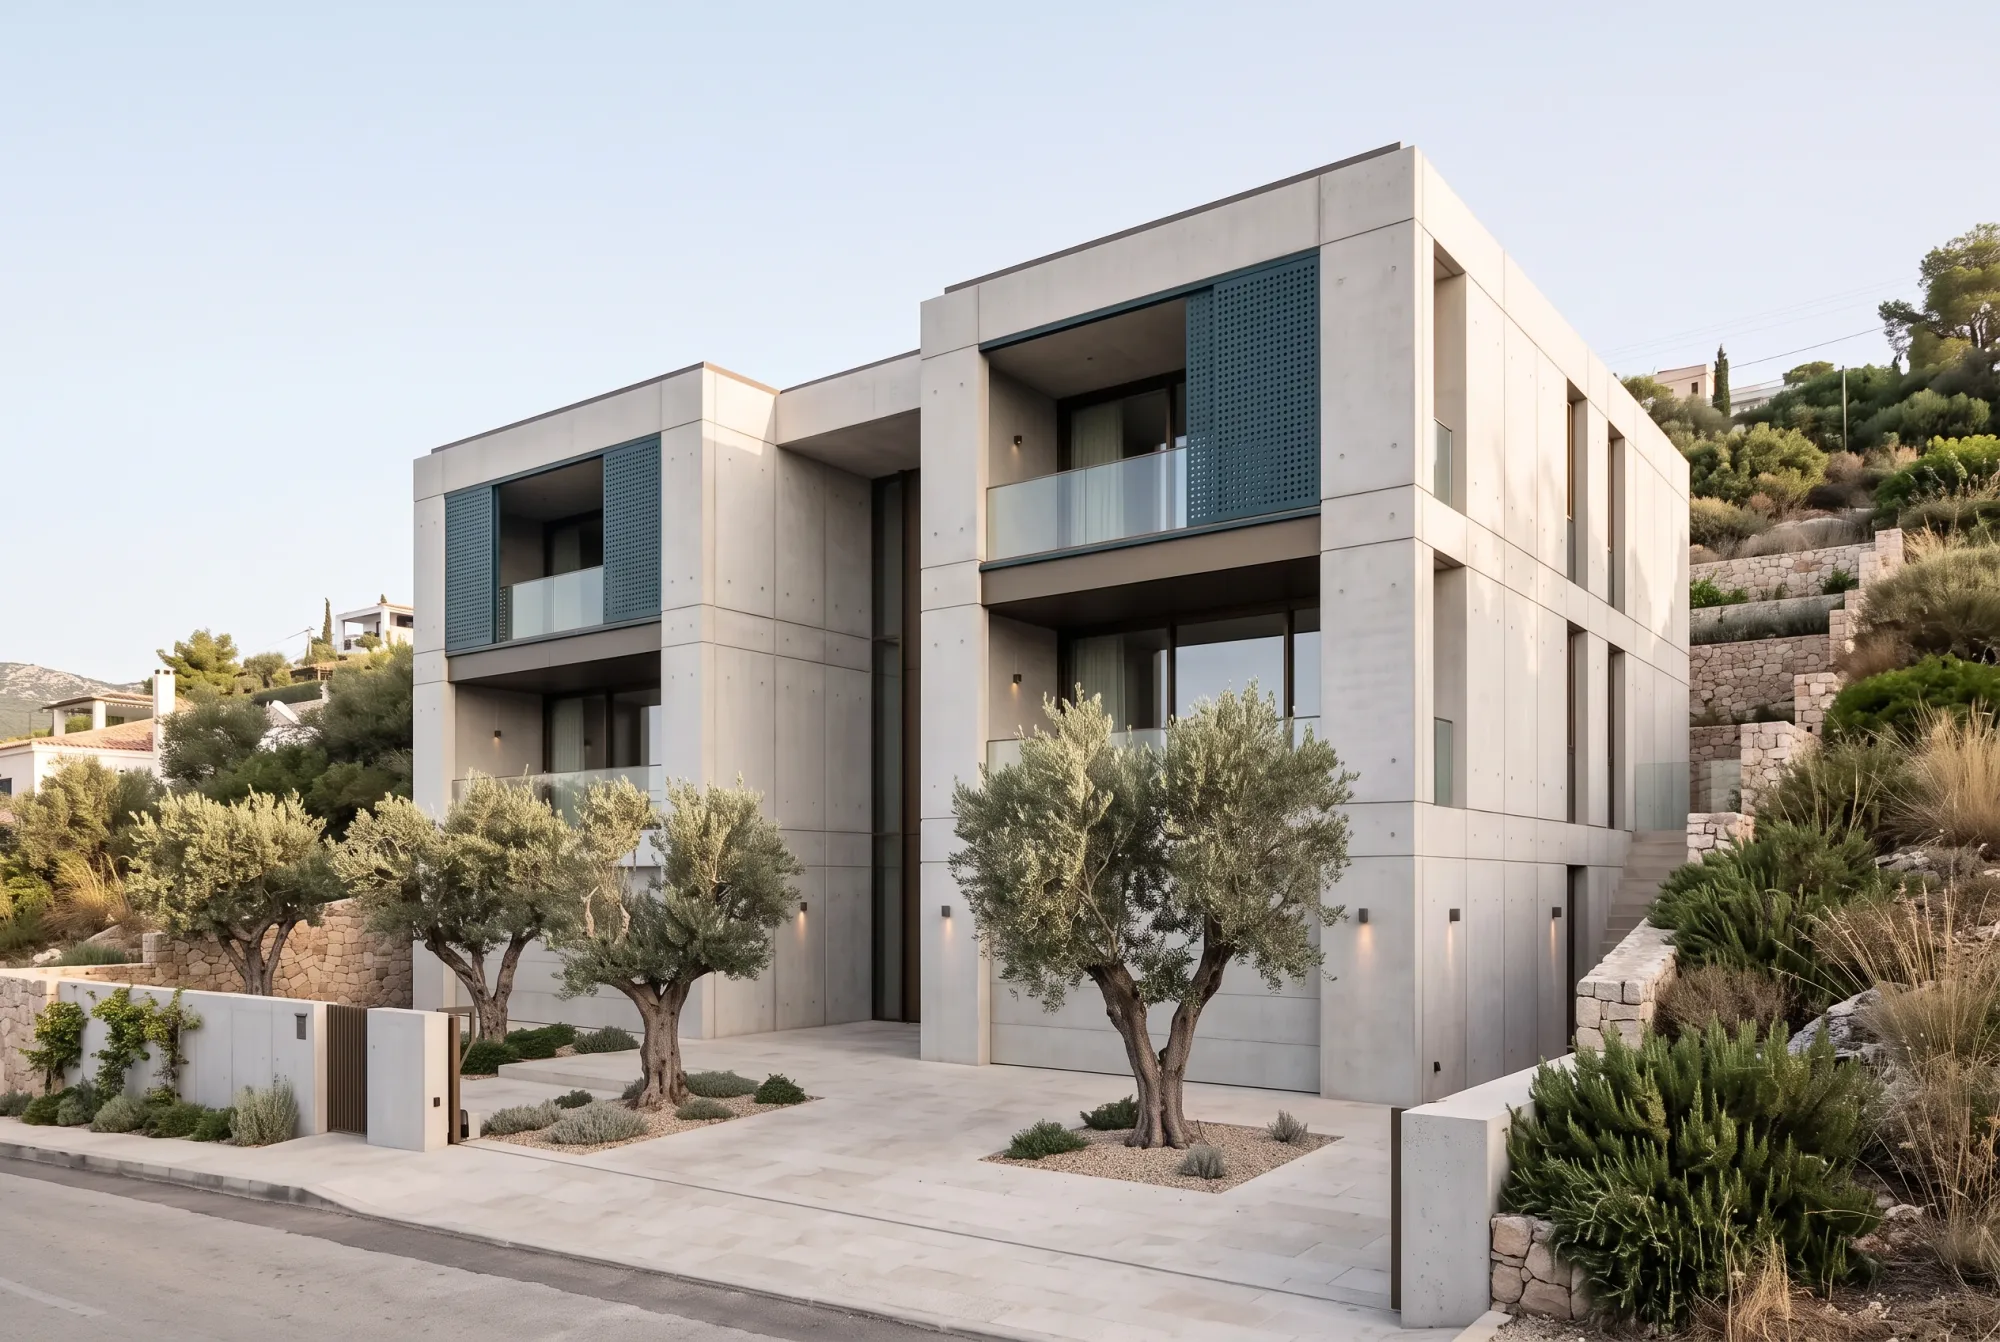
Image 1: starting project view. Edited result: Sliding perforated metal balcony screens.
2.3. Translucent Workshop Extension
Compare galvanised framing and ribbed opal panels within the existing extension, retaining its clear glass bays.
Edit prompt
Using Image 1, change the visible extension on the right to slender galvanised steel framing with vertically ribbed opal polycarbonate panels in place of the cream opaque infill panels. Keep the existing clear glass bays transparent. Preserve the extension dimensions, frame spacing, floor levels, historic brick workshop, sawtooth roofline, entrance, courtyard, camera view and daylight.
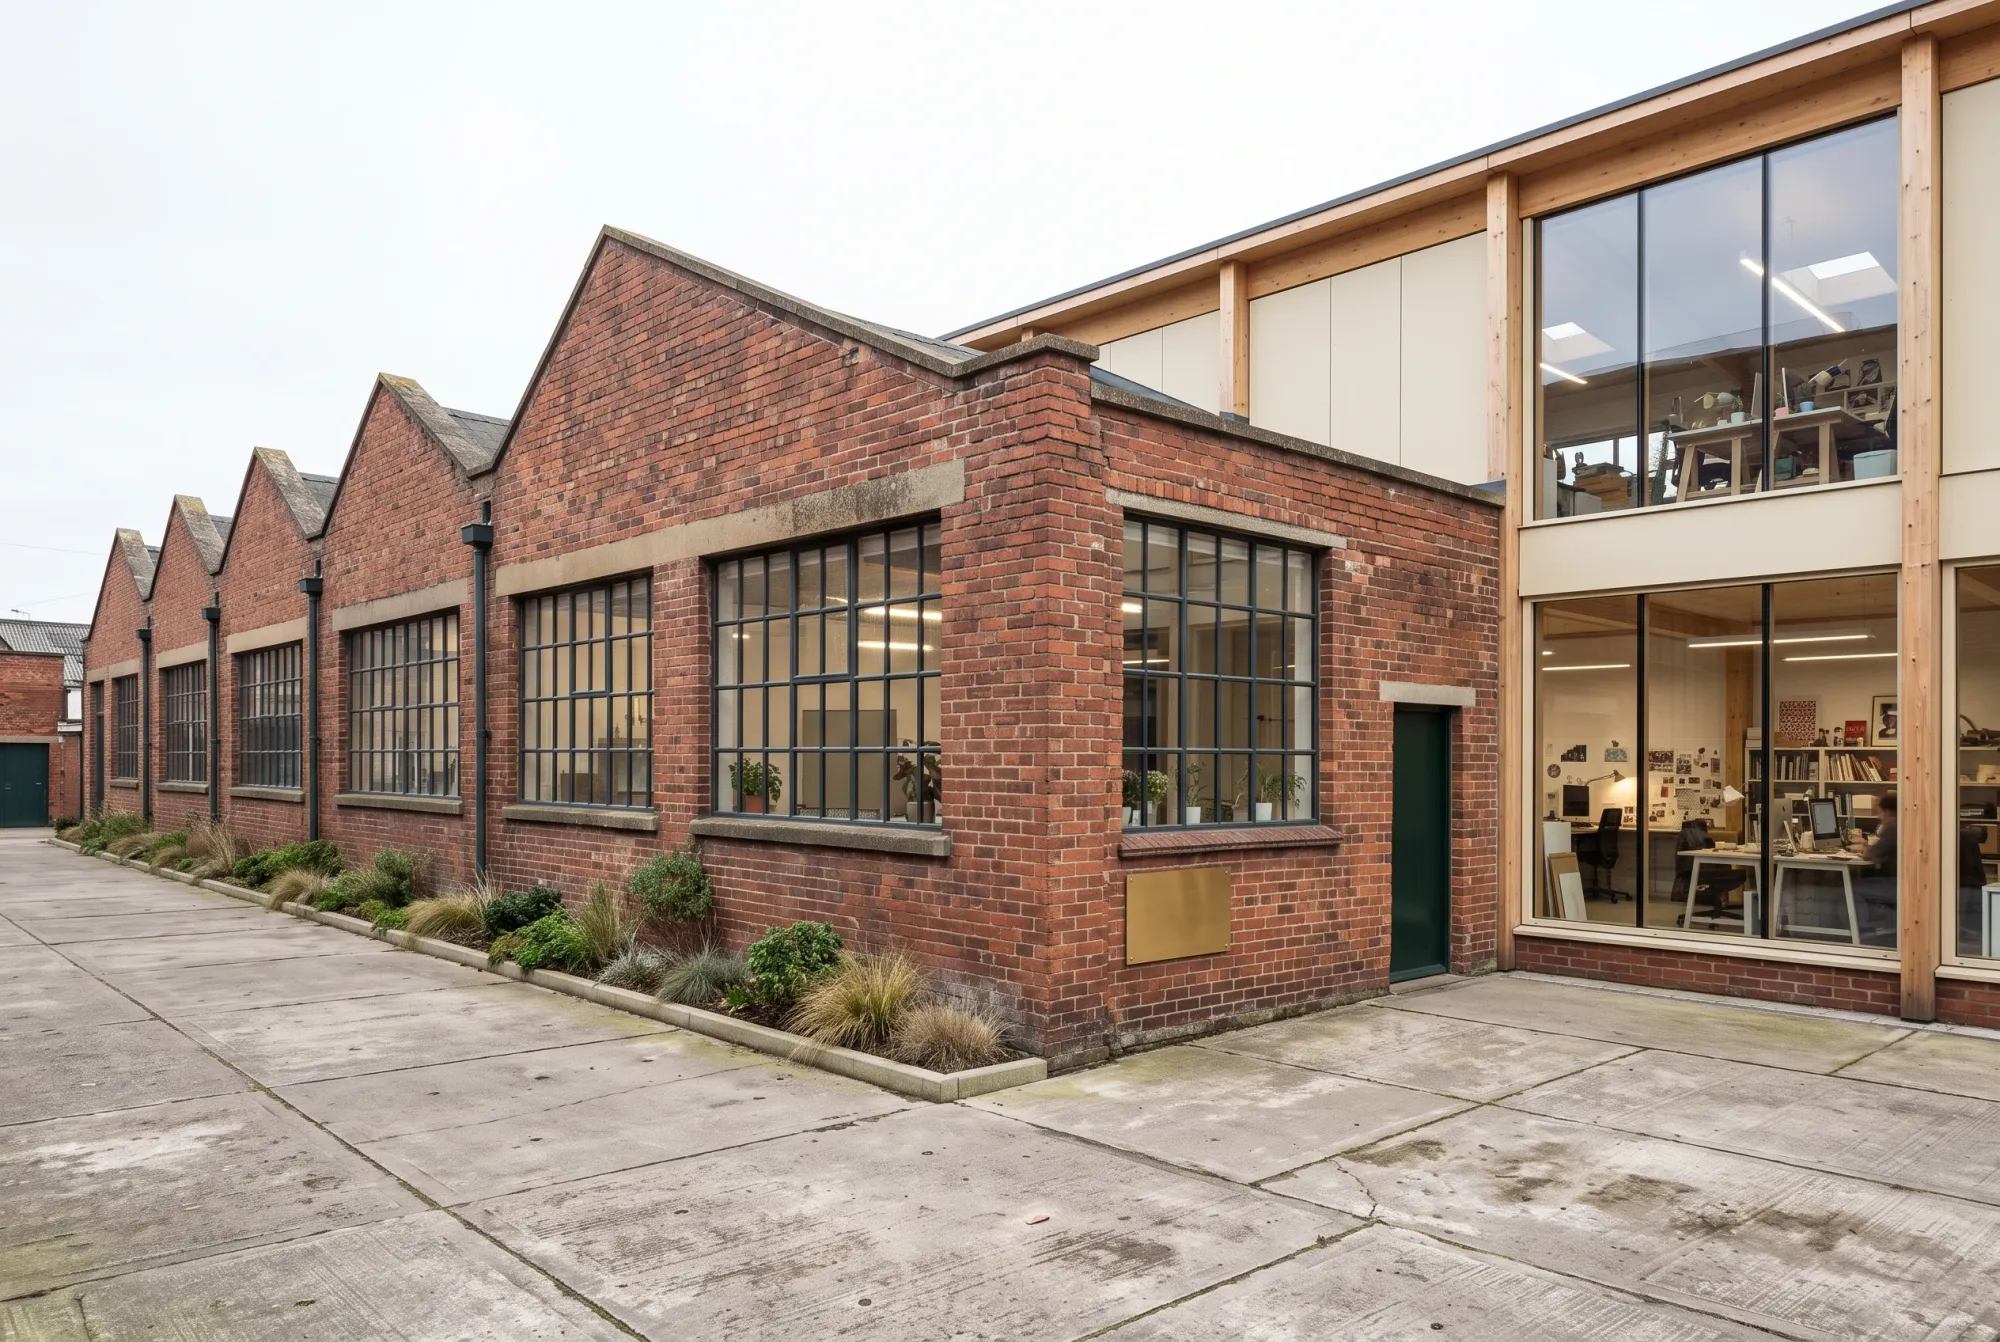
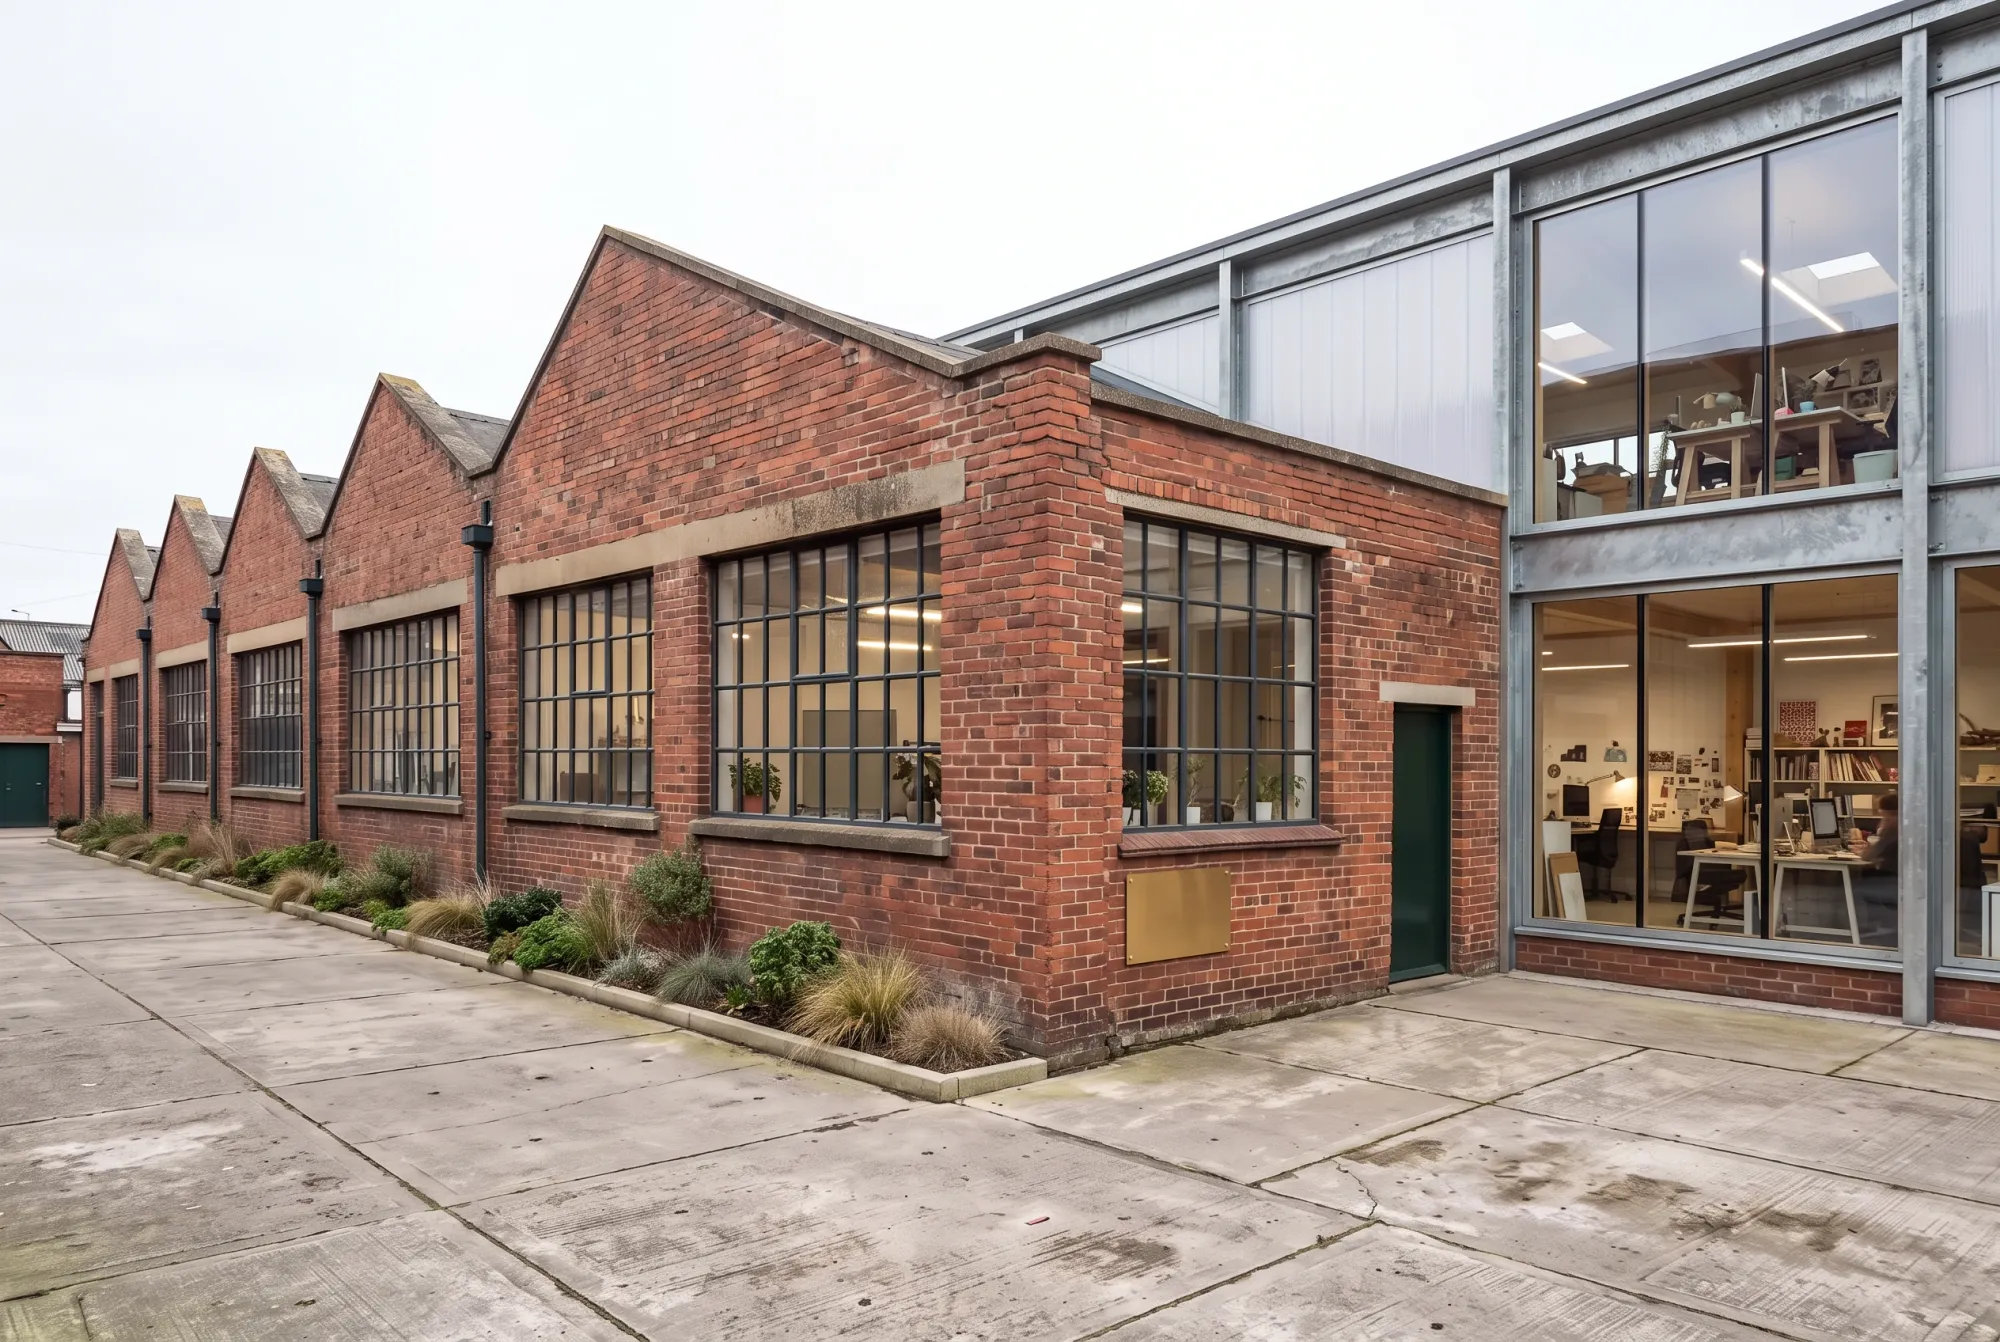
Image 1: starting project view. Edited result: Translucent workshop extension.
2.4. Blue Hour Presentation View
Show the same design at early blue hour, with a restrained contrast between the cool sky and warm interiors.
Edit prompt
Using Image 1, change the scene to early blue hour with a pale blue sky, warm light visible through the studio windows and subtle lighting beside the entrance. Keep the building geometry, facade materials, courtyard paving, planting and camera view unchanged.
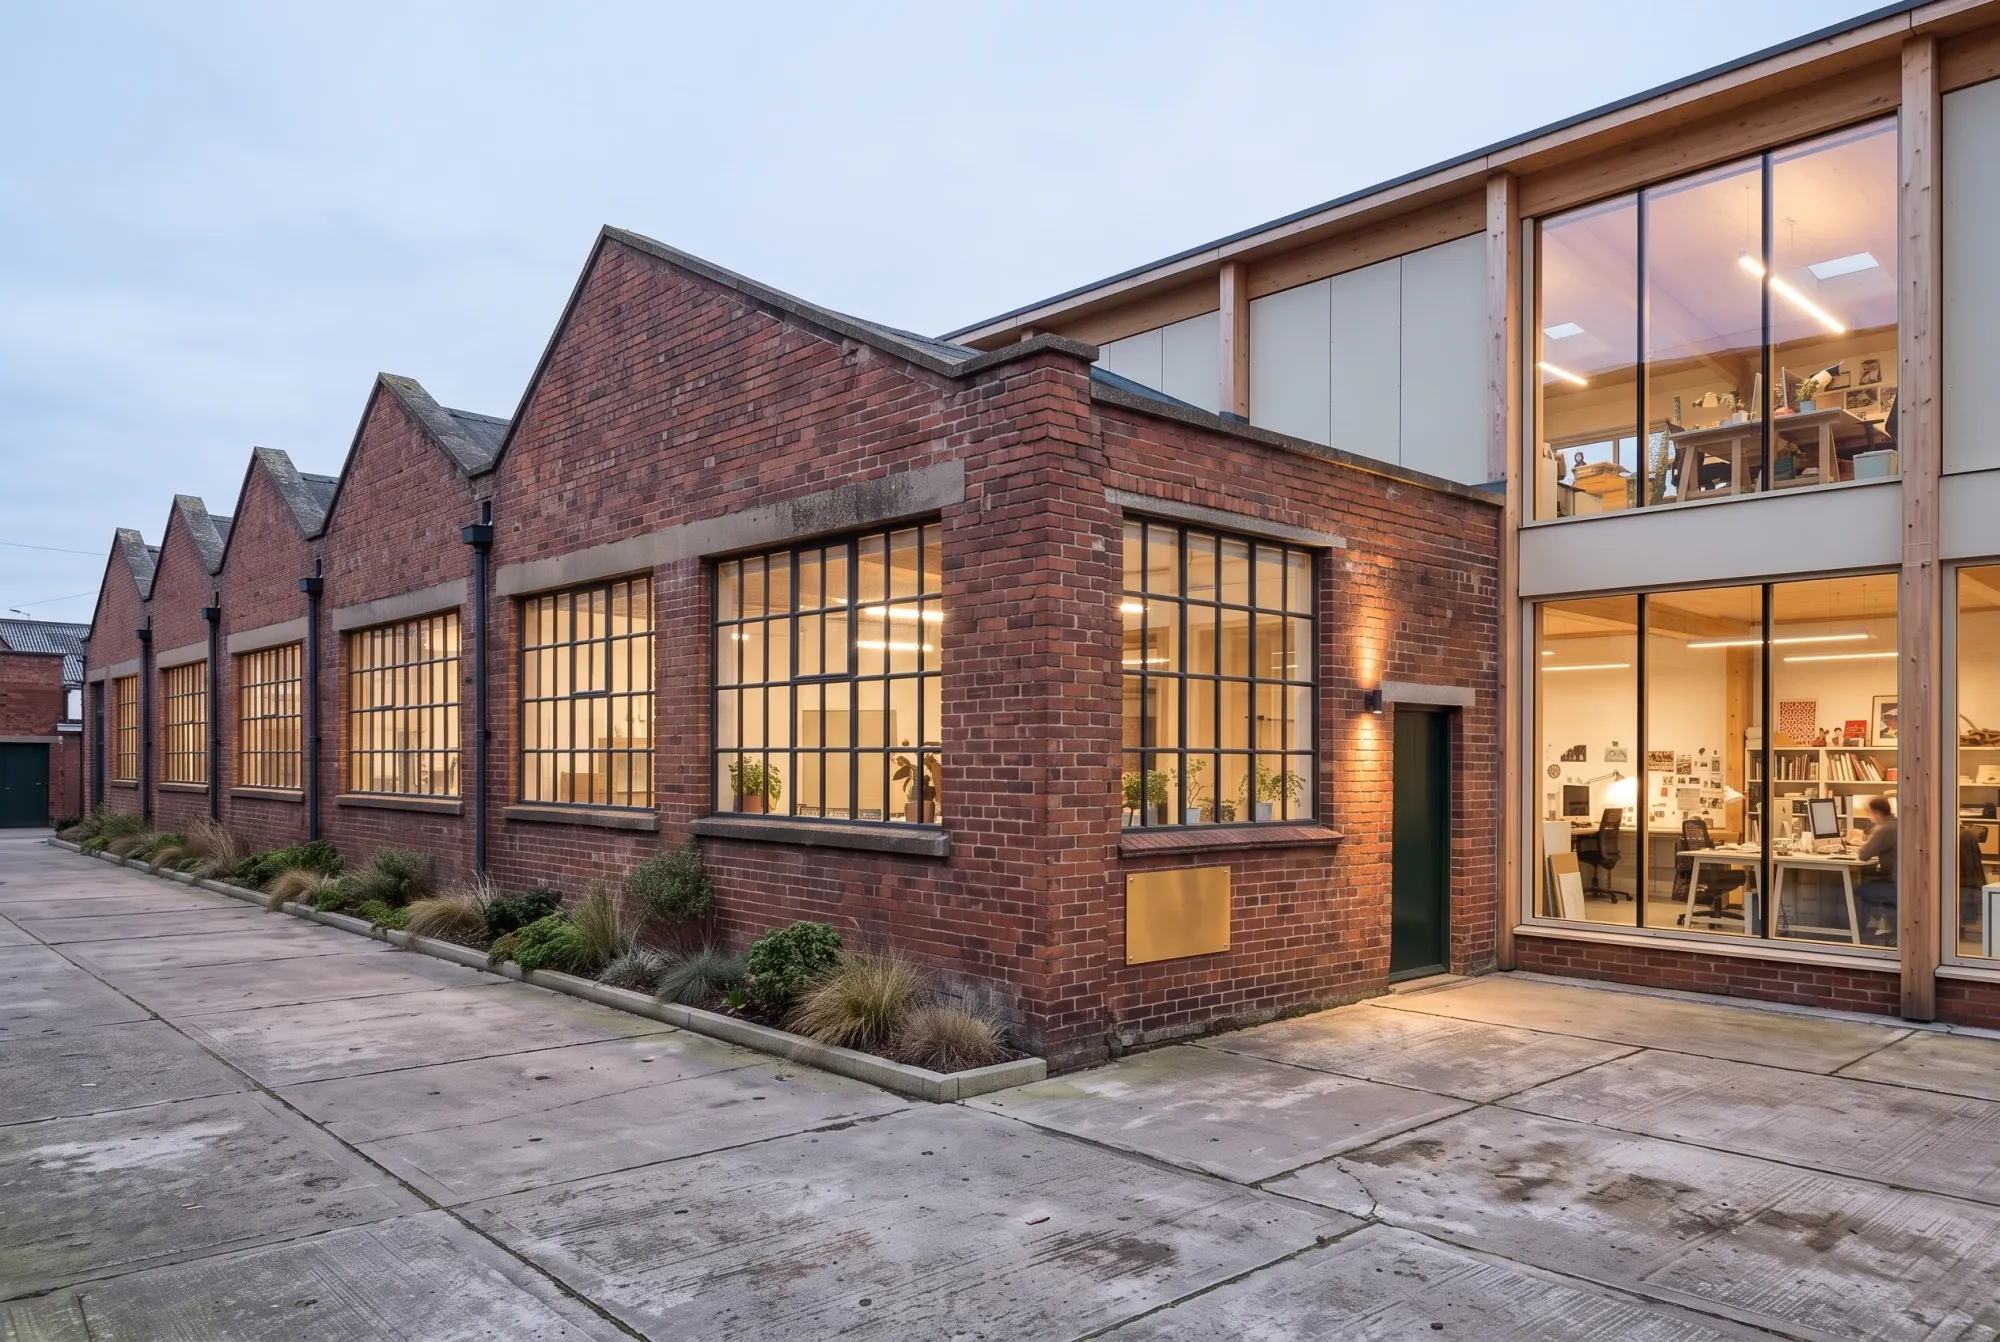
Image 1 · Generated starting image Generated with Nano Banana 2.1. Edited result Blue Hour Presentation View.
Result and review: Compare the sawtooth roofline, glazing and courtyard. The intended change concerns atmosphere and visible lighting.
2.5. Entrance Signage
Add a short studio name to the existing plaque. Quotation marks identify the exact lettering requested.
Edit prompt
Using Image 1, add the exact text "ATELIER 18" to the existing brass plaque beside the entrance, in small dark uppercase sans-serif letters centred on the plaque. Keep the plaque dimensions, door, brickwork, courtyard, timber extension, camera view and daylight unchanged.
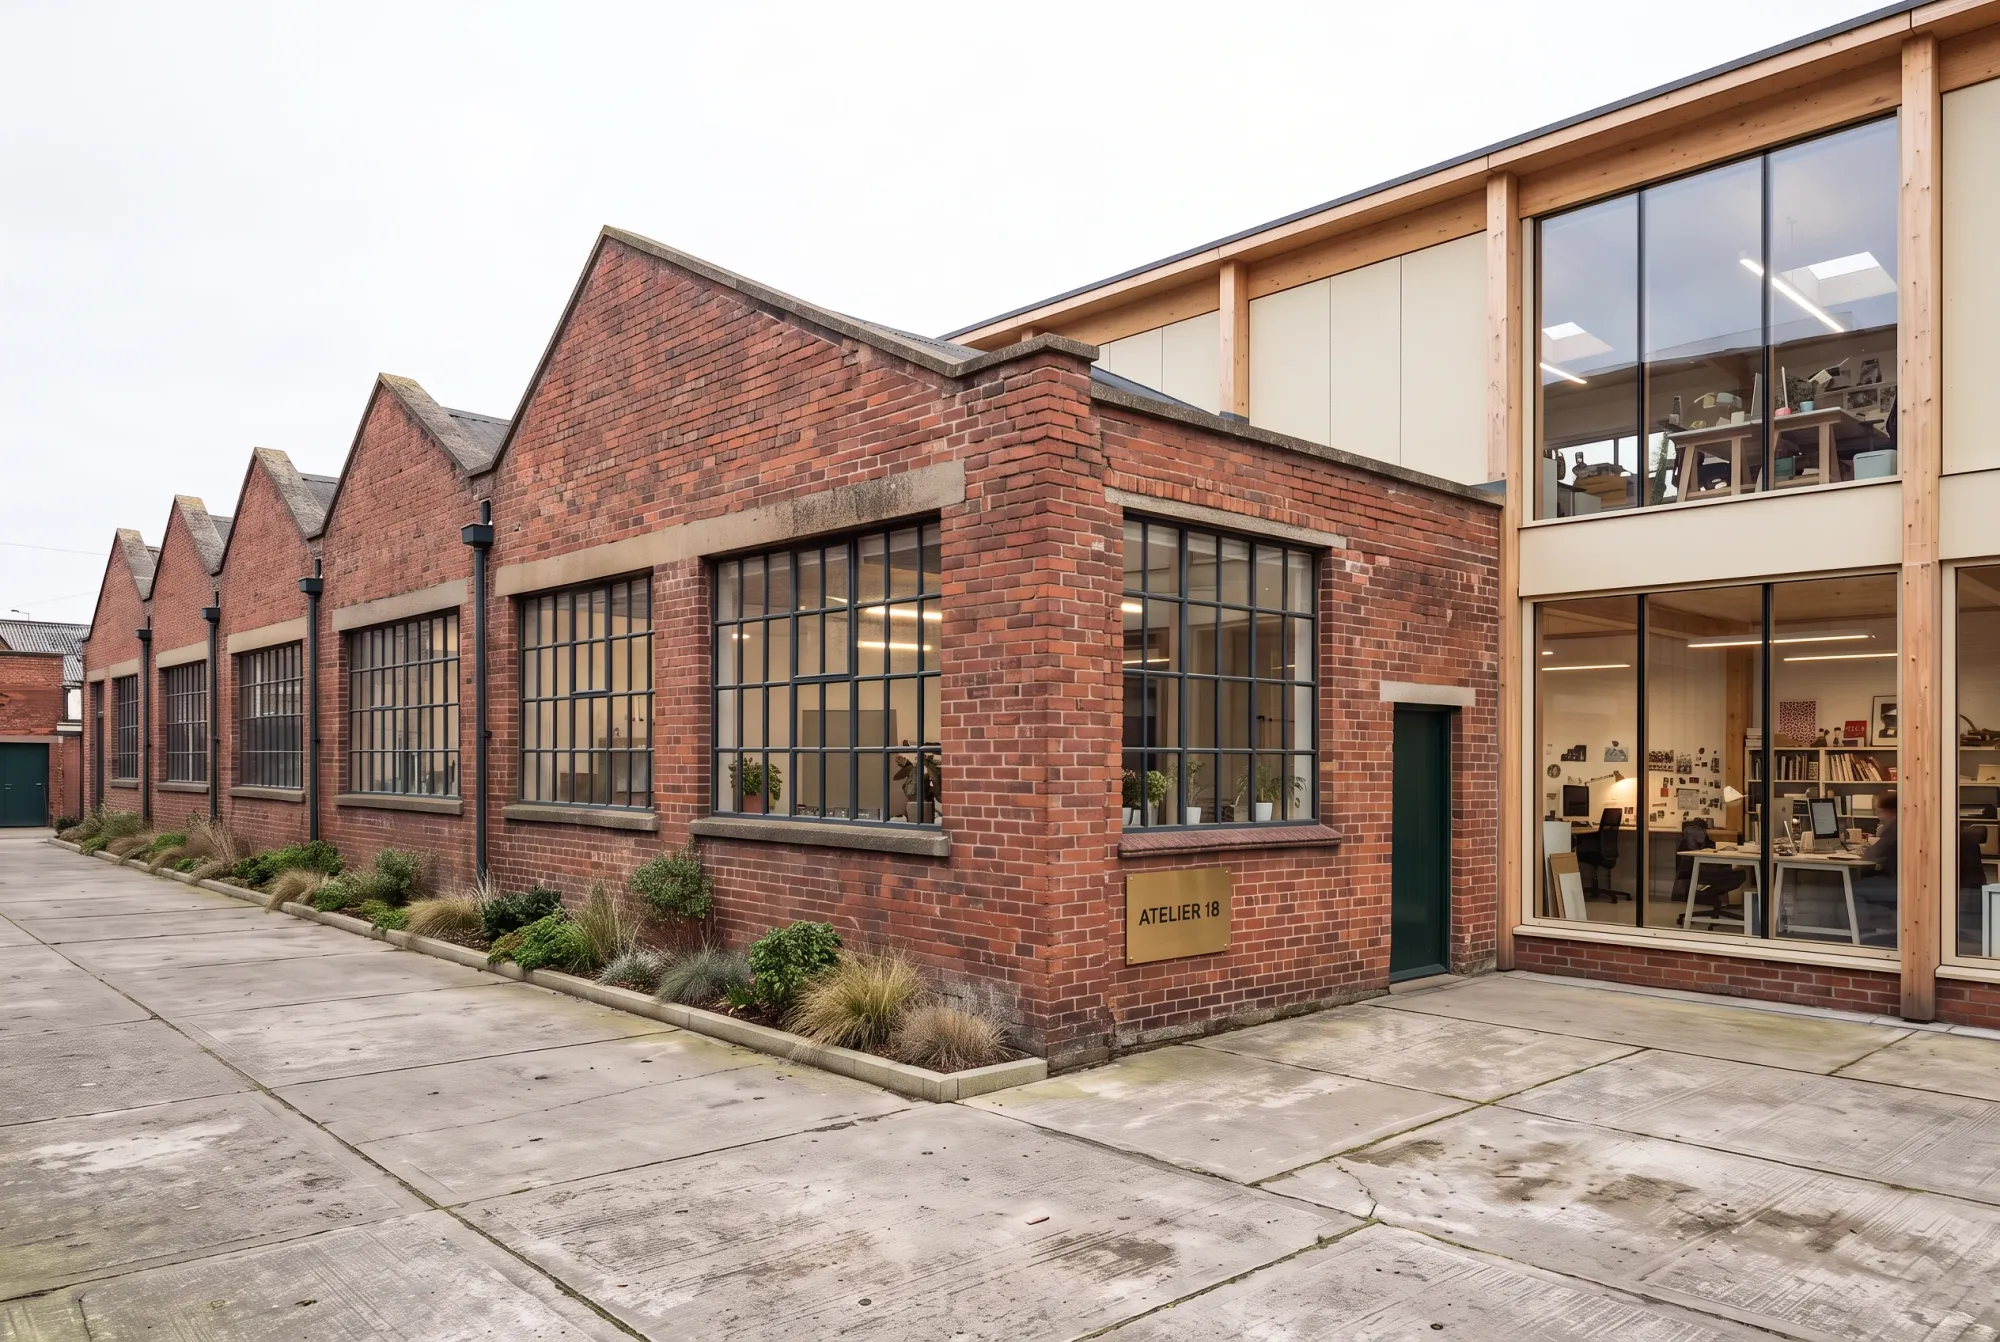
Image 1 · Generated starting image Generated with Nano Banana 2.1. Edited result Entrance Signage.
Result and review: The plaque reads “ATELIER 18” with the requested wording. Inspect letter spacing and alignment at full size. Short text is easier to check than a dense sign layout.
3. Interior Design Examples
Compare a cabinet finish, a tile backsplash and restaurant upholstery. The marked reference examples assign a specific material to a specific surface, with the surrounding room retained.
3.1. Oxblood Enamelled Steel Kitchen Fronts
Compare satin enamelled steel fronts while retaining the cabinet arrangement, stone surfaces and dining area.
Edit prompt
Using Image 1, replace the pale oak kitchen cabinet fronts with oxblood enamelled steel fronts, with a satin sheen, thin folded edges and discreet recessed finger pulls. Keep the cabinet layout, appliances, stone island, countertops, pendant, dining furniture, exposed brick, ceiling, windows, floor, camera view and daylight unchanged.
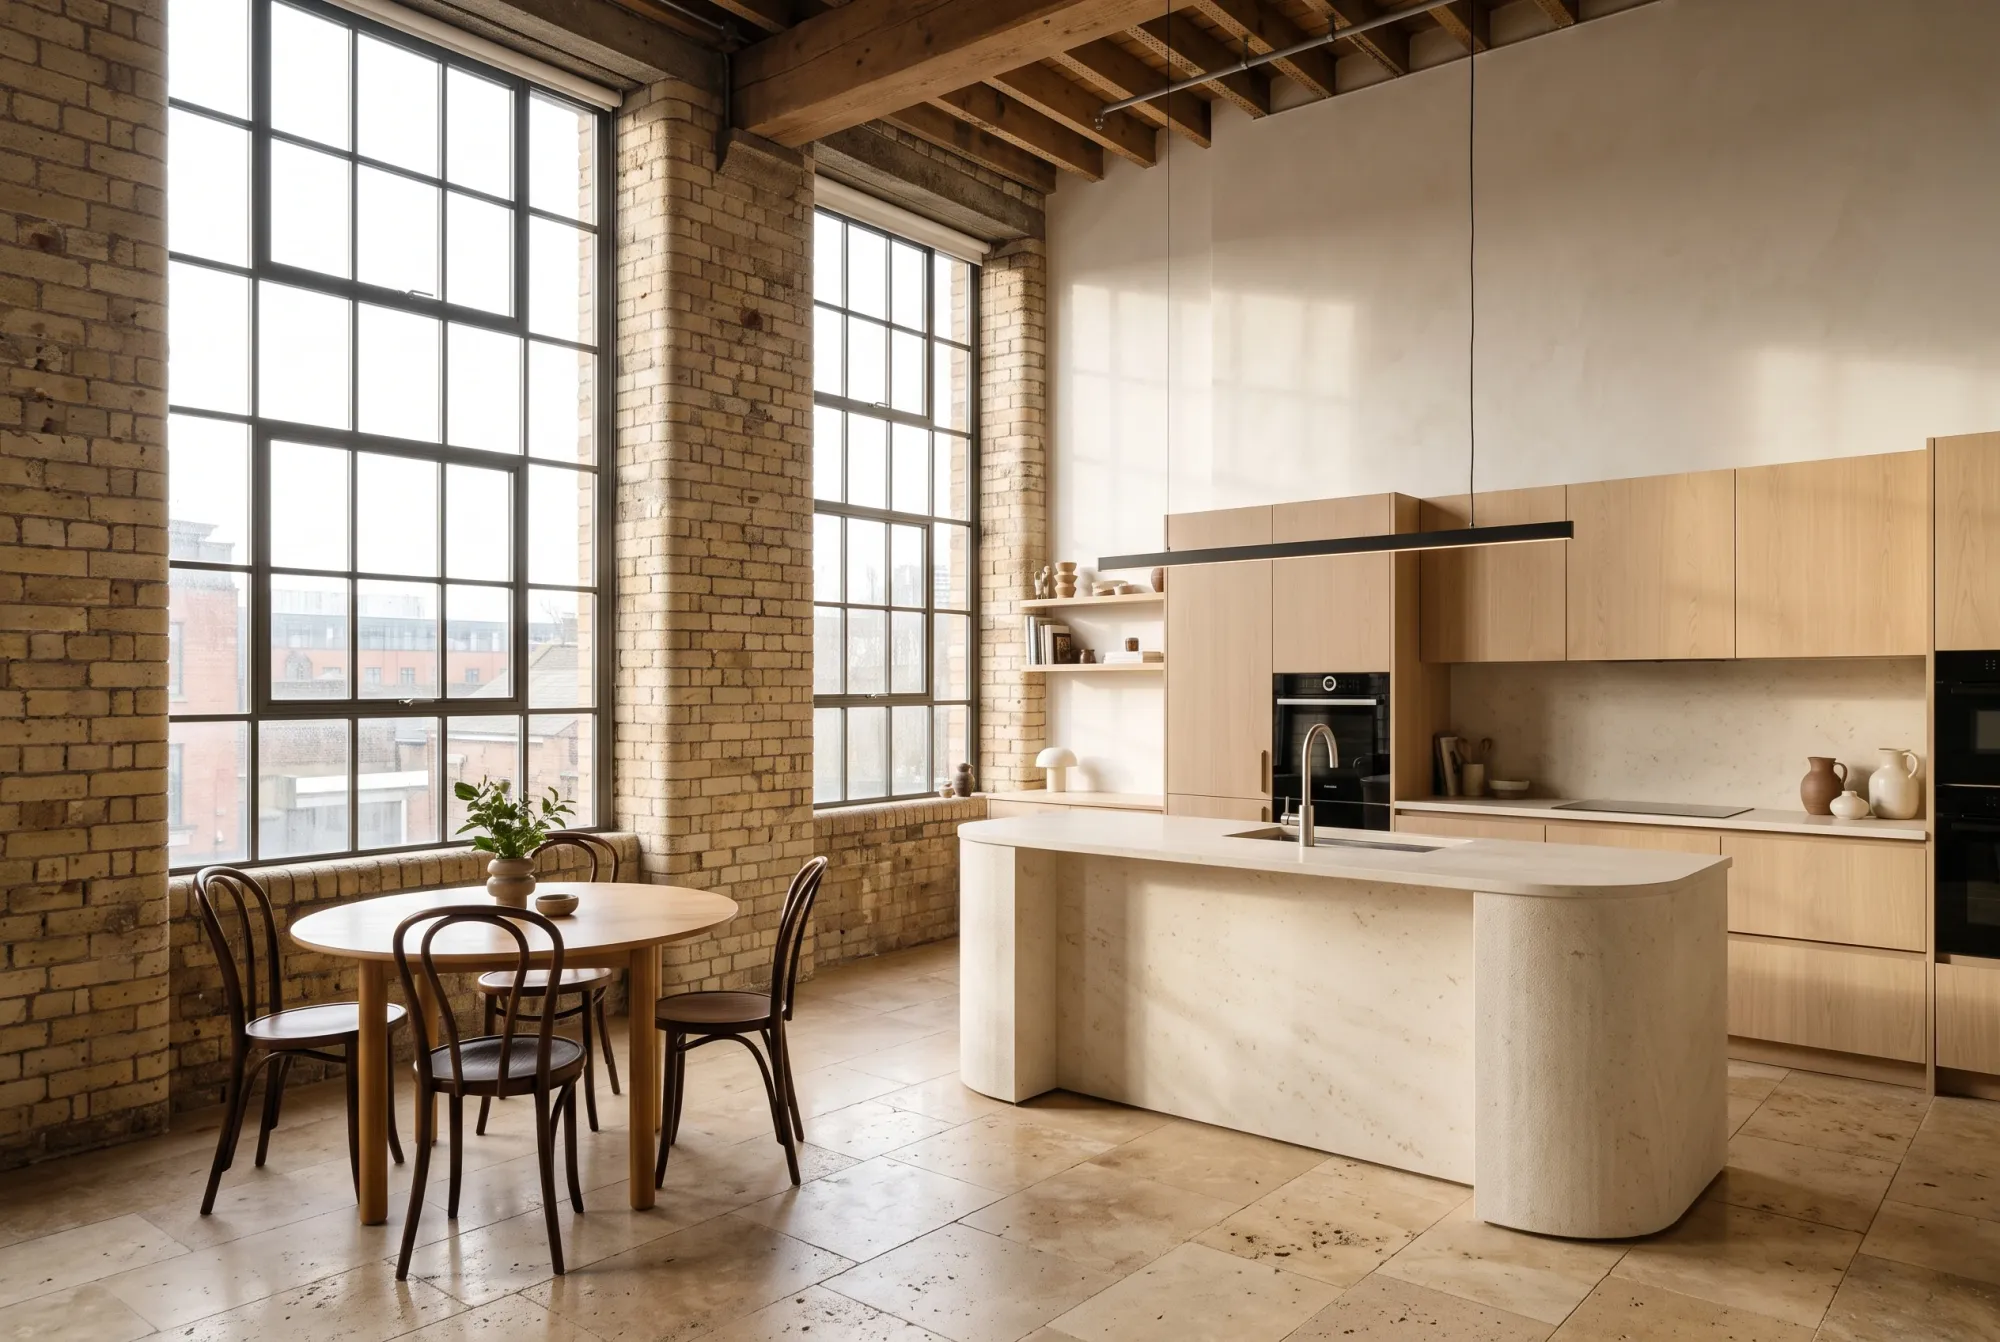
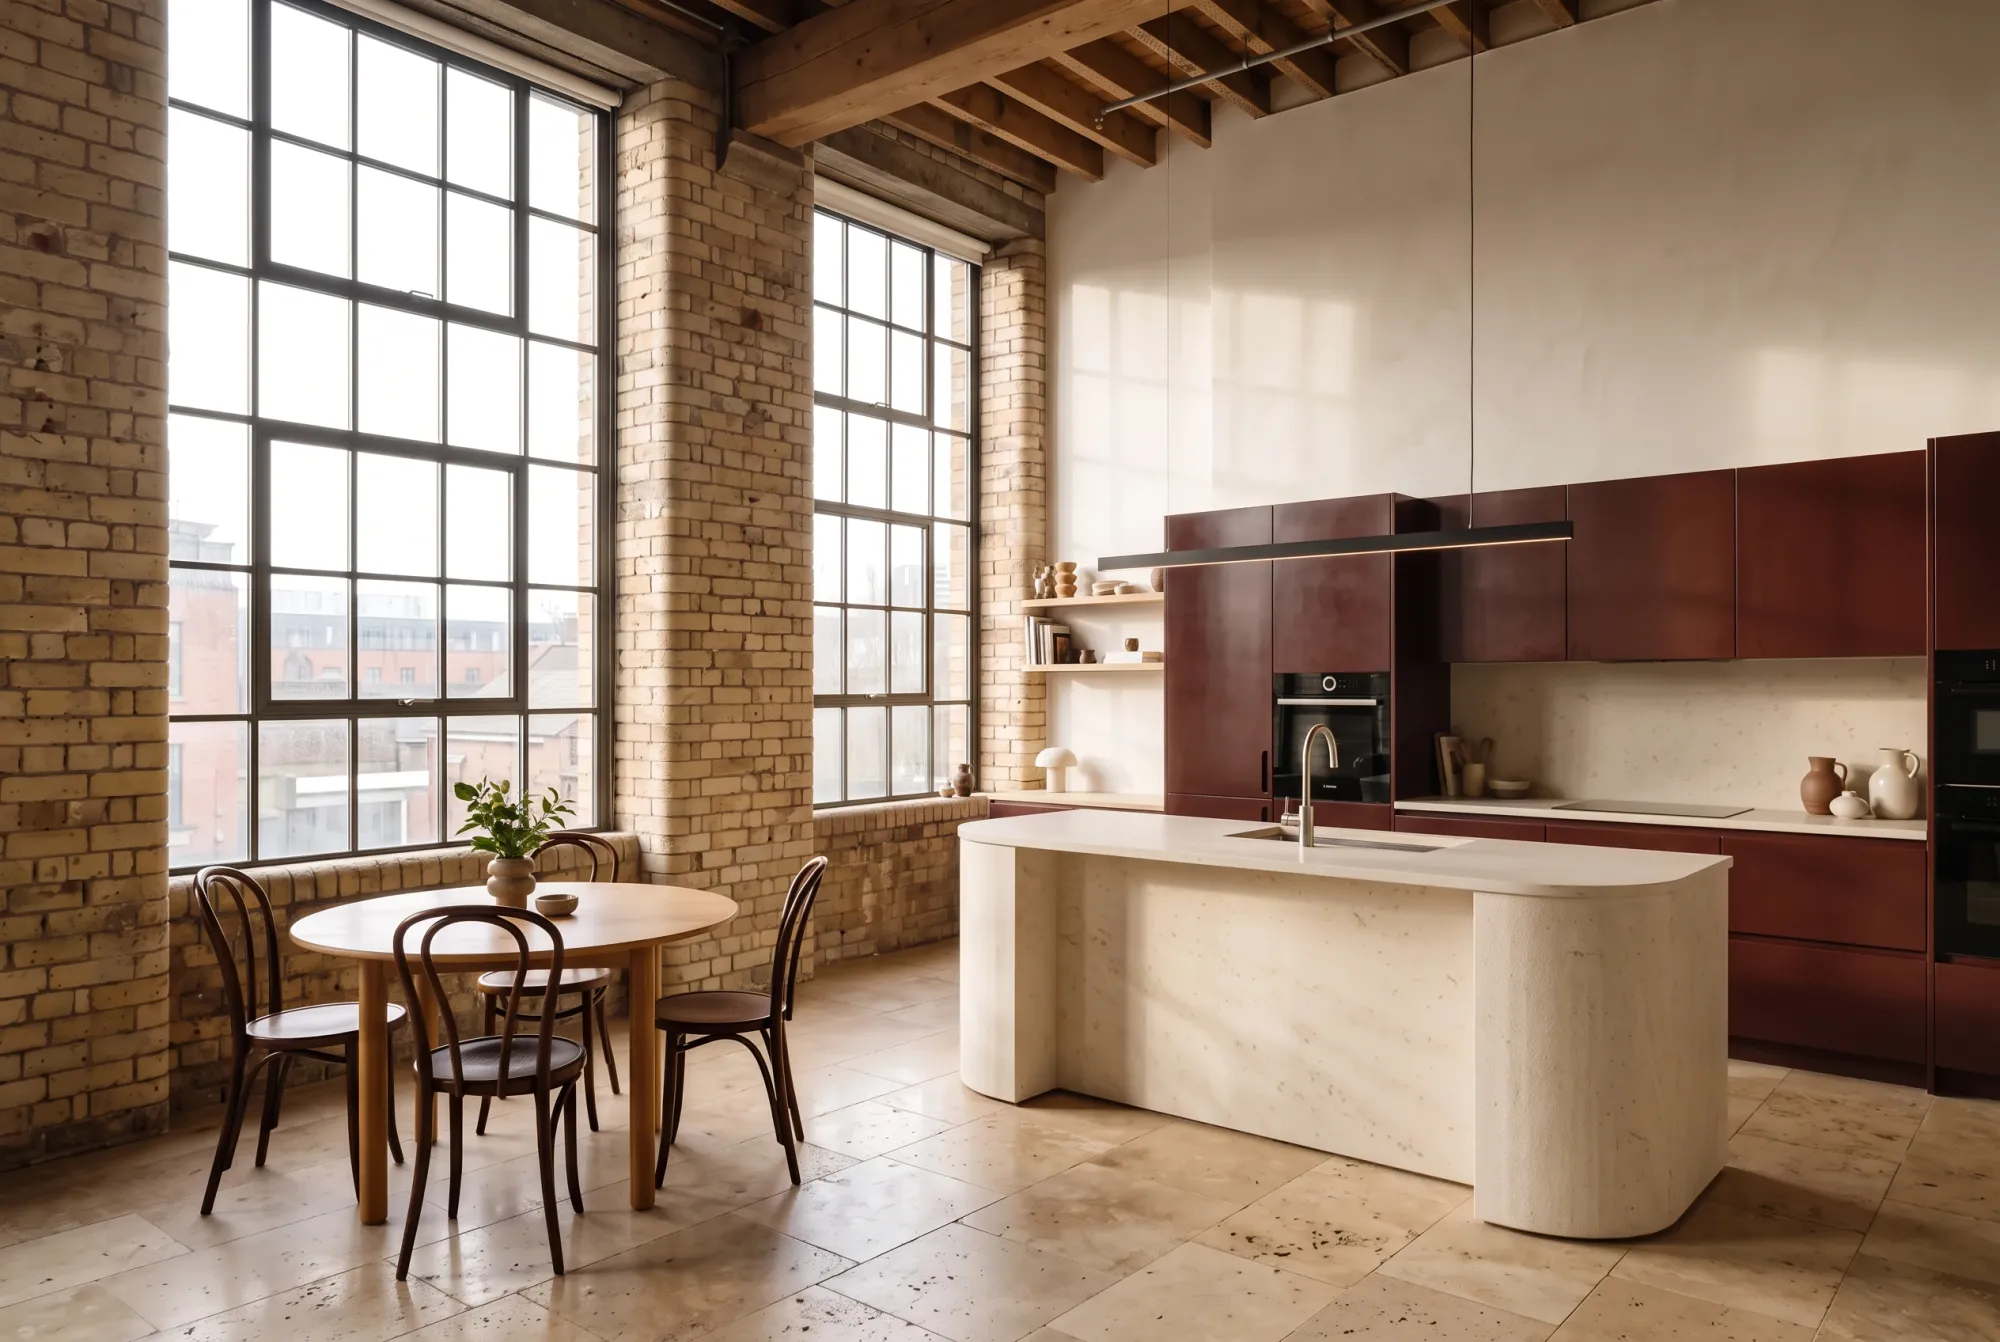
Image 1: starting project view. Edited result: Oxblood enamelled steel kitchen fronts.
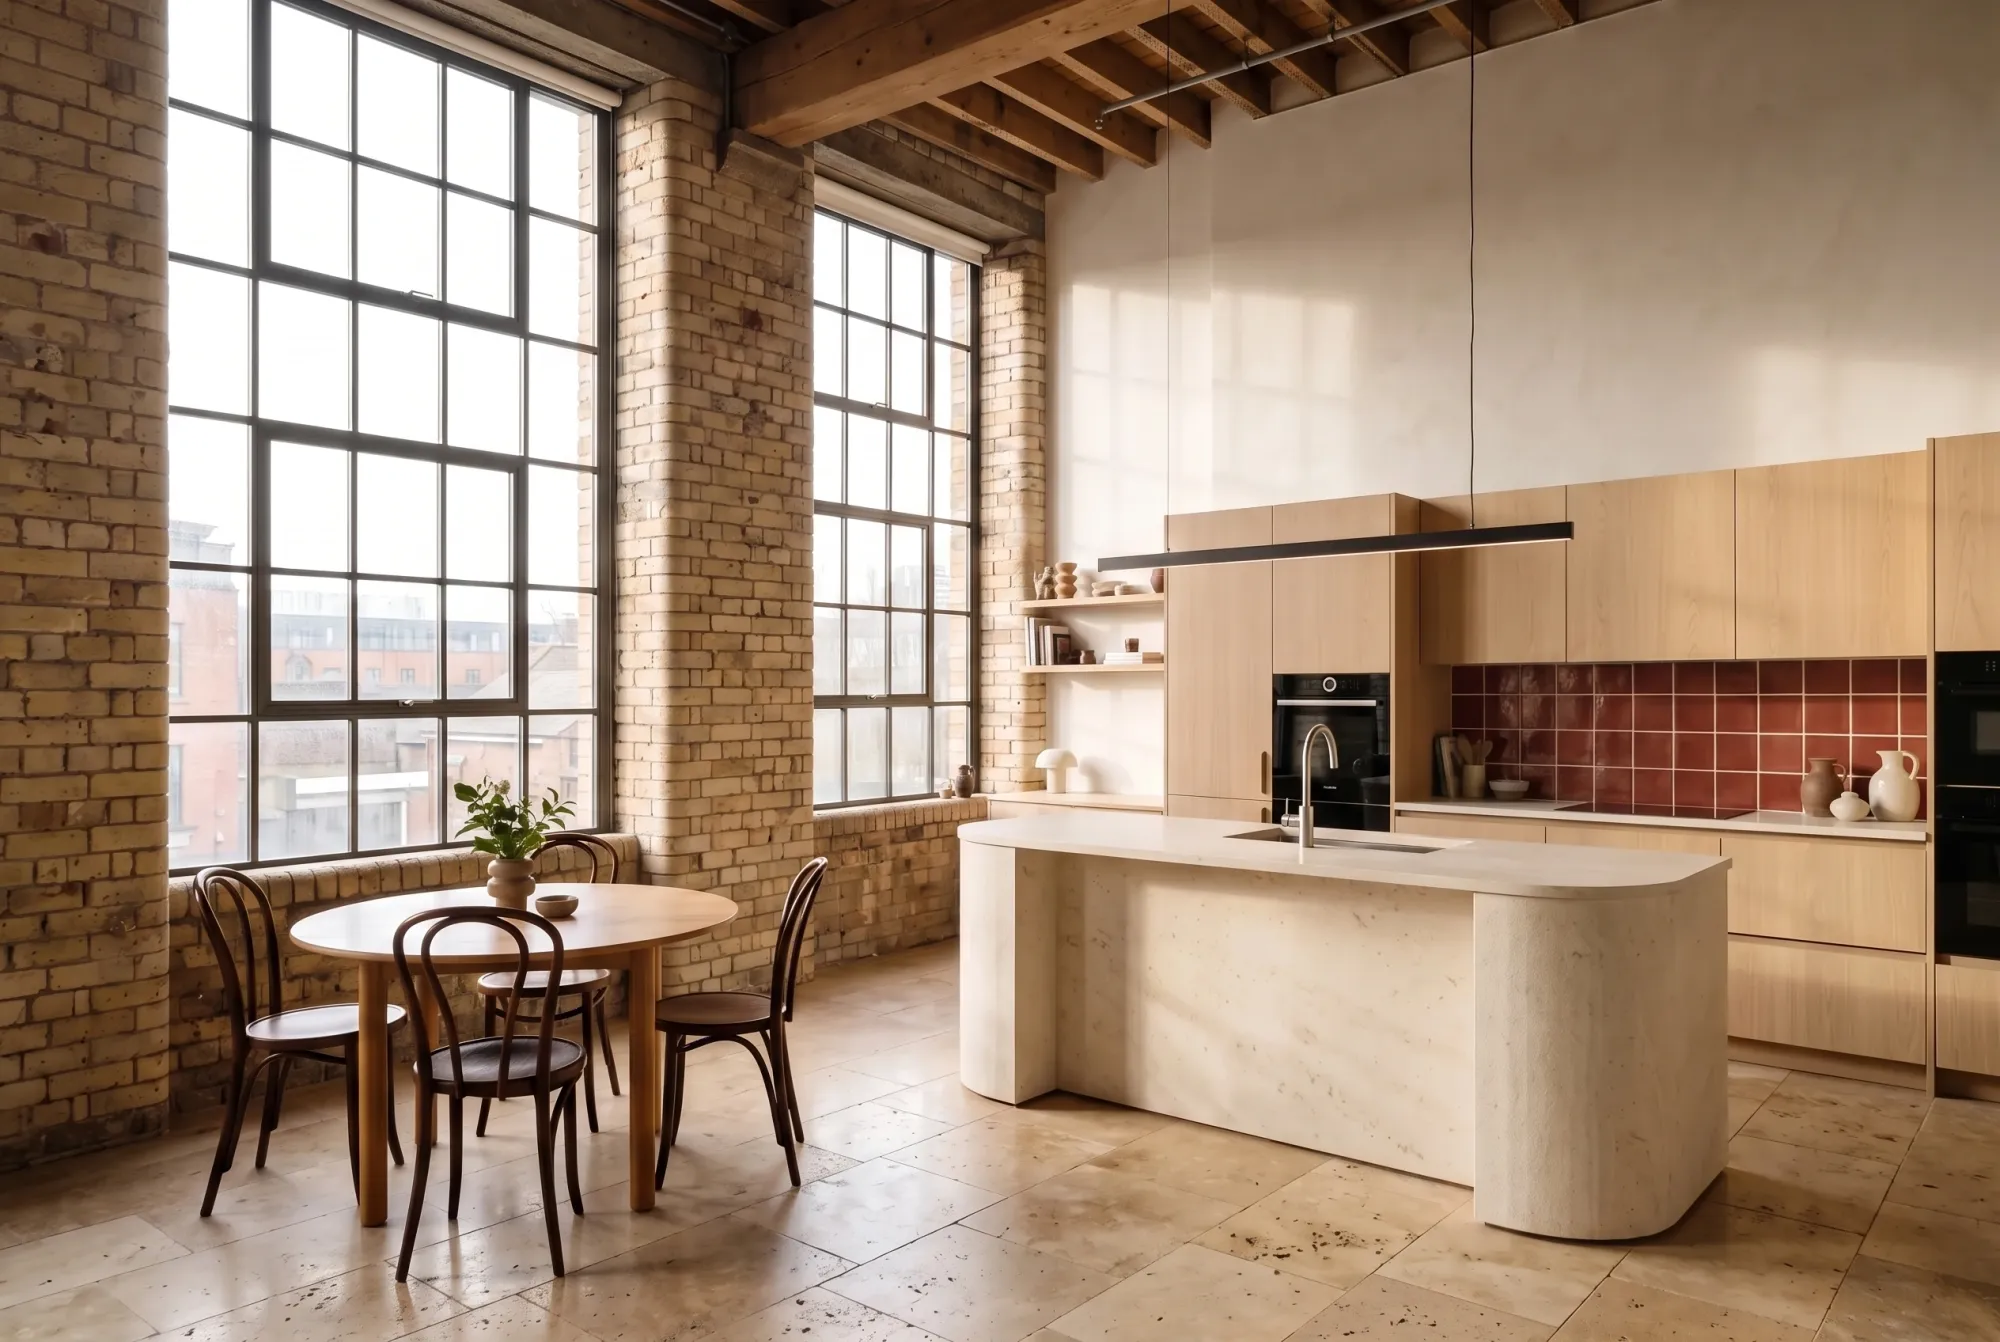
3.2. Oxide-Red Ceramic Backsplash
Crop the tile surface around several joints. Transfer its color, glaze and joint treatment to the vertical backsplash while keeping the worktops and island intact.
Edit prompt
Edit Image 1. Replace the vertical stone backsplash labelled EDIT SPLASH, inside the purple outline, with oxide-red square ceramic tiles.
Use the close crop in Image 2 for the red glaze, softly rounded tile edges, subtle surface variation and thin warm off-white grout joints. Fit the tiles to the existing backsplash wall as a straight square grid, approximately 100 mm per tile. Keep the tile grid aligned to that wall's perspective, stopping at the existing cabinet underside and worktop junction.
Preserve the original stone island and horizontal worktops, pale oak cabinetry, appliances, tap, pendant, shelves and ceramics. Keep the objects in front of the backsplash in their original positions, with the new tiles visible behind them. Retain the dining furniture, brick walls, ceiling beams, windows, floor, camera, crop and daylight from Image 1.
Return a clean interior photograph with the red tiles confined to the marked backsplash. Restore the original brickwork behind the IMAGE 1 label and remove all image labels, the EDIT SPLASH label and the purple outline.
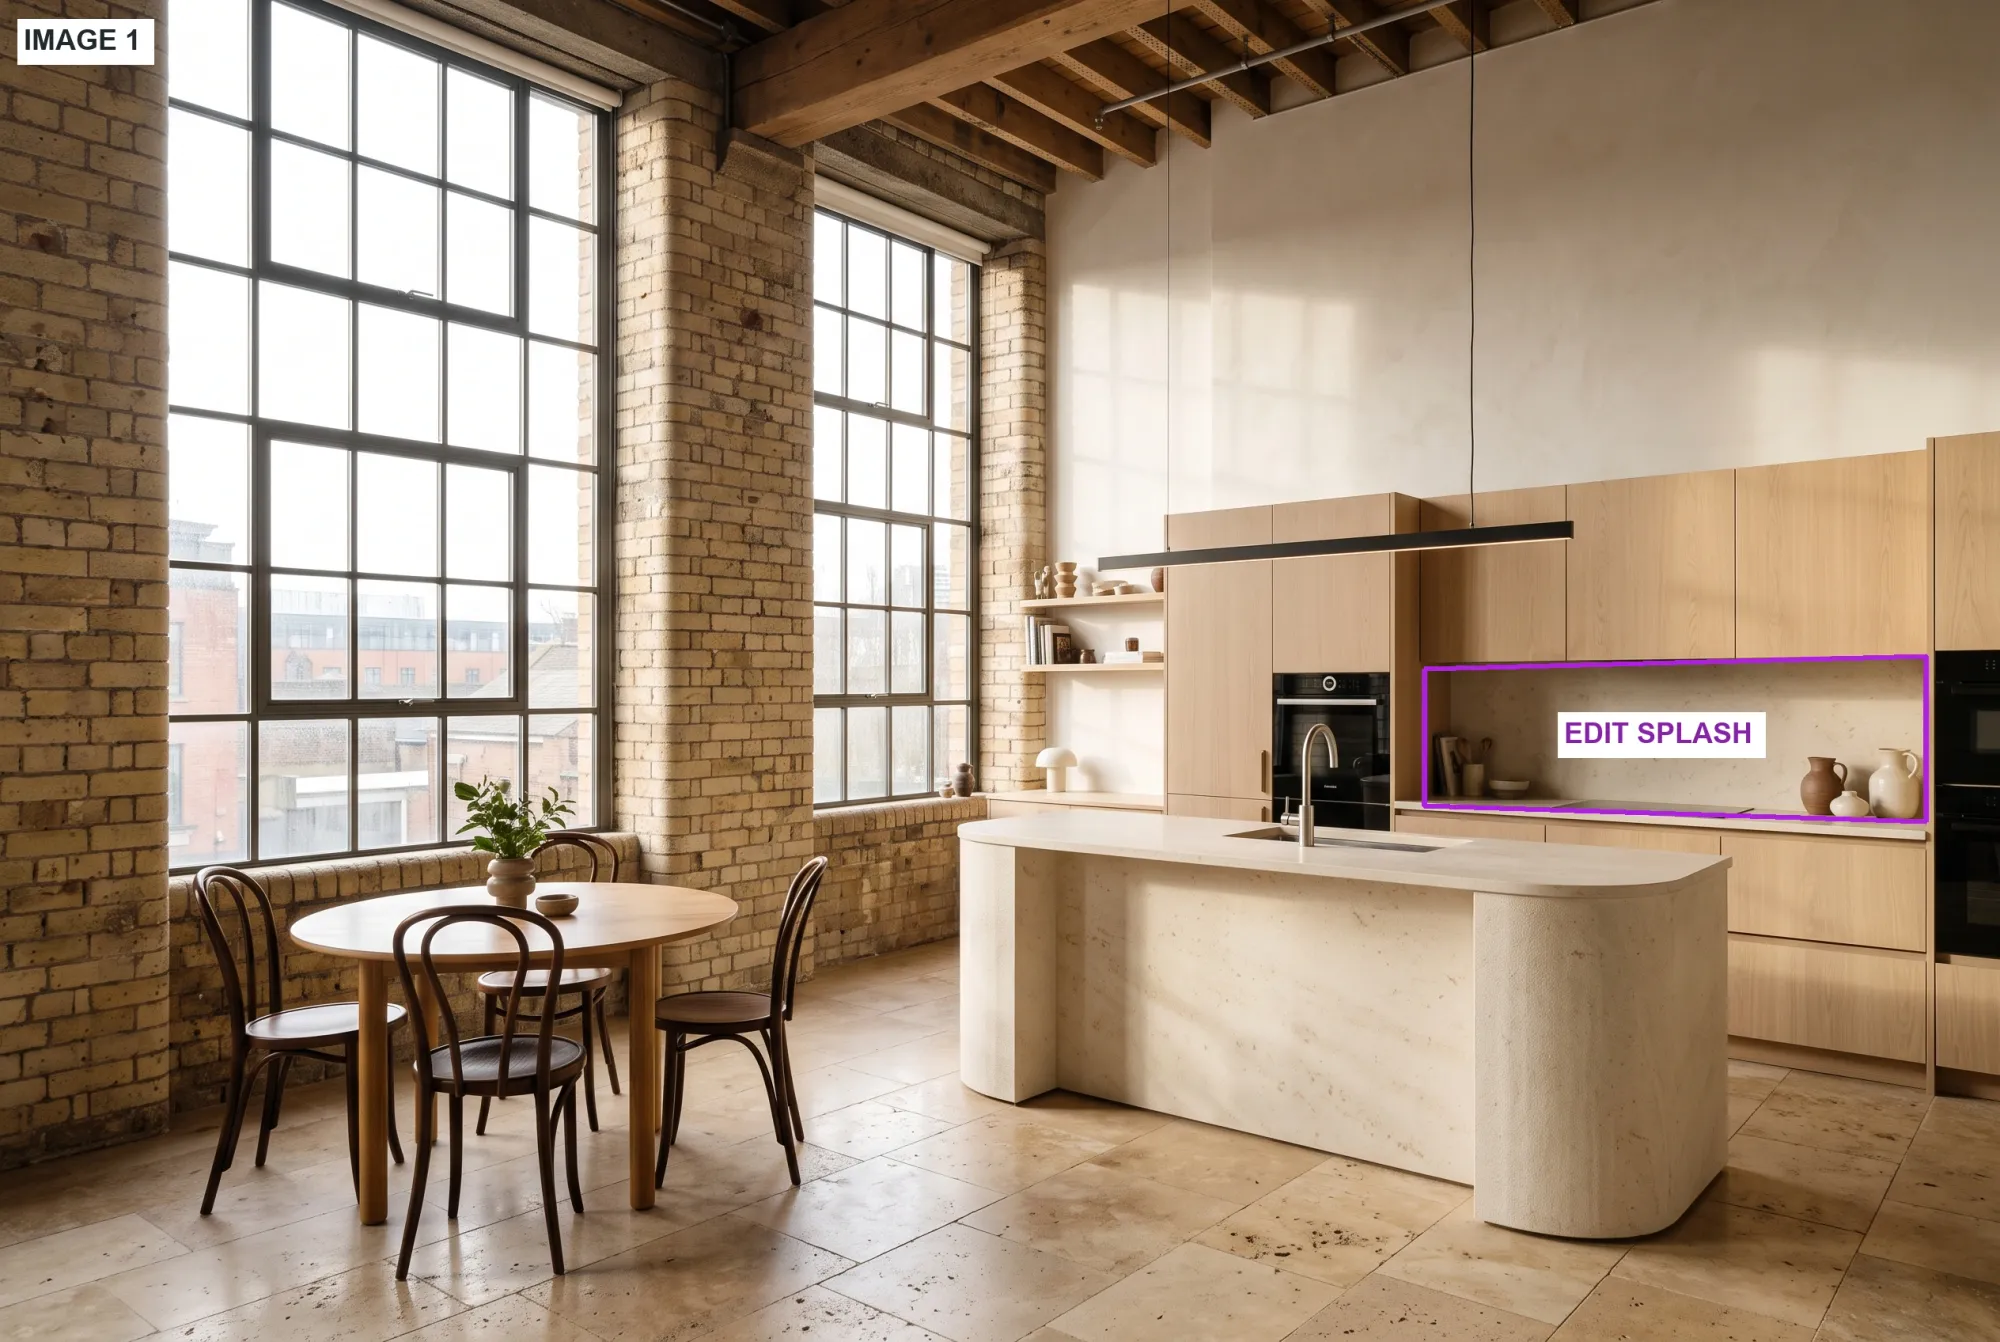
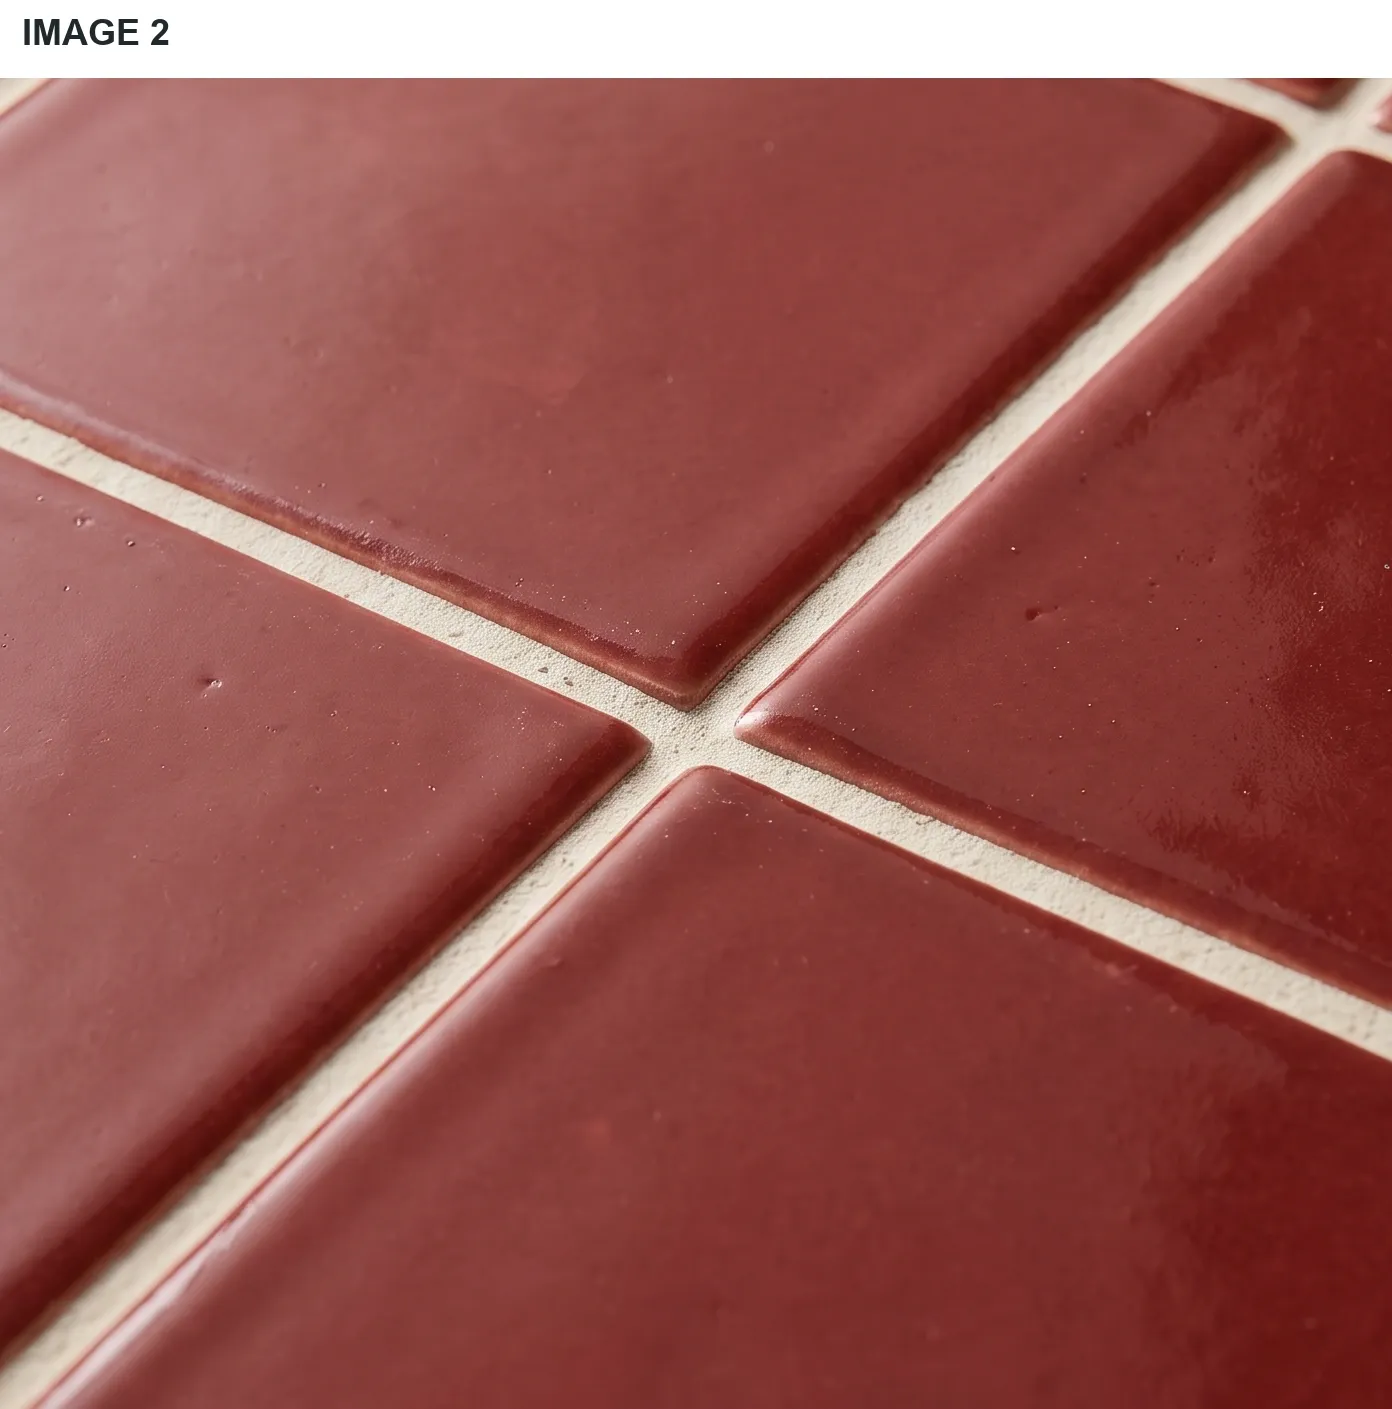
Image 1: marked project. Image 2: cropped reference.
3.3. Chartreuse Wool Banquette
Crop the upholstery close enough to show its fibres and weave. Transfer the material to the marked seating while keeping the original cushion shapes and seams.
Edit prompt
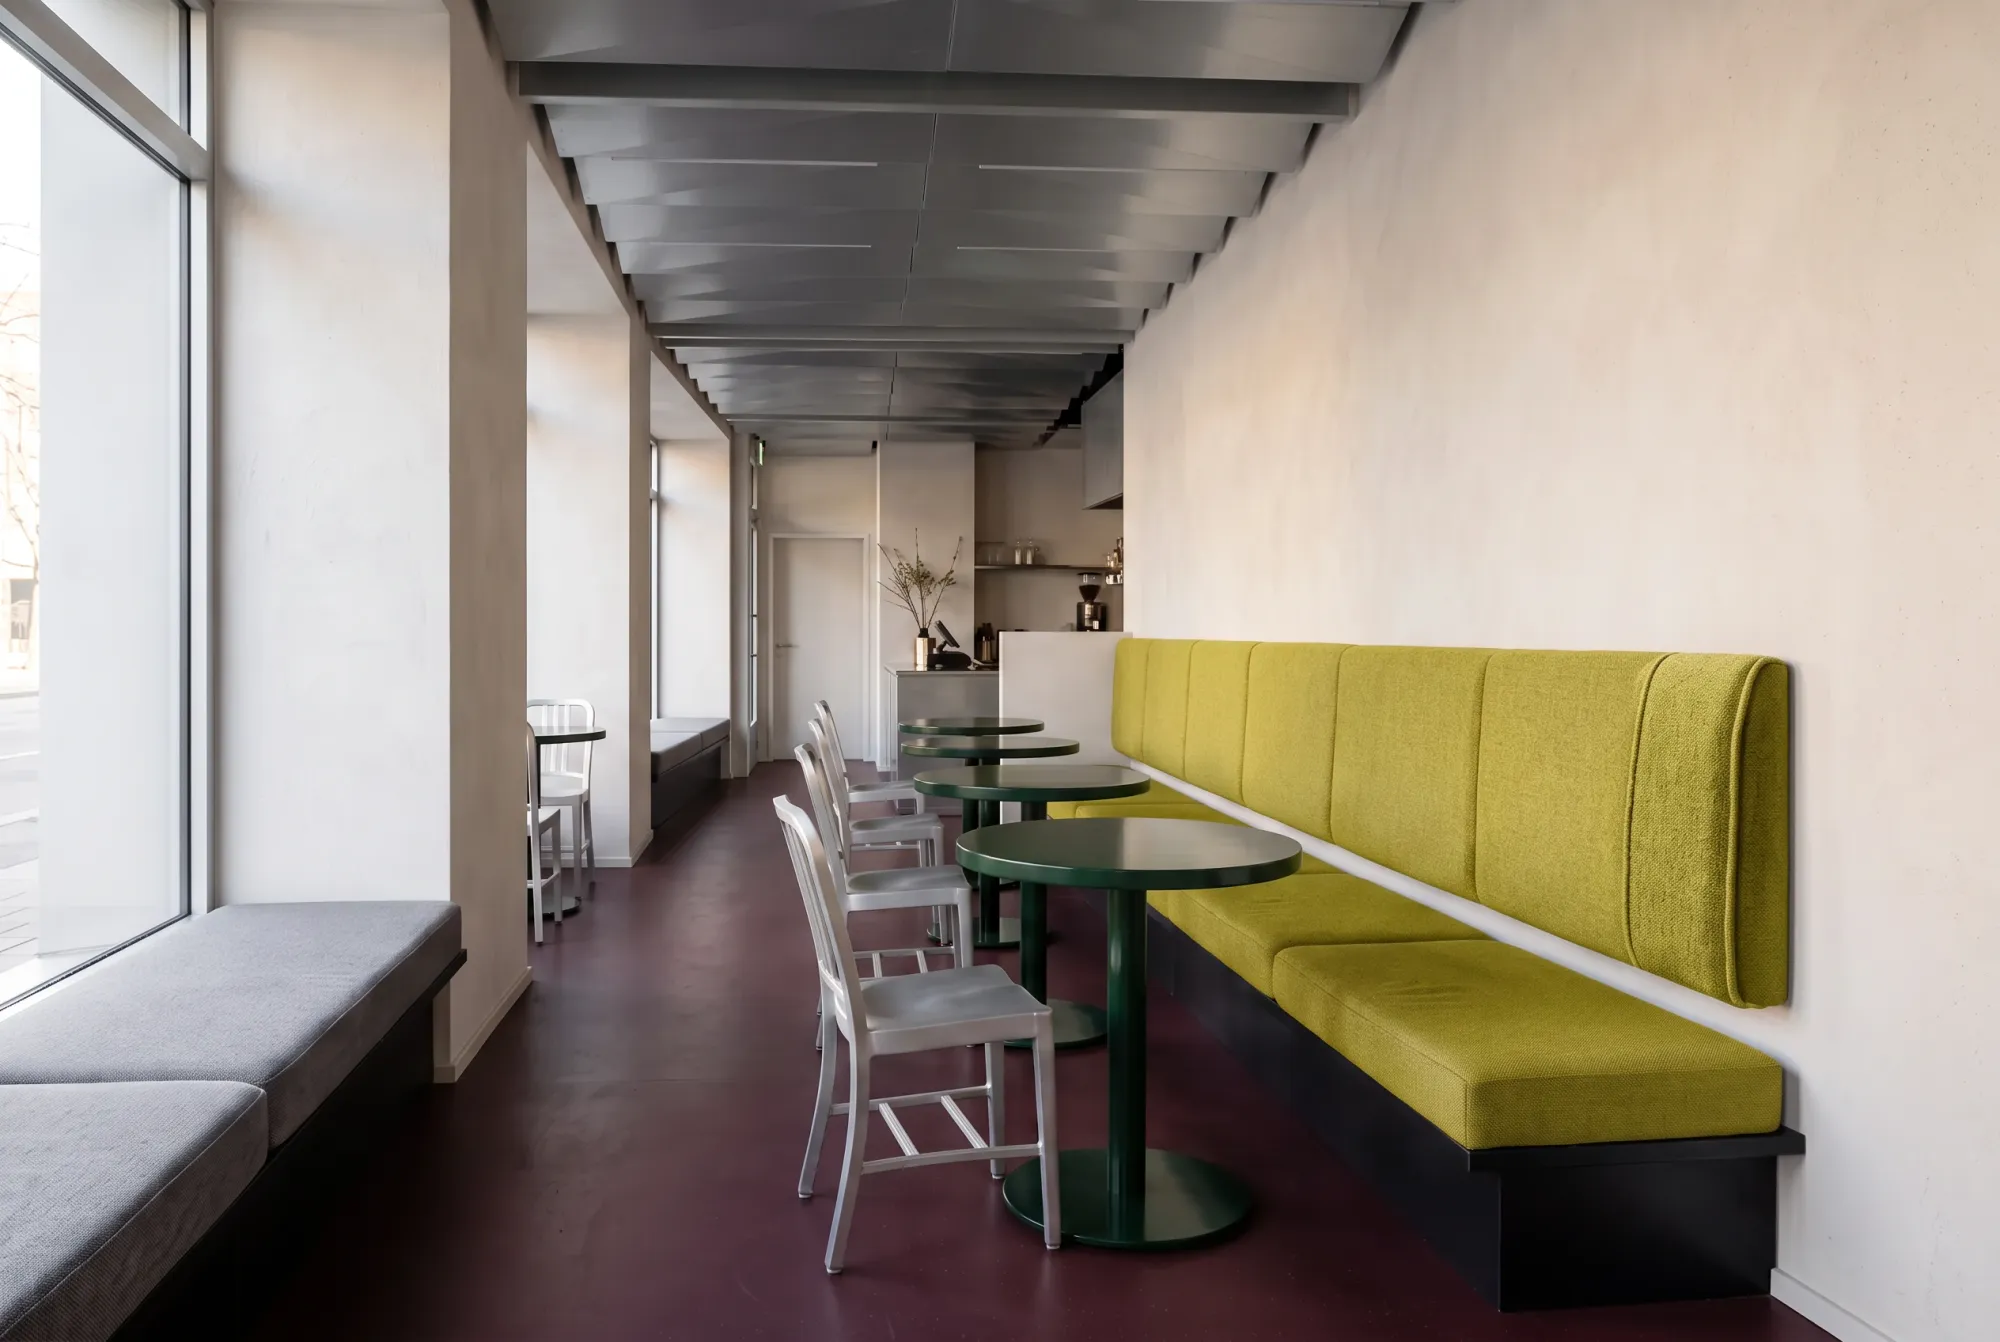
Edit Image 1. Reupholster the padded back and seat cushions of the right-hand banquette labelled EDIT SEAT, inside the purple outline, in chartreuse wool.
Use the close crop in Image 2 only for the chartreuse color, tight woven texture, fine visible fibres and matte surface. Scale that weave naturally across the upholstery in Image 1. Keep the original back-panel divisions, vertical seams, cushion joints, rounded edges and padding thickness.
Preserve the black steel plinth beneath the banquette. Keep every window-seat cushion on the left in its original grey fabric. Retain the dark-green tables and aluminium chairs in their existing positions, including where they overlap the marked upholstery. Preserve the walls, windows, burgundy floor, folded ceiling panels, rear counter and doorway.
Use the original camera, crop, afternoon daylight and shadows from Image 1. Return a clean restaurant photograph with the chartreuse fabric confined to the marked right-hand banquette and all image labels, the EDIT SEAT label and the purple outline removed.
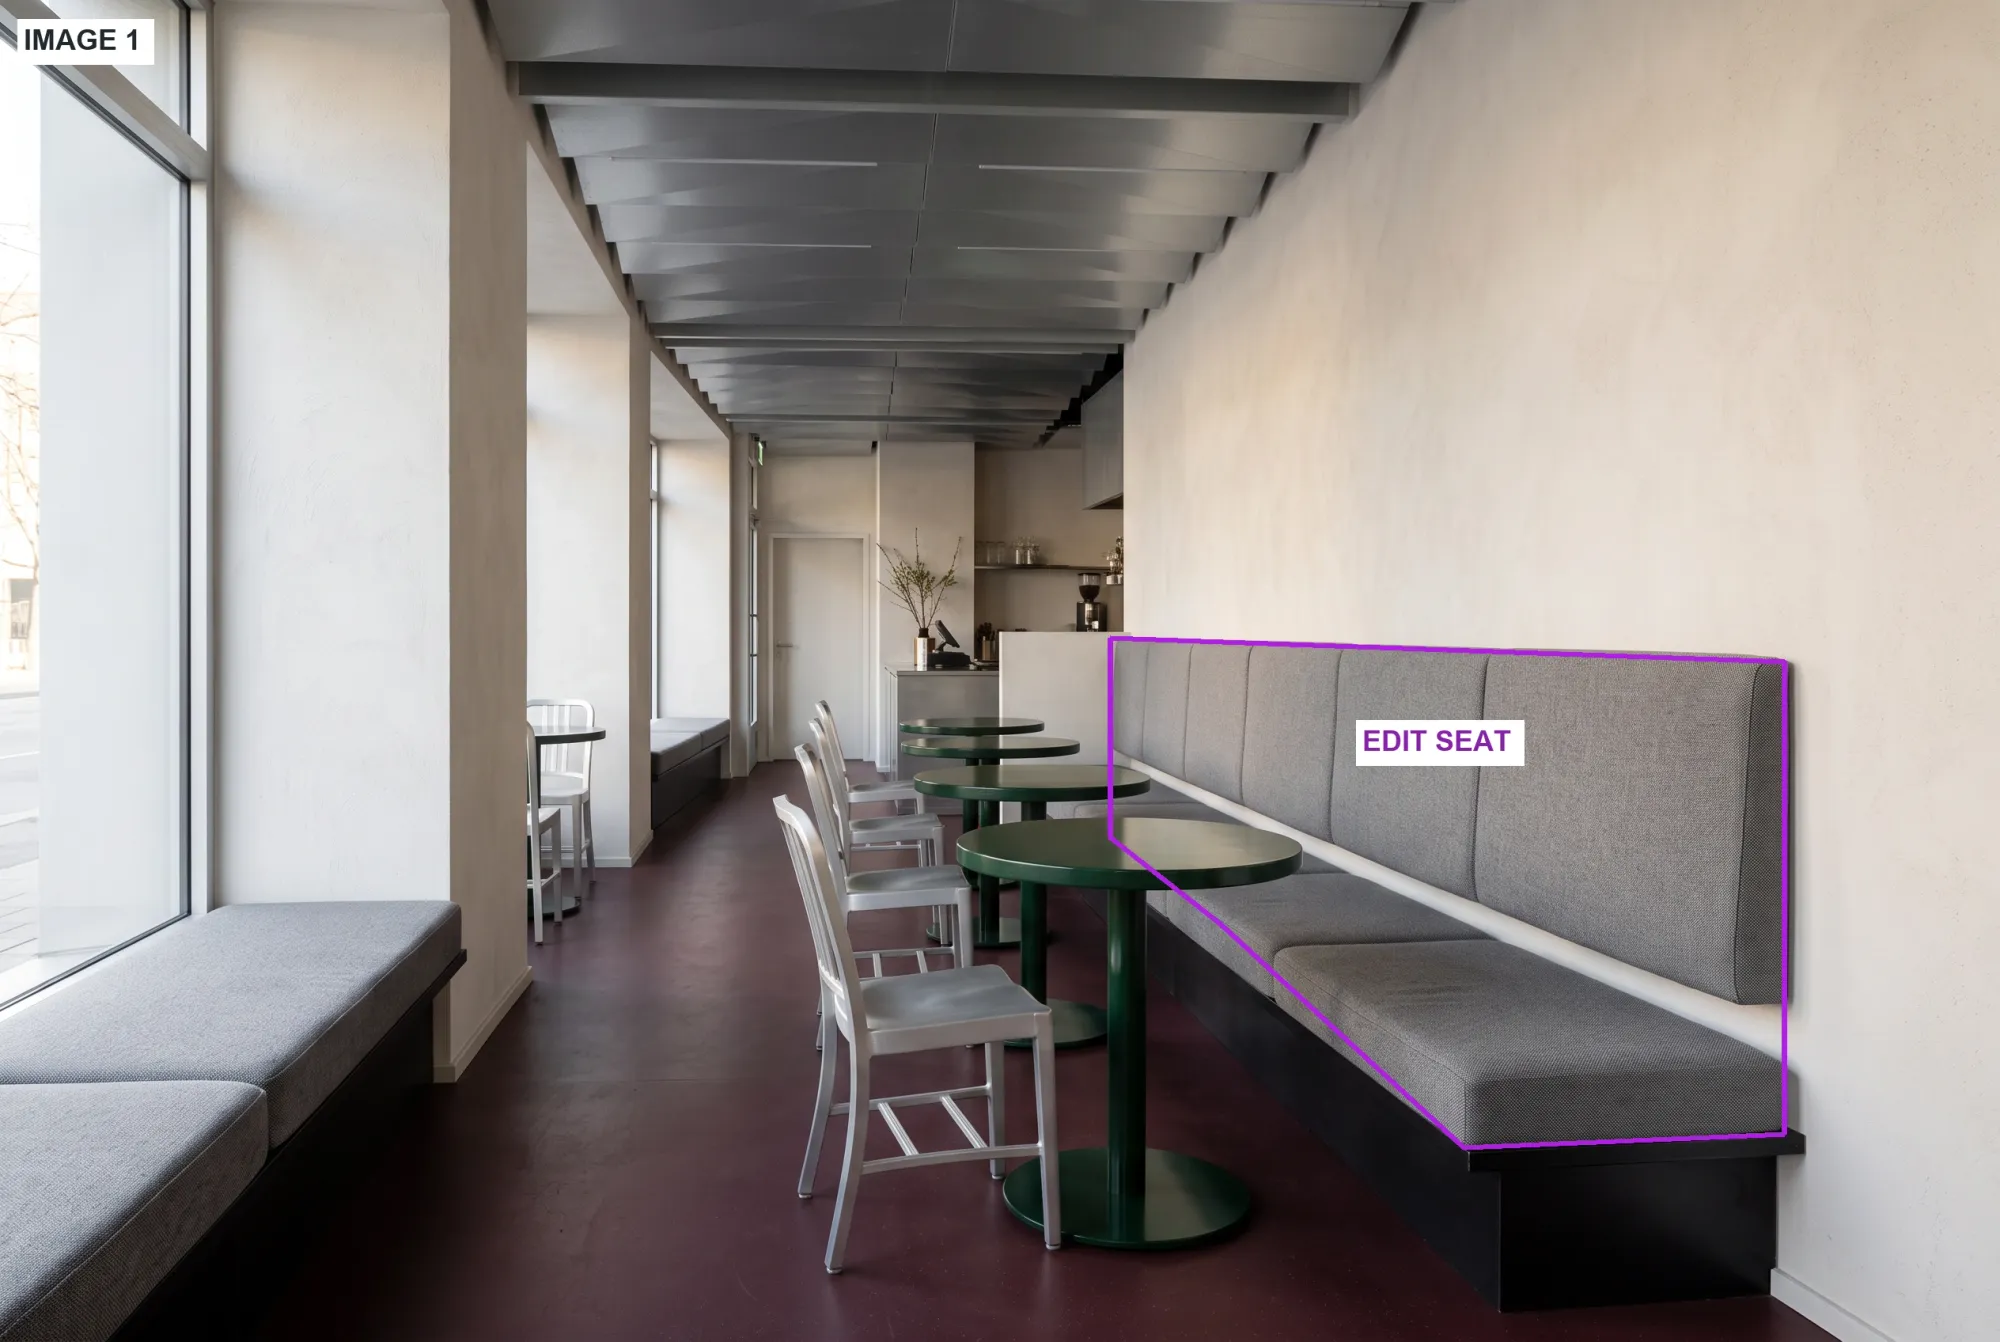
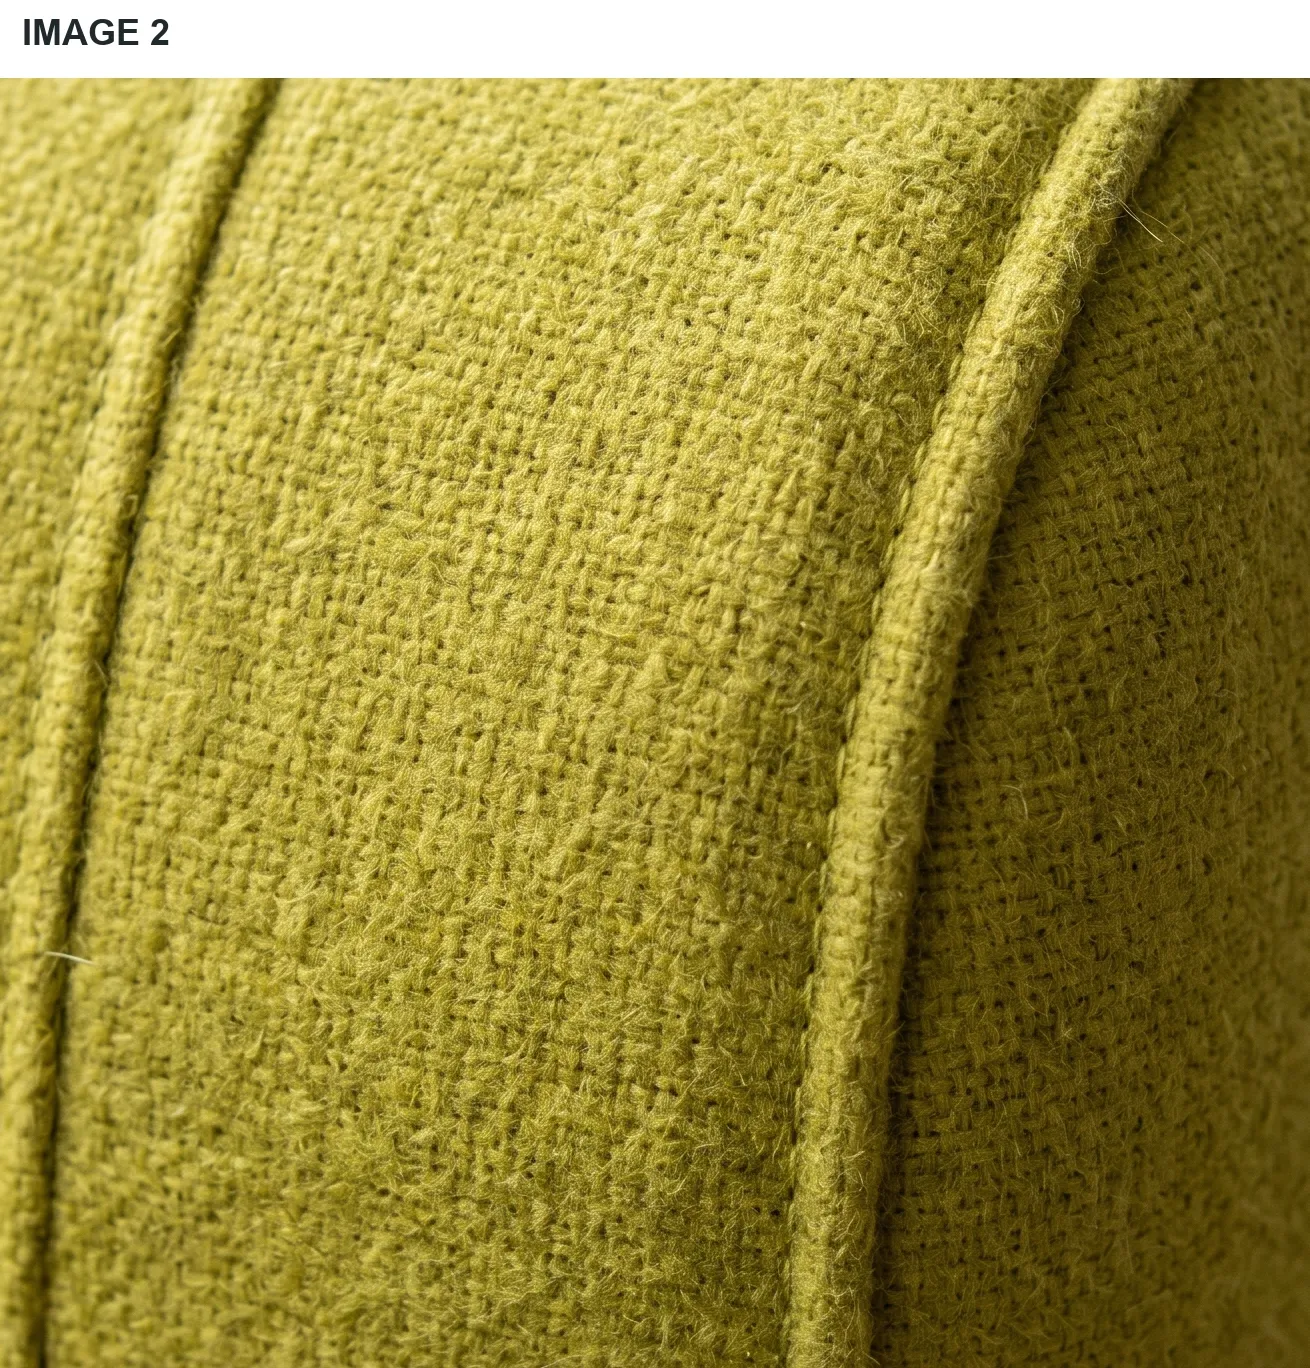
Image 1: marked project. Image 2: cropped reference.
4. Reference Images, Close Crops and Marked Edits
Use a reference when the required texture, construction detail, planting or finish is easier to show than describe. Keep the original project view responsible for its geometry, camera and setting. Give each additional image one specific role.
Prepare the reference before writing the prompt
- Crop a material reference close enough to show its texture, joints and surface finish. Retain enough context to judge the pattern direction and scale.
- For a building detail, crop around the element being transferred, such as a folded window surround or a railing connection.
- For landscaping, crop a planting group with enough visible ground or edging to understand spacing and height.
- For an interior finish, isolate the selected surface. For an object replacement, retain the complete object so its shape and proportions remain visible.
- Add IMAGE 1, IMAGE 2 and any additional labels to the actual files before uploading or annotate them on RunDiffusion. Place labels in a clear margin where possible. Refer to these visible labels in the prompt.
- Outline the destination on the project image and name the marker in the prompt. A second labelled outline can identify an adjacent feature to preserve.
- Describe how the reference should fit the project perspective, surface boundaries and lighting. Ask for a clean result with the working labels and outlines removed.
For the reference preparation workflow, read our Additional Edit Model Tips.
For assigning image roles and marked targets, see the Multi-Image Prompt Guide.
4.1. Separate Texture and Color References
Crop the ribbed ceramic surface for its texture, then use a separate close crop for the blue color. Assign both to the marked side wall while the original building controls its geometry.
Edit prompt
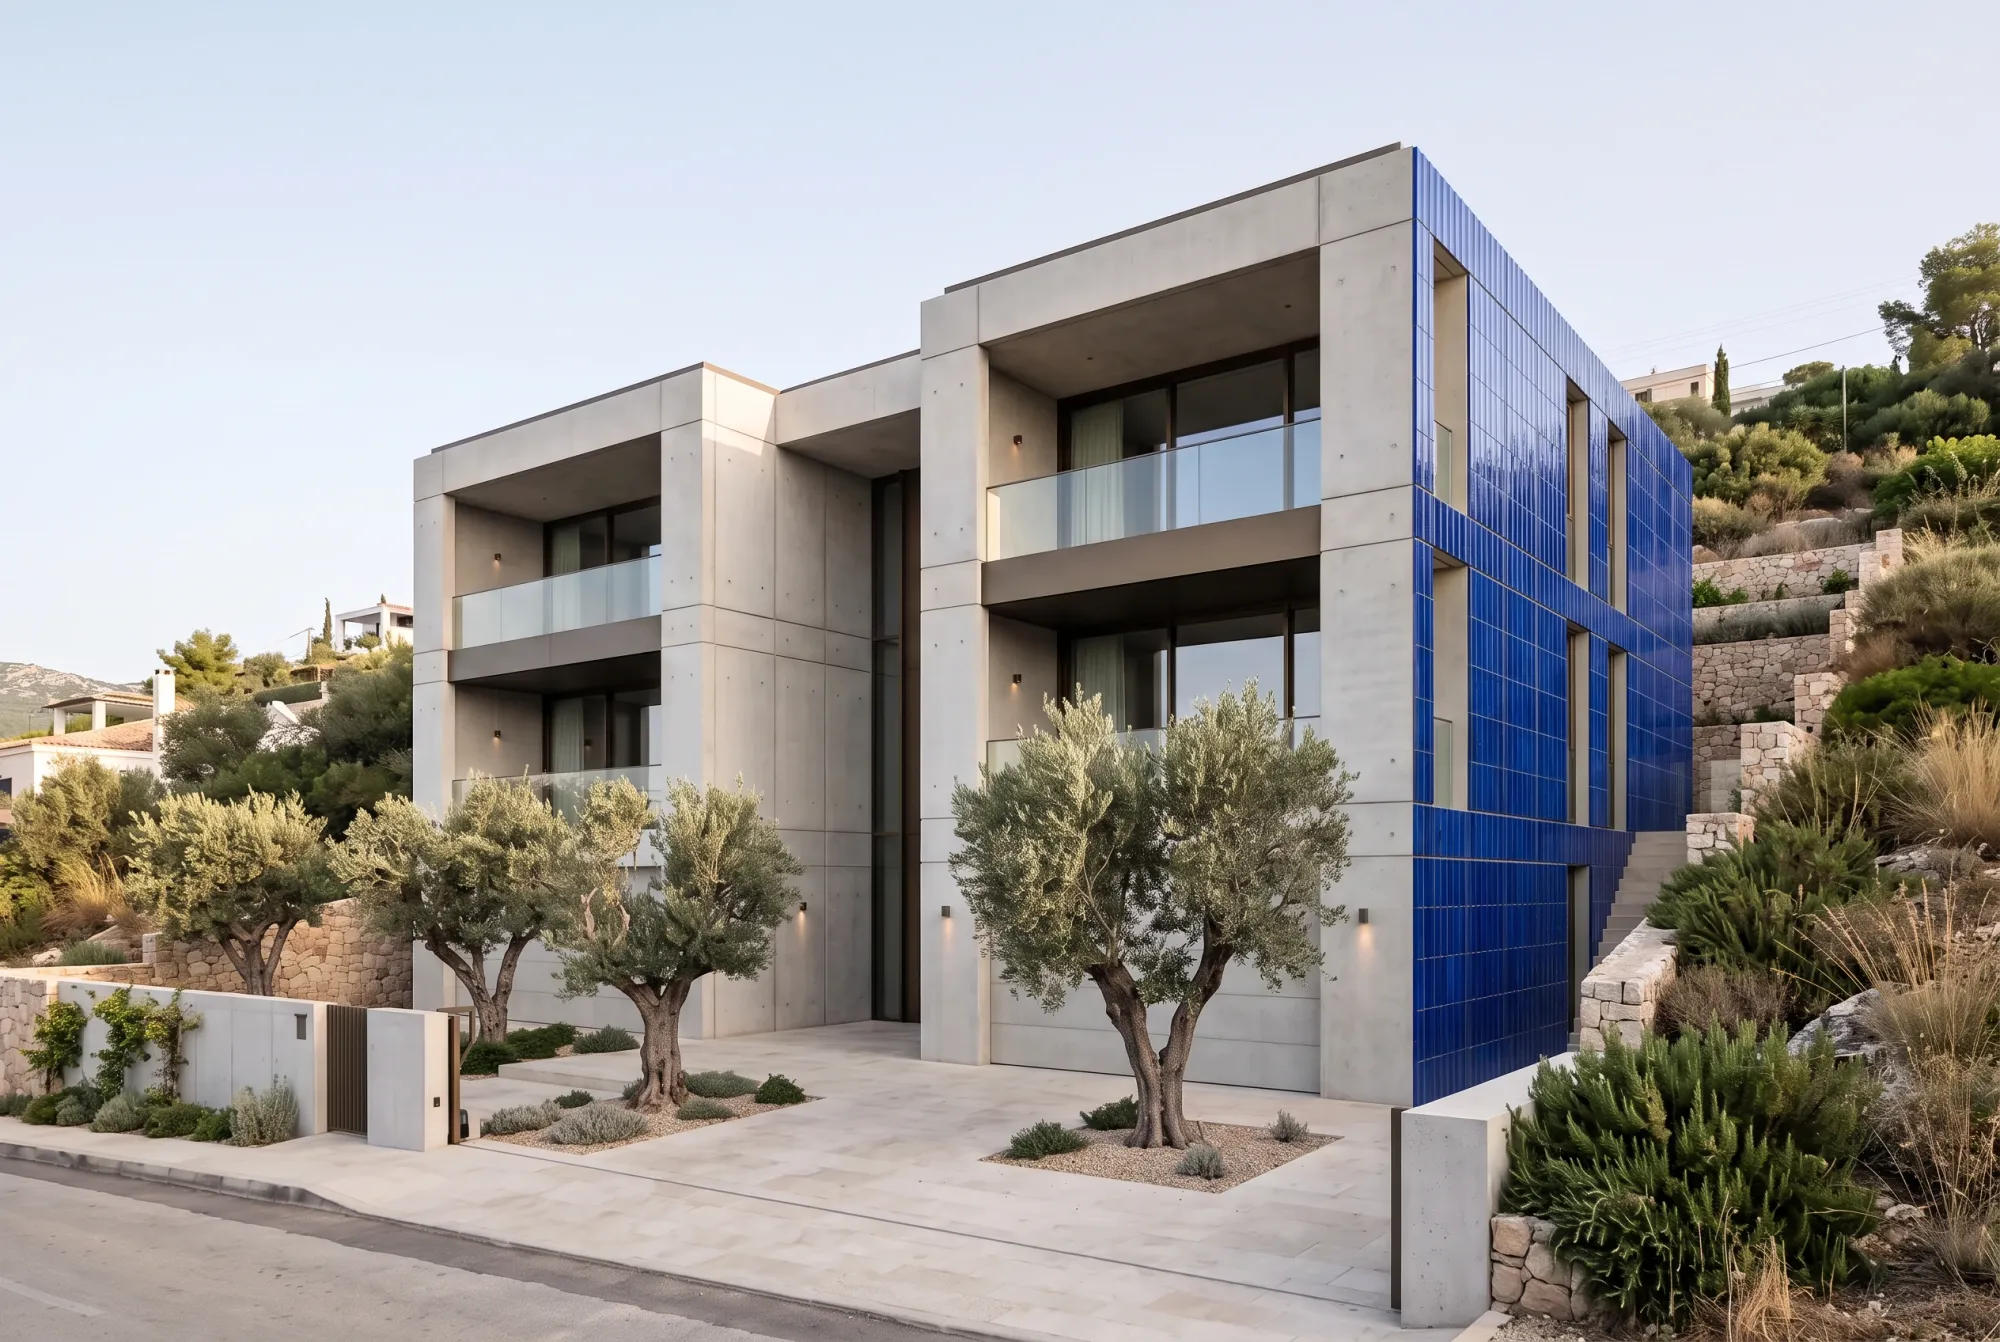
Edit Image 1. Replace the concrete surface of the right-facing side wall labelled EDIT WALL, inside the purple outline, with glazed ceramic. The finish change stops at the vertical corner where that side wall meets the front elevation.
Use the close-up in Image 2 for the ceramic texture: vertical ribs, narrow tile joints and slight glaze variation. Use the close-up in Image 3 for the ultramarine blue color. Transfer those surface qualities to the marked side wall in Image 1, with the ribs vertical and the tile scale fitted to the existing wall.
Keep the entire front elevation in its original pale exposed concrete, including both tall rectangular balcony surrounds and the recessed wall between them. Preserve the original side-window openings, concrete window reveals, bronze frames, glazing and horizontal panel boundaries. Retain the building geometry, balconies, glass balustrades, entrance, paving, trees, planting, stairs and retaining walls exactly as they appear in Image 1.
Use the original camera, perspective, crop, daylight, shadows and reflections from Image 1. Return the finished photograph with the blue ceramic confined to the marked side wall and all image labels, the EDIT WALL label and the purple outline removed.
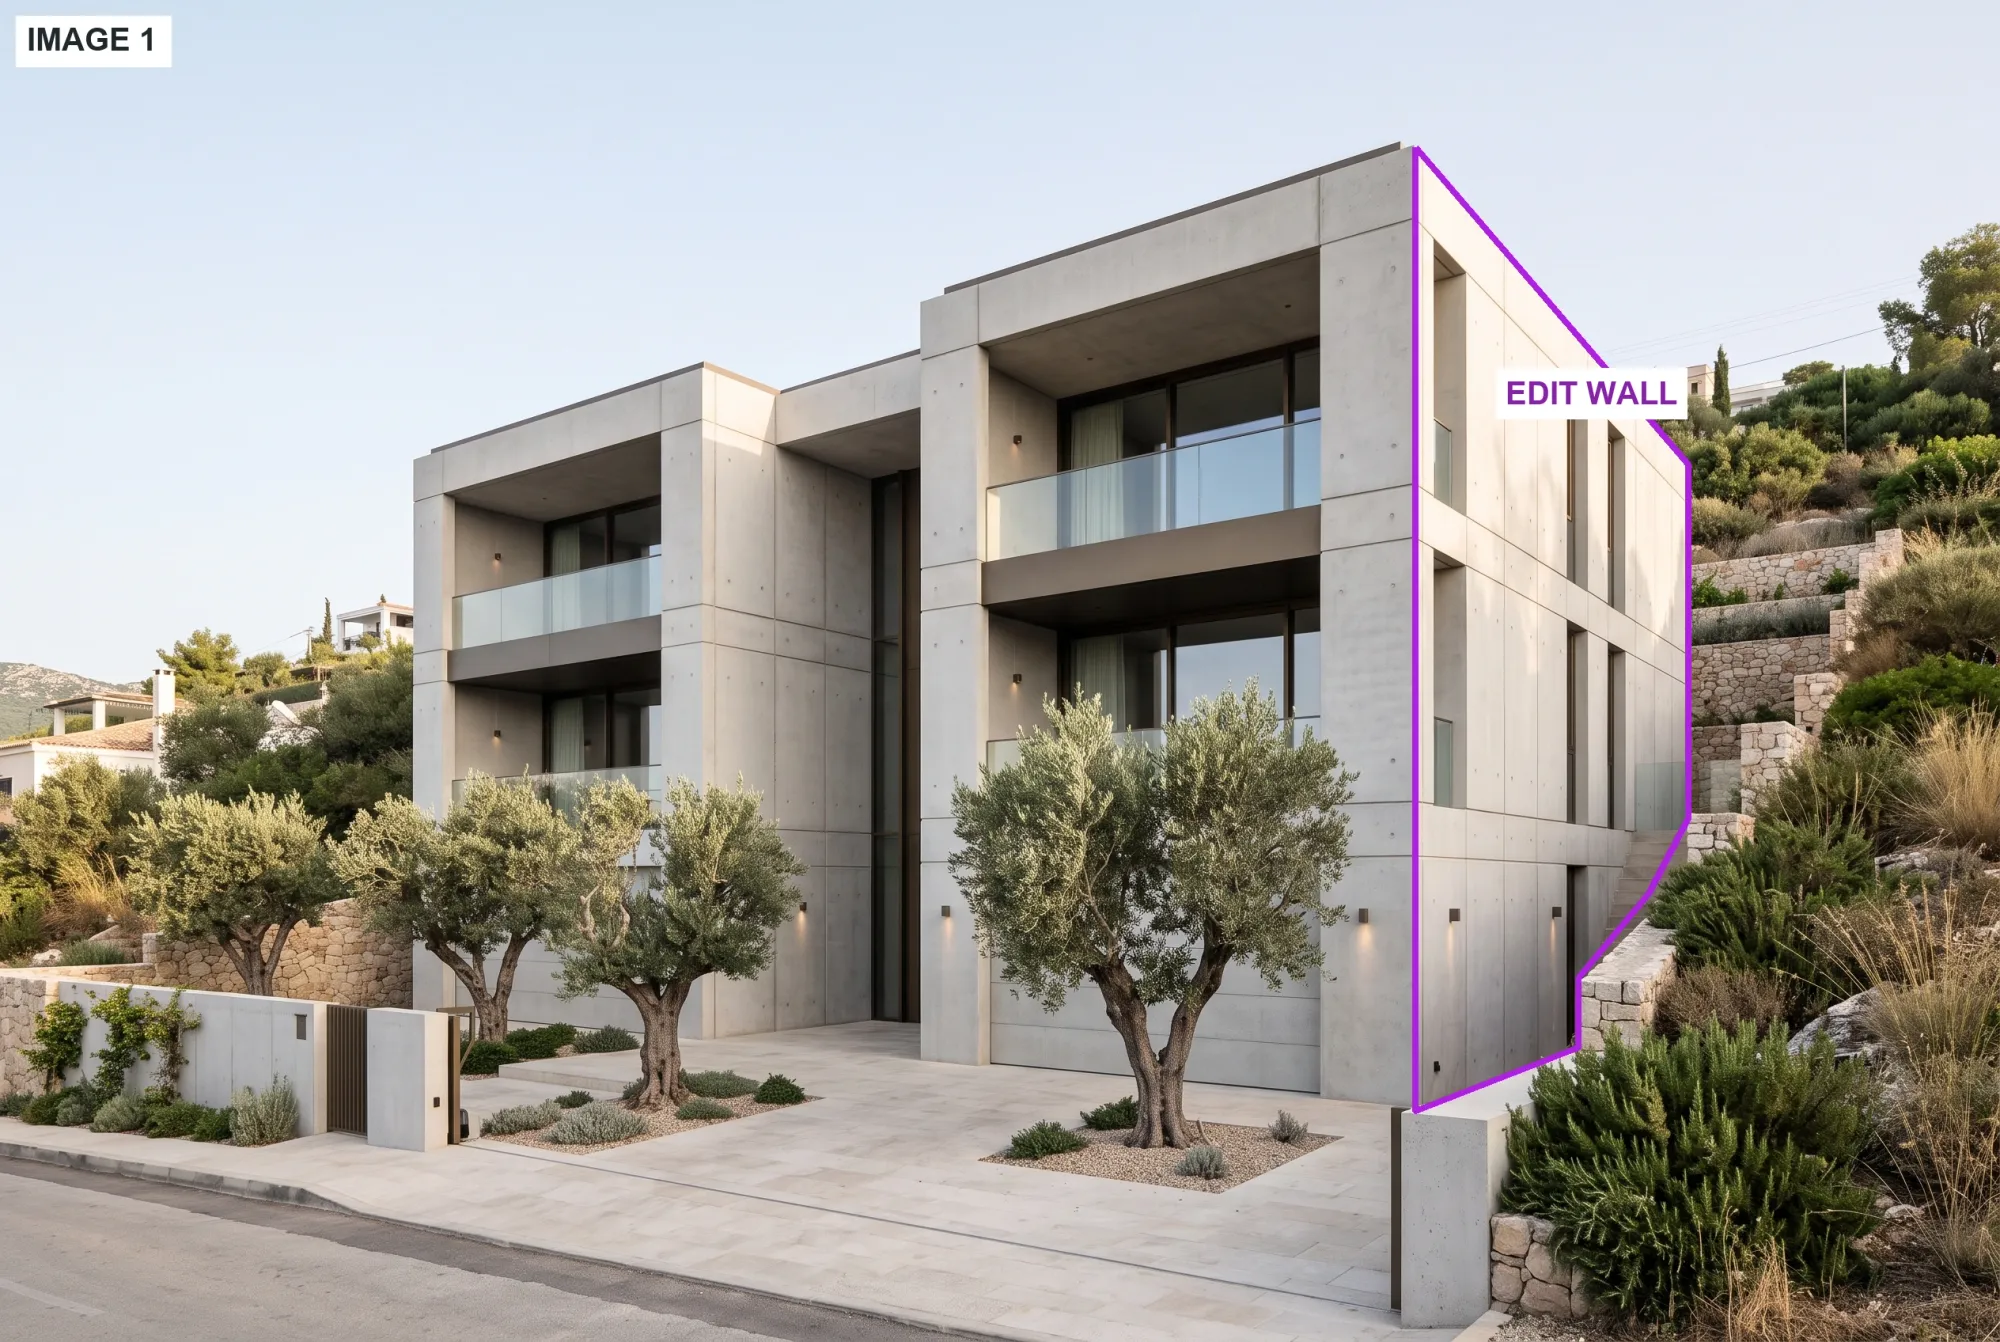
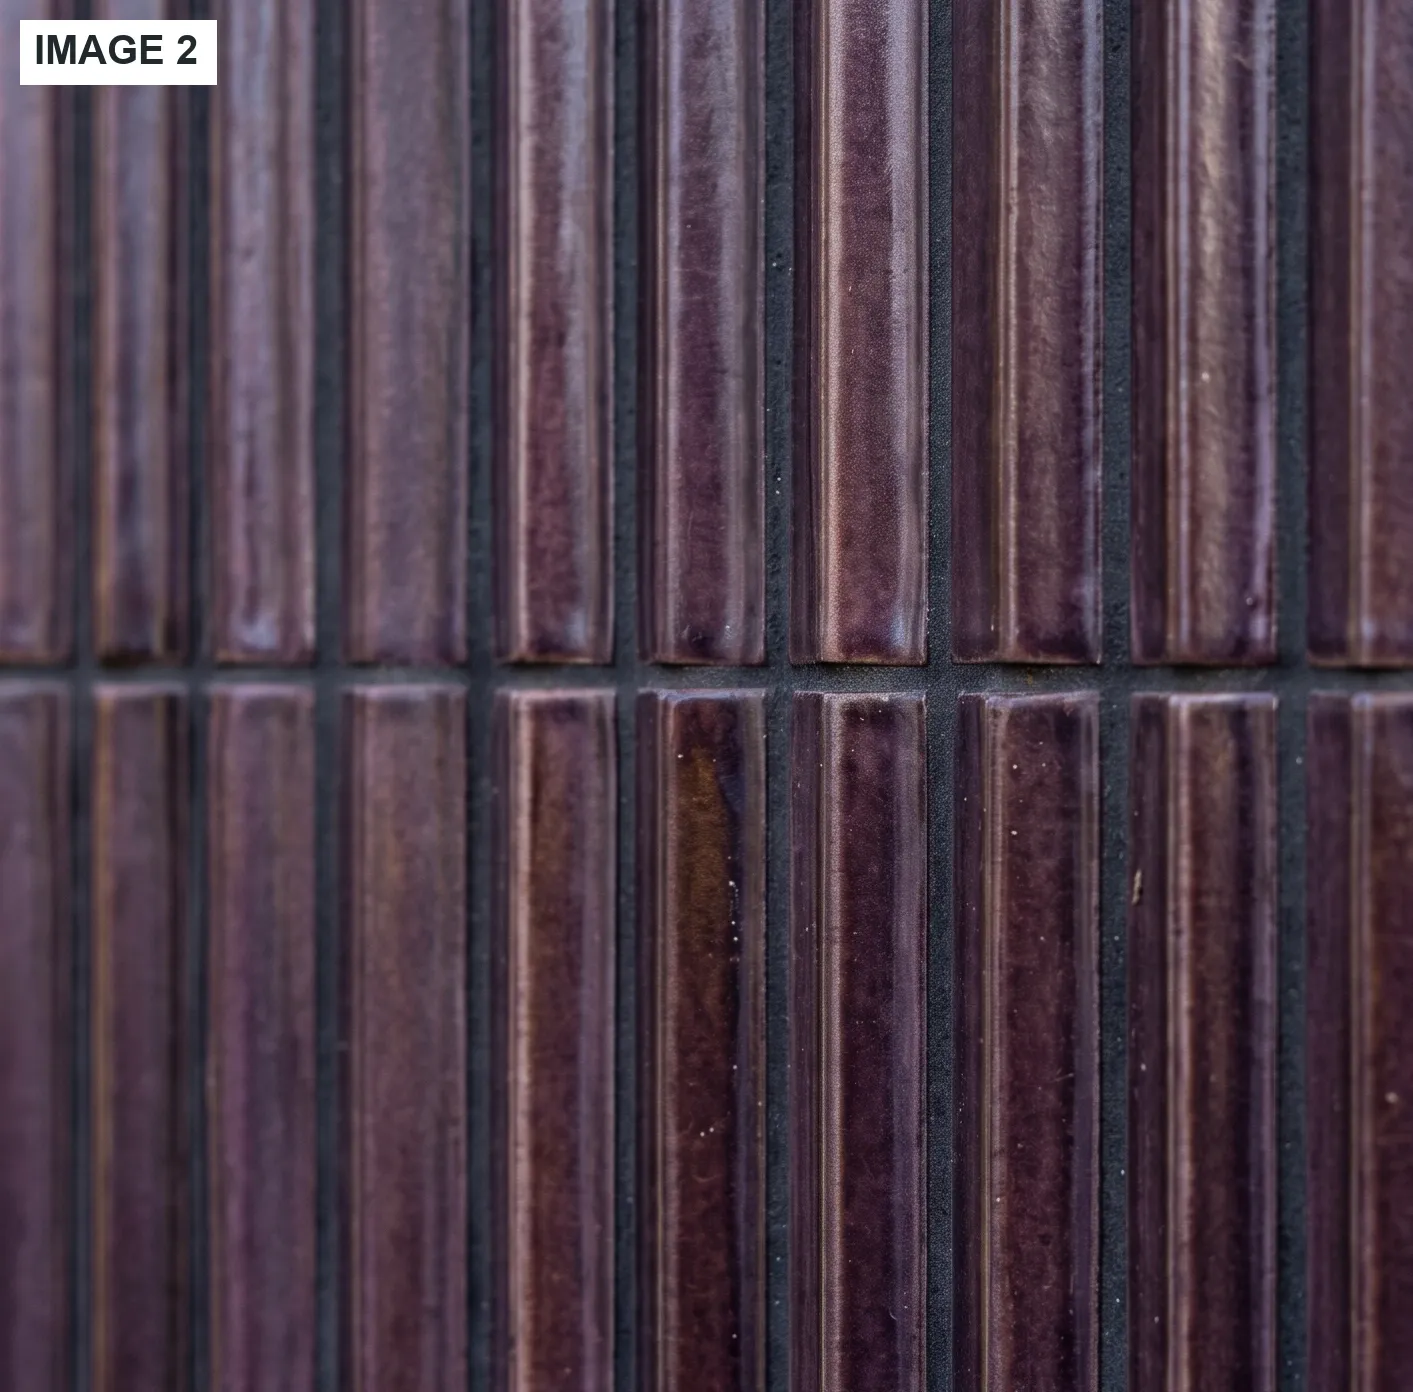

Image 1: marked project. Image 2: ceramic texture crop. Image 3: blue color crop.
4.2. A Building Detail for One Window
Crop the folded corner and surface of a window surround. Fit that detail to one marked opening while retaining the project glazing and frame divisions.
Edit prompt
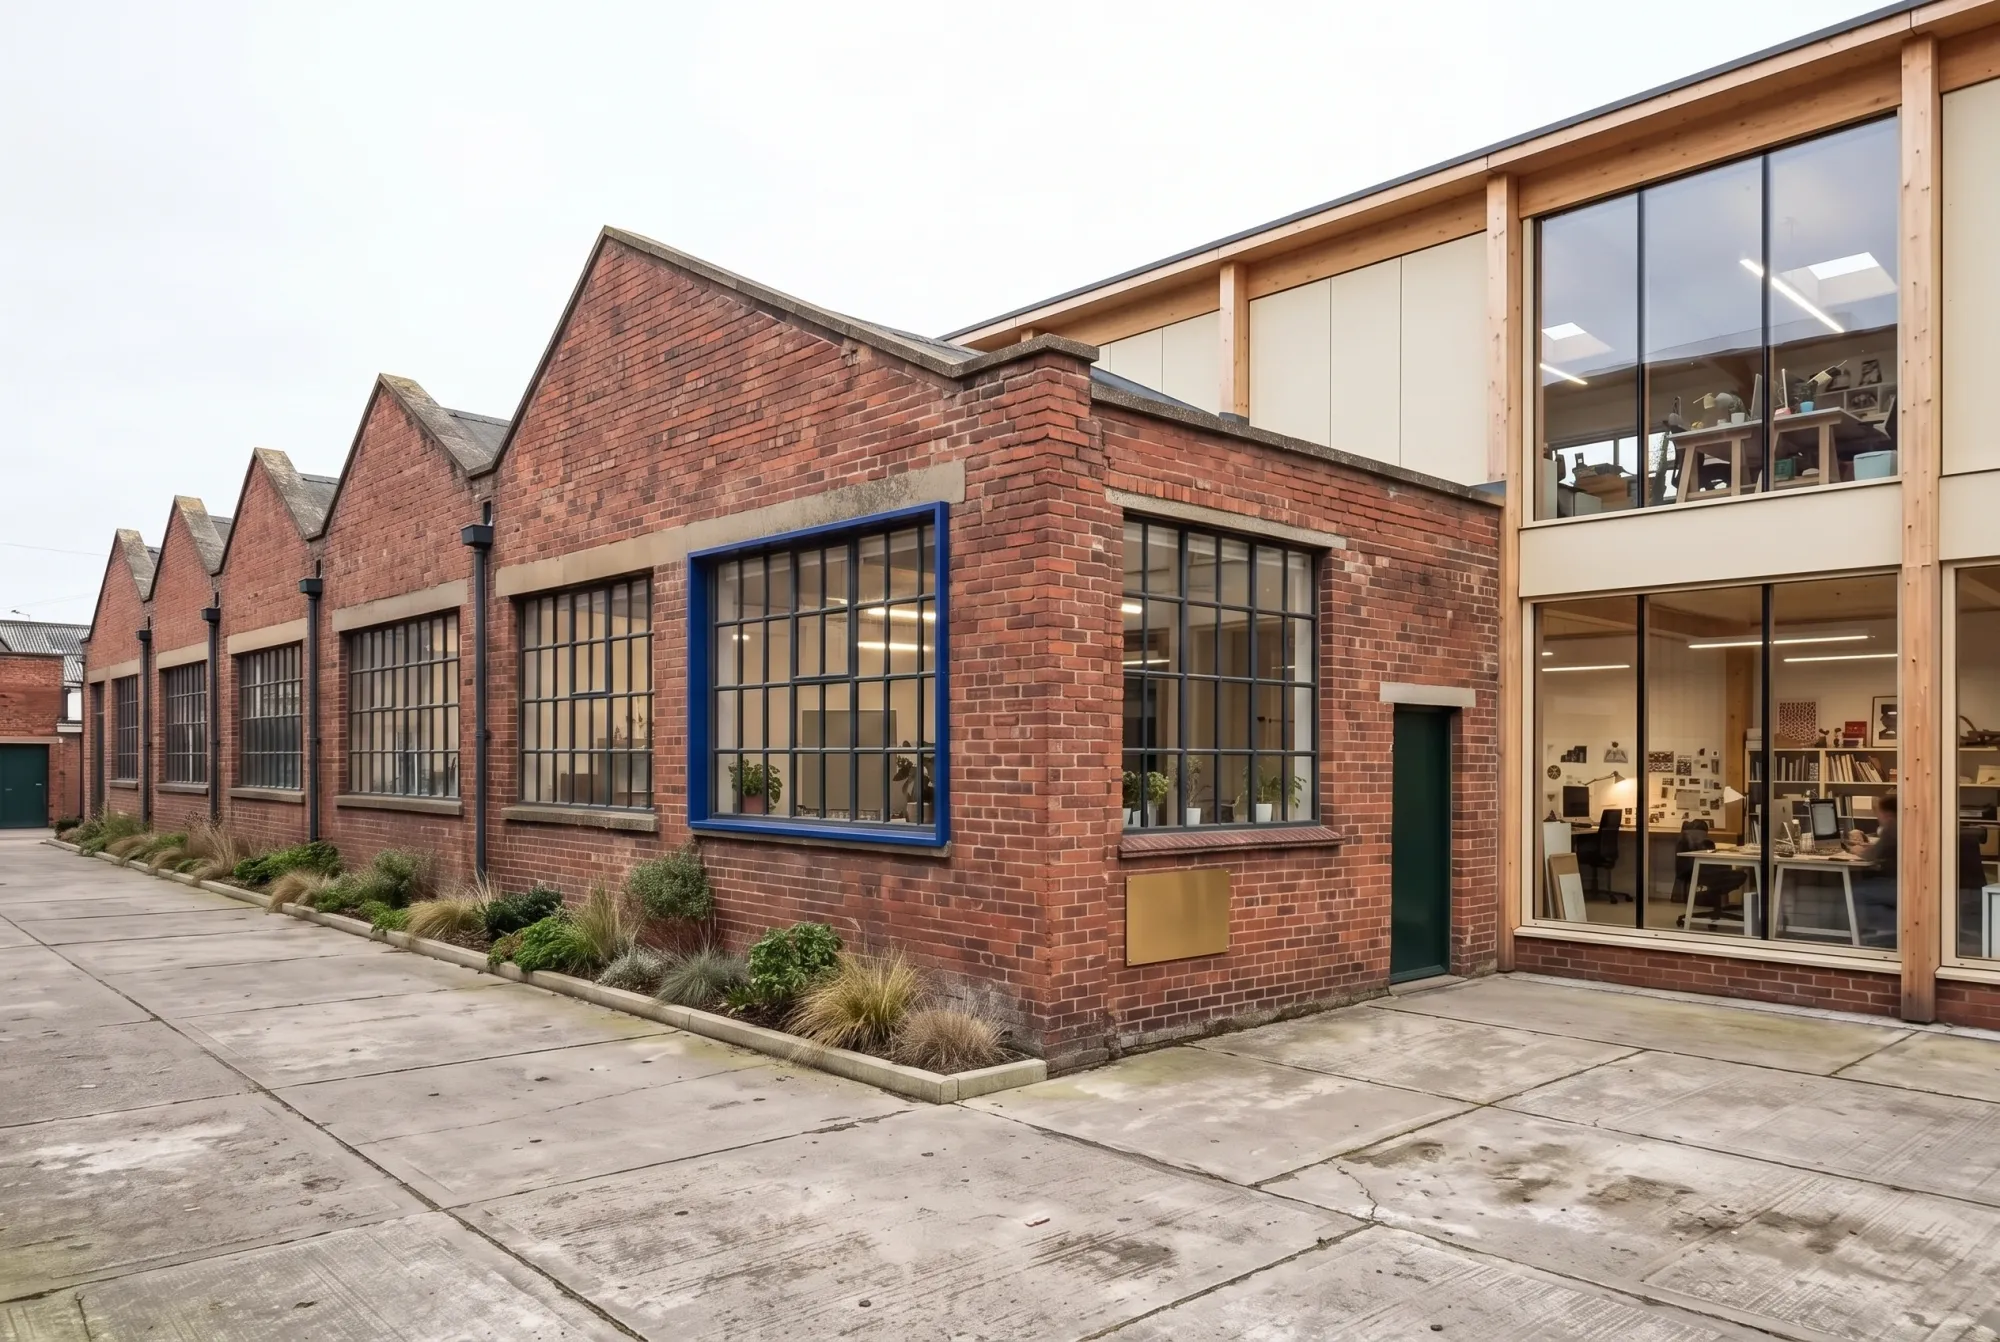
Edit Image 1. Add thin ultramarine enamelled steel trim around the outside perimeter of the single gridded workshop window labelled EDIT WINDOW, inside the purple outline.
Use the close crop in Image 2 for the blue metal finish, folded corner and thin outer lip. Fit a narrow rectangular surround to the existing opening in Image 1, with a shallow projection of approximately 60 mm beyond the brick face. Let the original window determine its width, height and perspective.
Keep the entire original charcoal window frame and its rectangular mullion grid visible inside the new surround. Preserve every glass pane, its reflections and the interior seen through it. Retain the original concrete lintel and sill above and below the opening. Keep all other windows, brickwork, doors, drainpipes, plaque, planting, curb, paving and the glazed extension exactly as they appear in Image 1.
Use the original camera, crop and daylight. Return a clean photograph with the blue trim around the marked window, the complete original glazing and frame grid visible, and all labels and the purple outline removed.
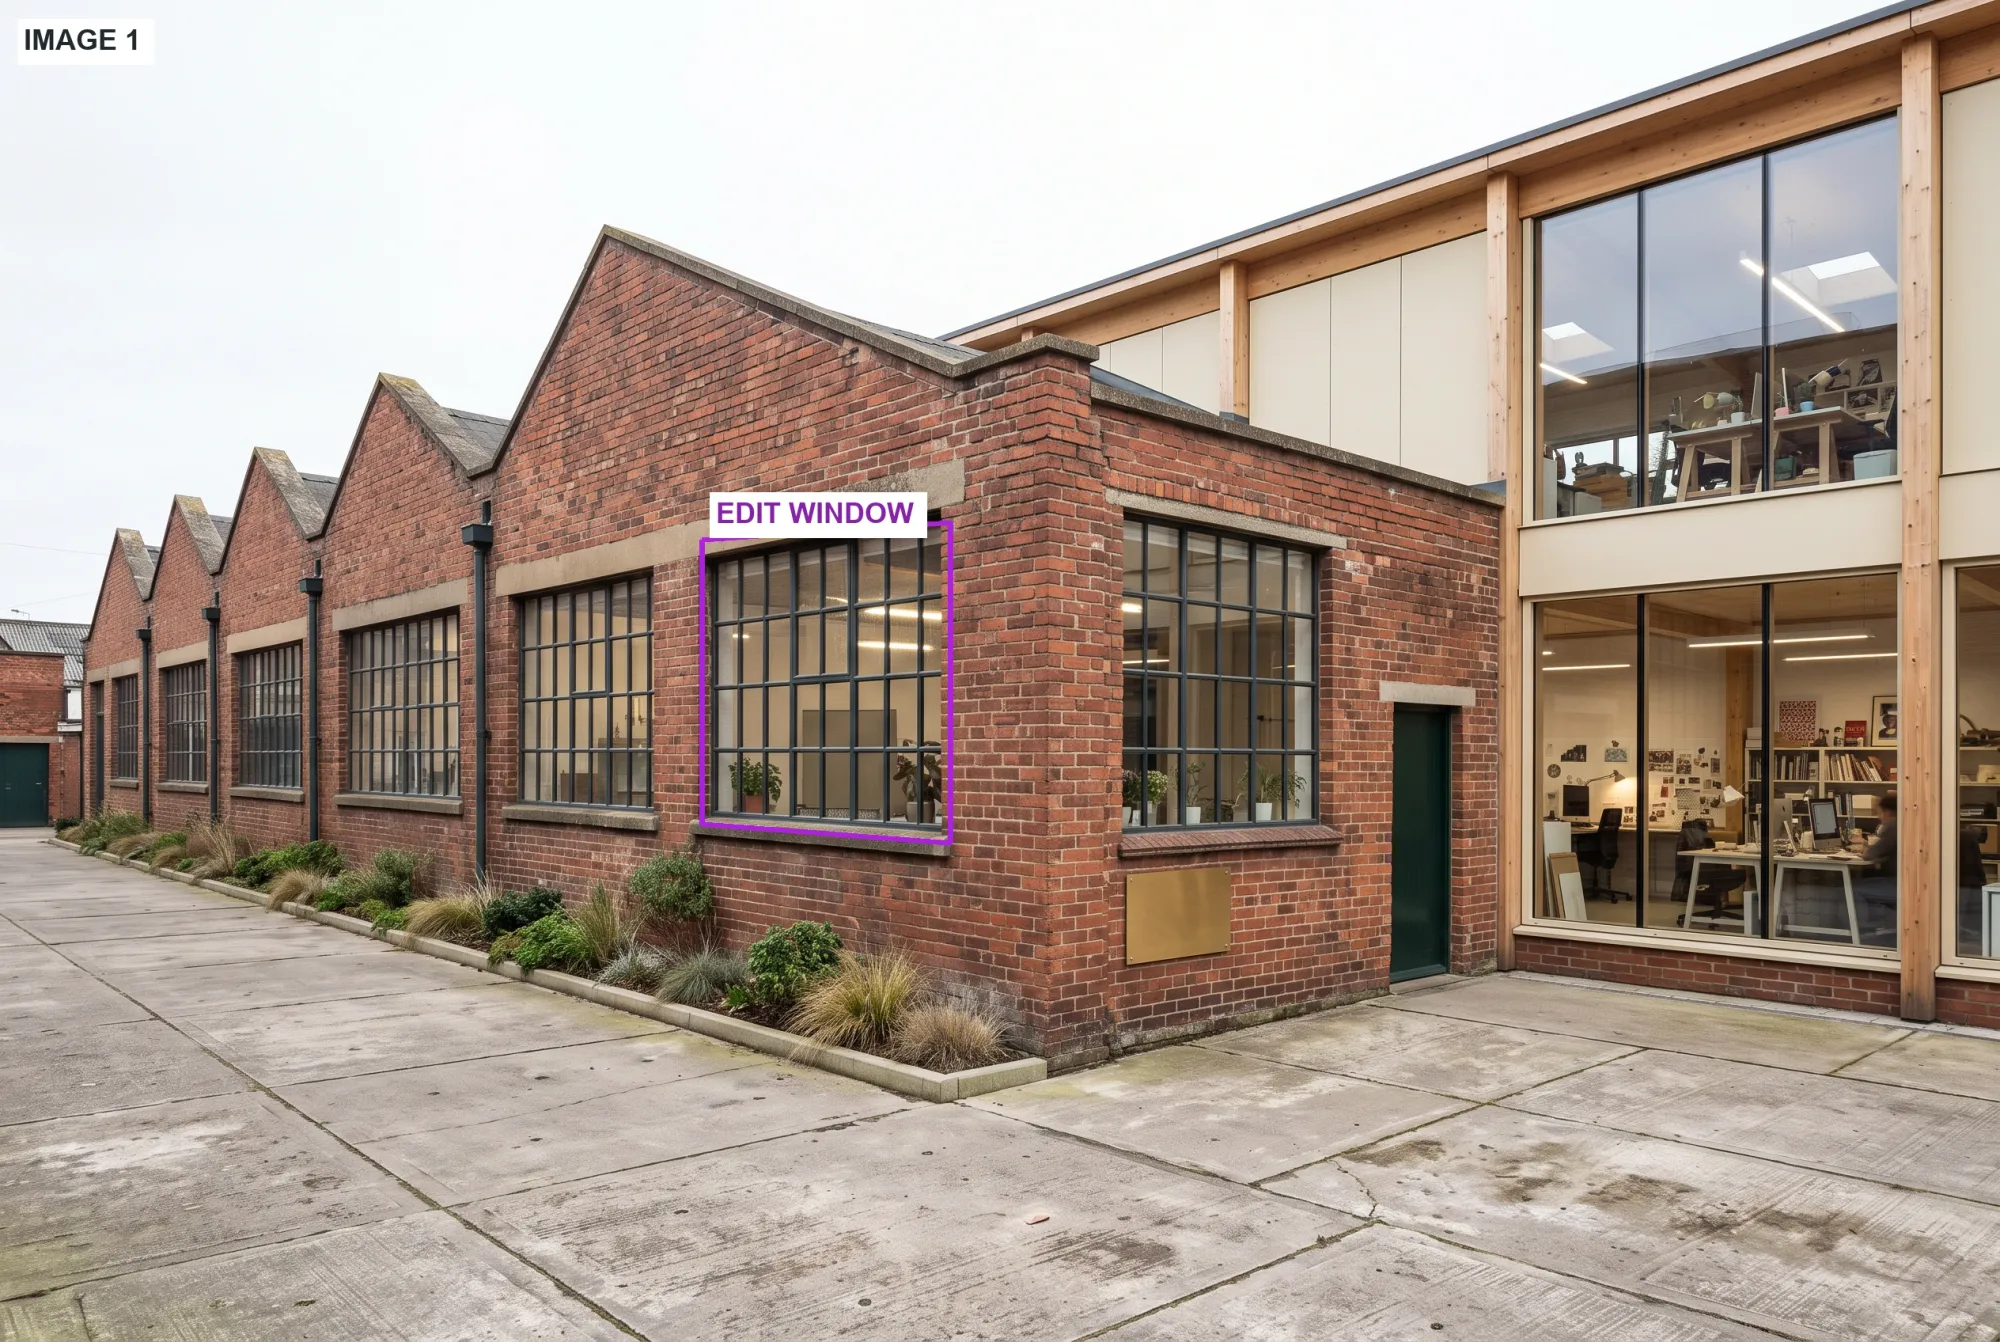
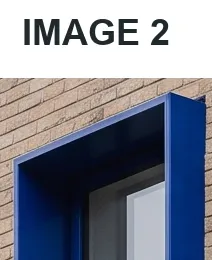
Image 1: marked project. Image 2: cropped reference.
4.3. Planting Within an Existing Border
Crop a short planting group with visible gravel and enough edging to establish scale. Keep the project bed responsible for the footprint.
Edit prompt
Edit Image 1. Replace the planting and exposed soil within the existing narrow border labelled EDIT BED, inside the purple outline.
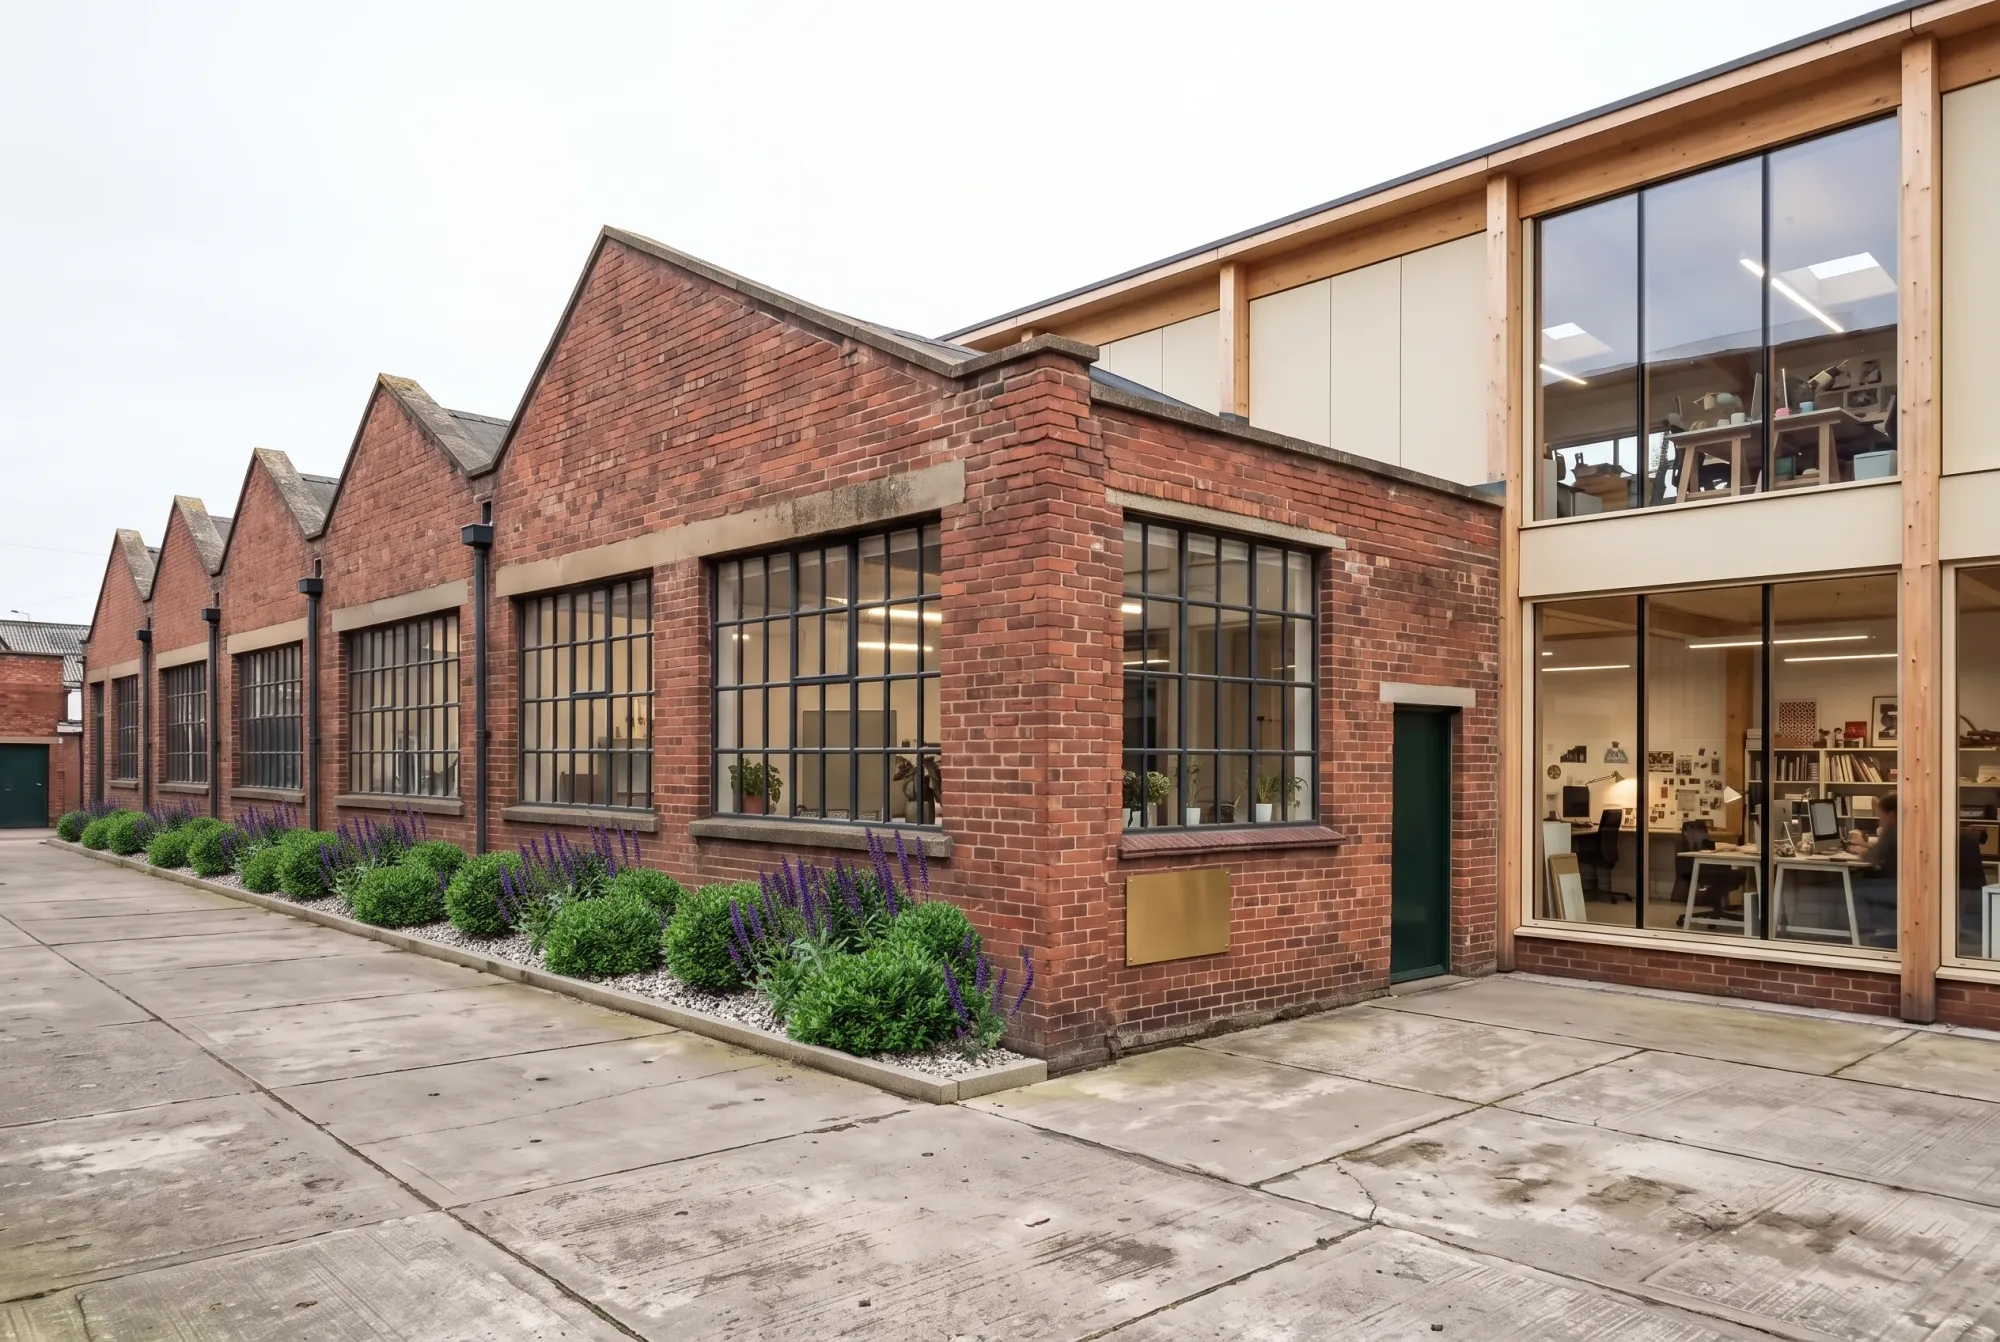
Use the close crop in Image 2 for the low rounded hebe shrubs, upright violet salvia flowers, pale gravel and their repeated grouping. Fit those plants into the existing bed in Image 1 at a height below the workshop window sills. Keep small visible gravel gaps between the groups.
Preserve the exact position, shape and width of the original planting bed. Keep its concrete curb in its existing position, with the courtyard paving continuing up to the same outside edge. Retain the original paving joints, brick walls, window frames, doors, drainpipes, plaque and glazed extension. Use Image 1 for the building design, camera, crop and daylight.
Return a clean courtyard photograph with the new planting contained within the original border and all image labels, the EDIT BED label and the purple outline removed.
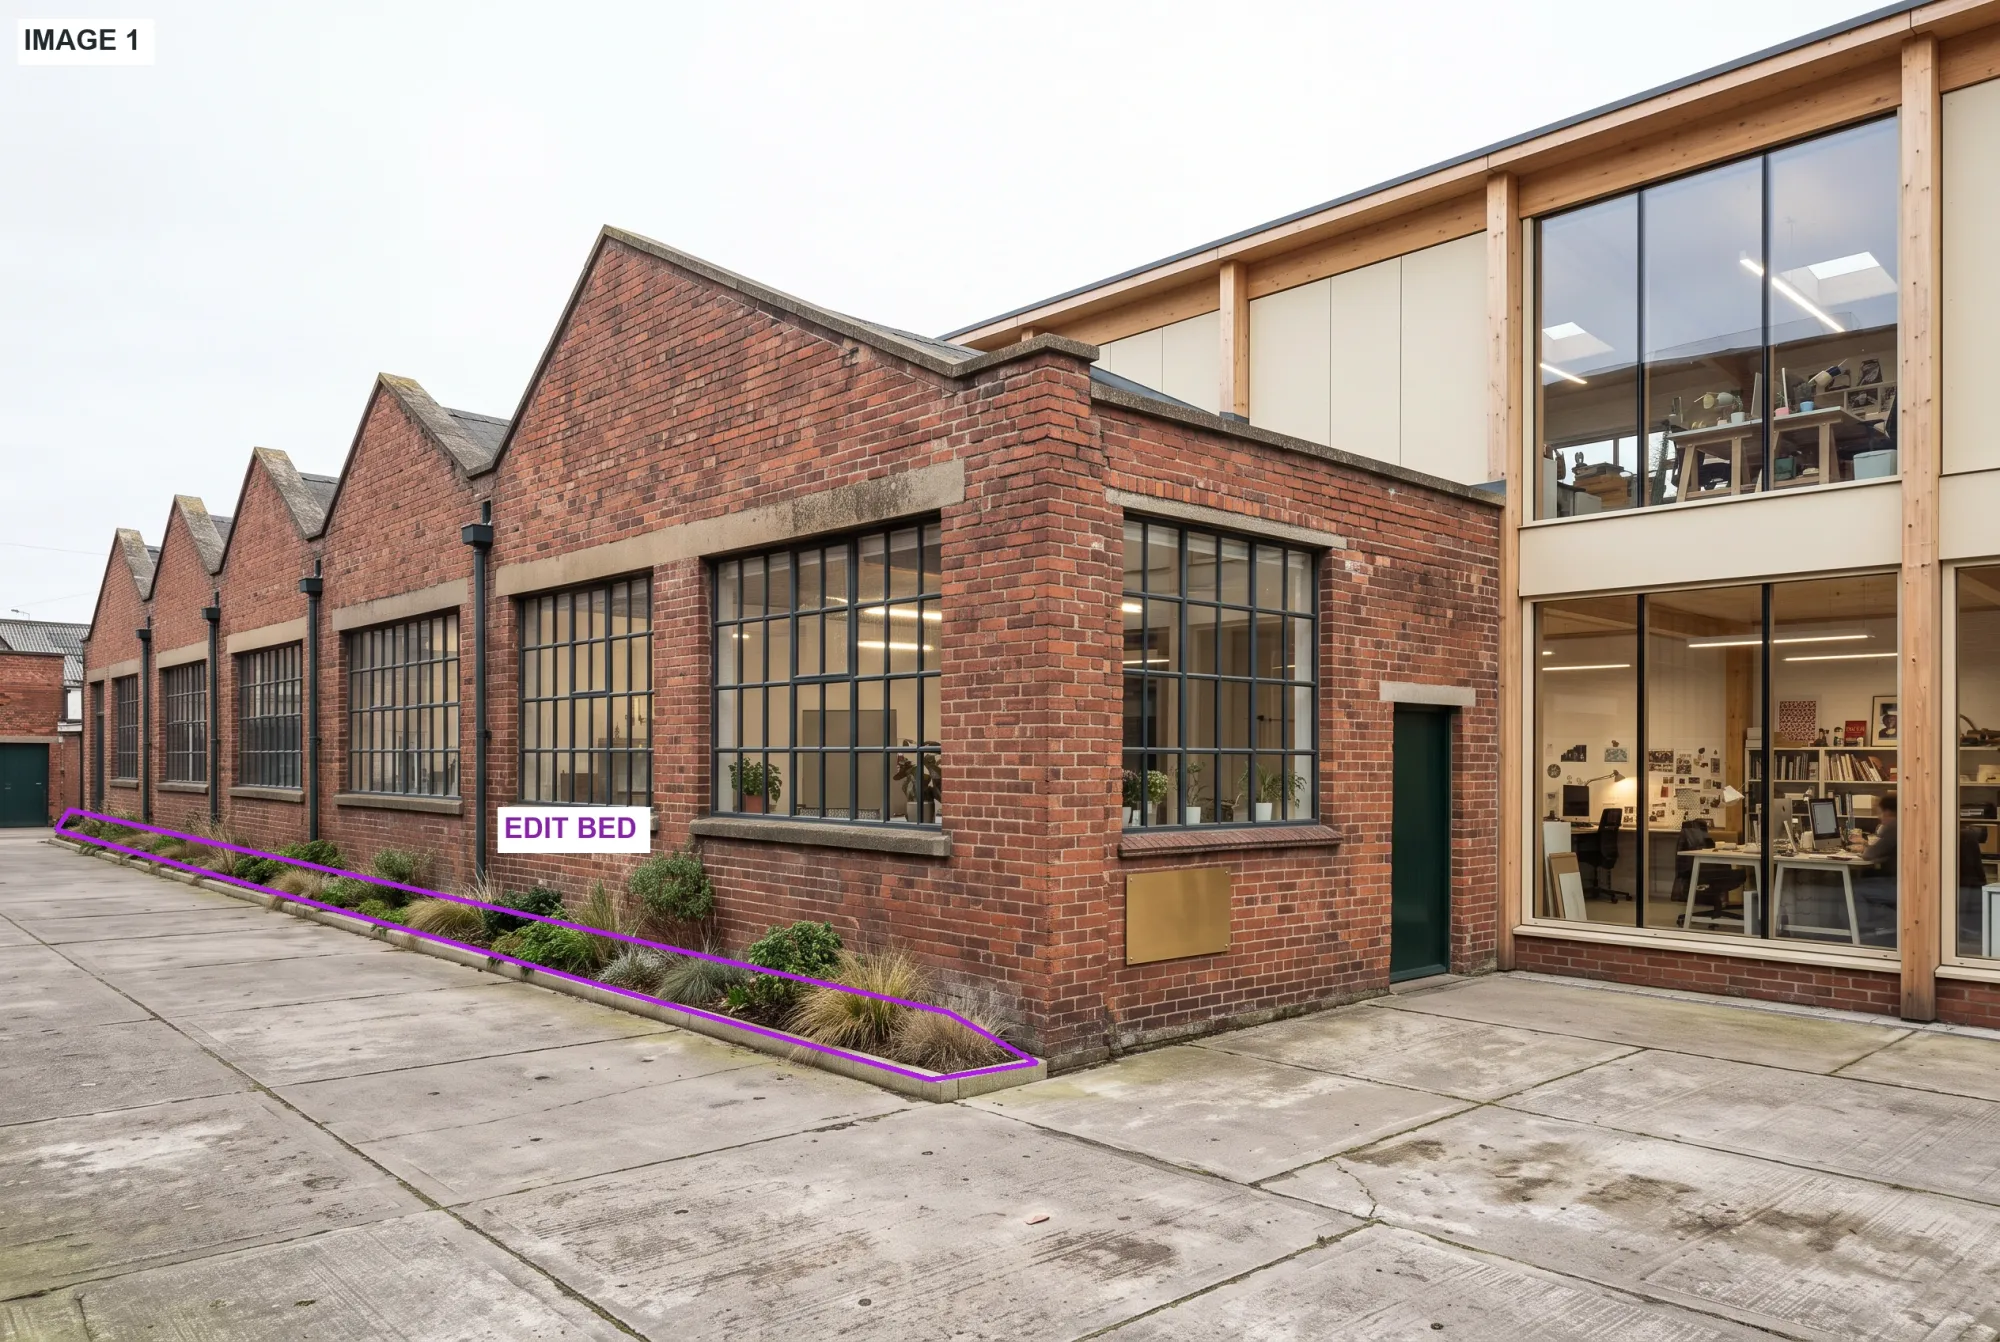
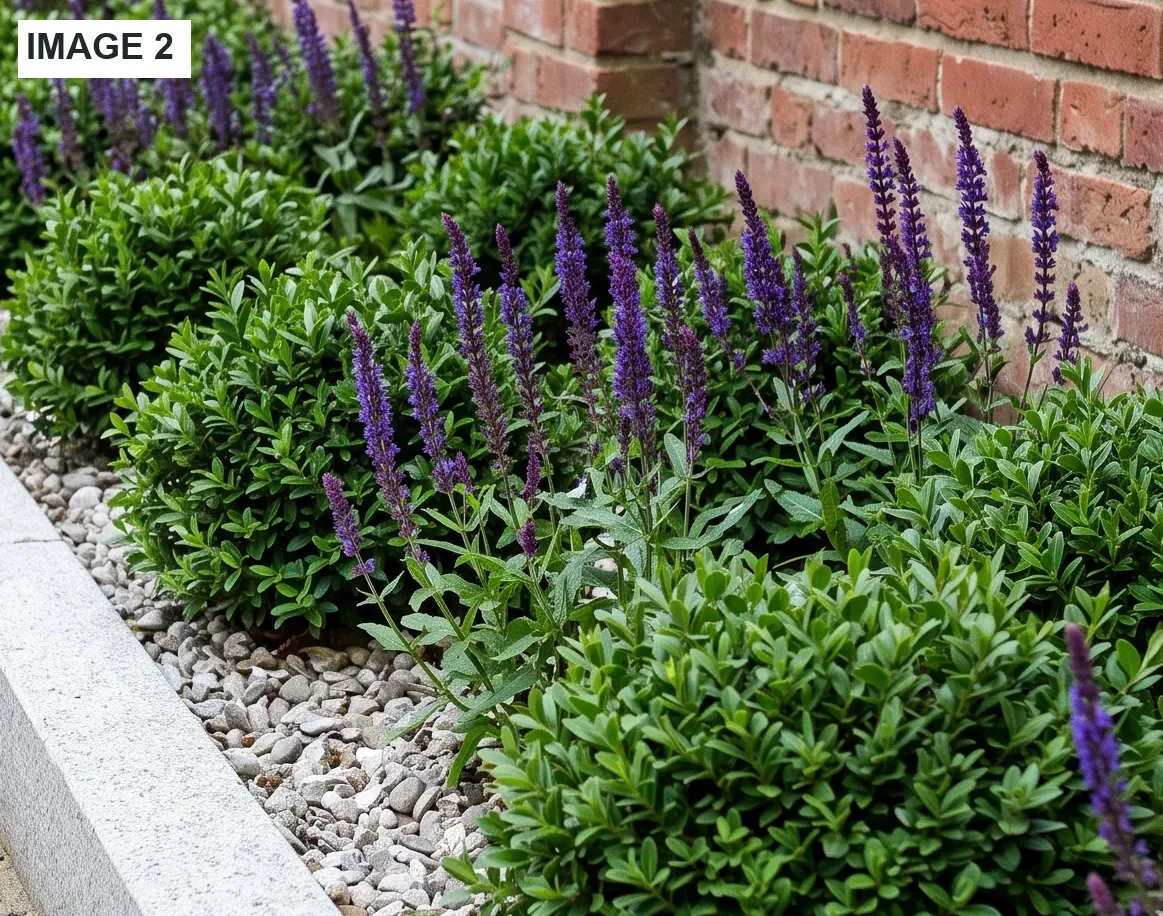
Image 1: marked project. Image 2: cropped reference.
4.4. Brushed Steel on Selected Cabinet Fronts
Crop the cabinet surface close enough to see its brushed grain and reflections. Assign the crop to the finish while the project retains the cabinet layout.
Edit prompt
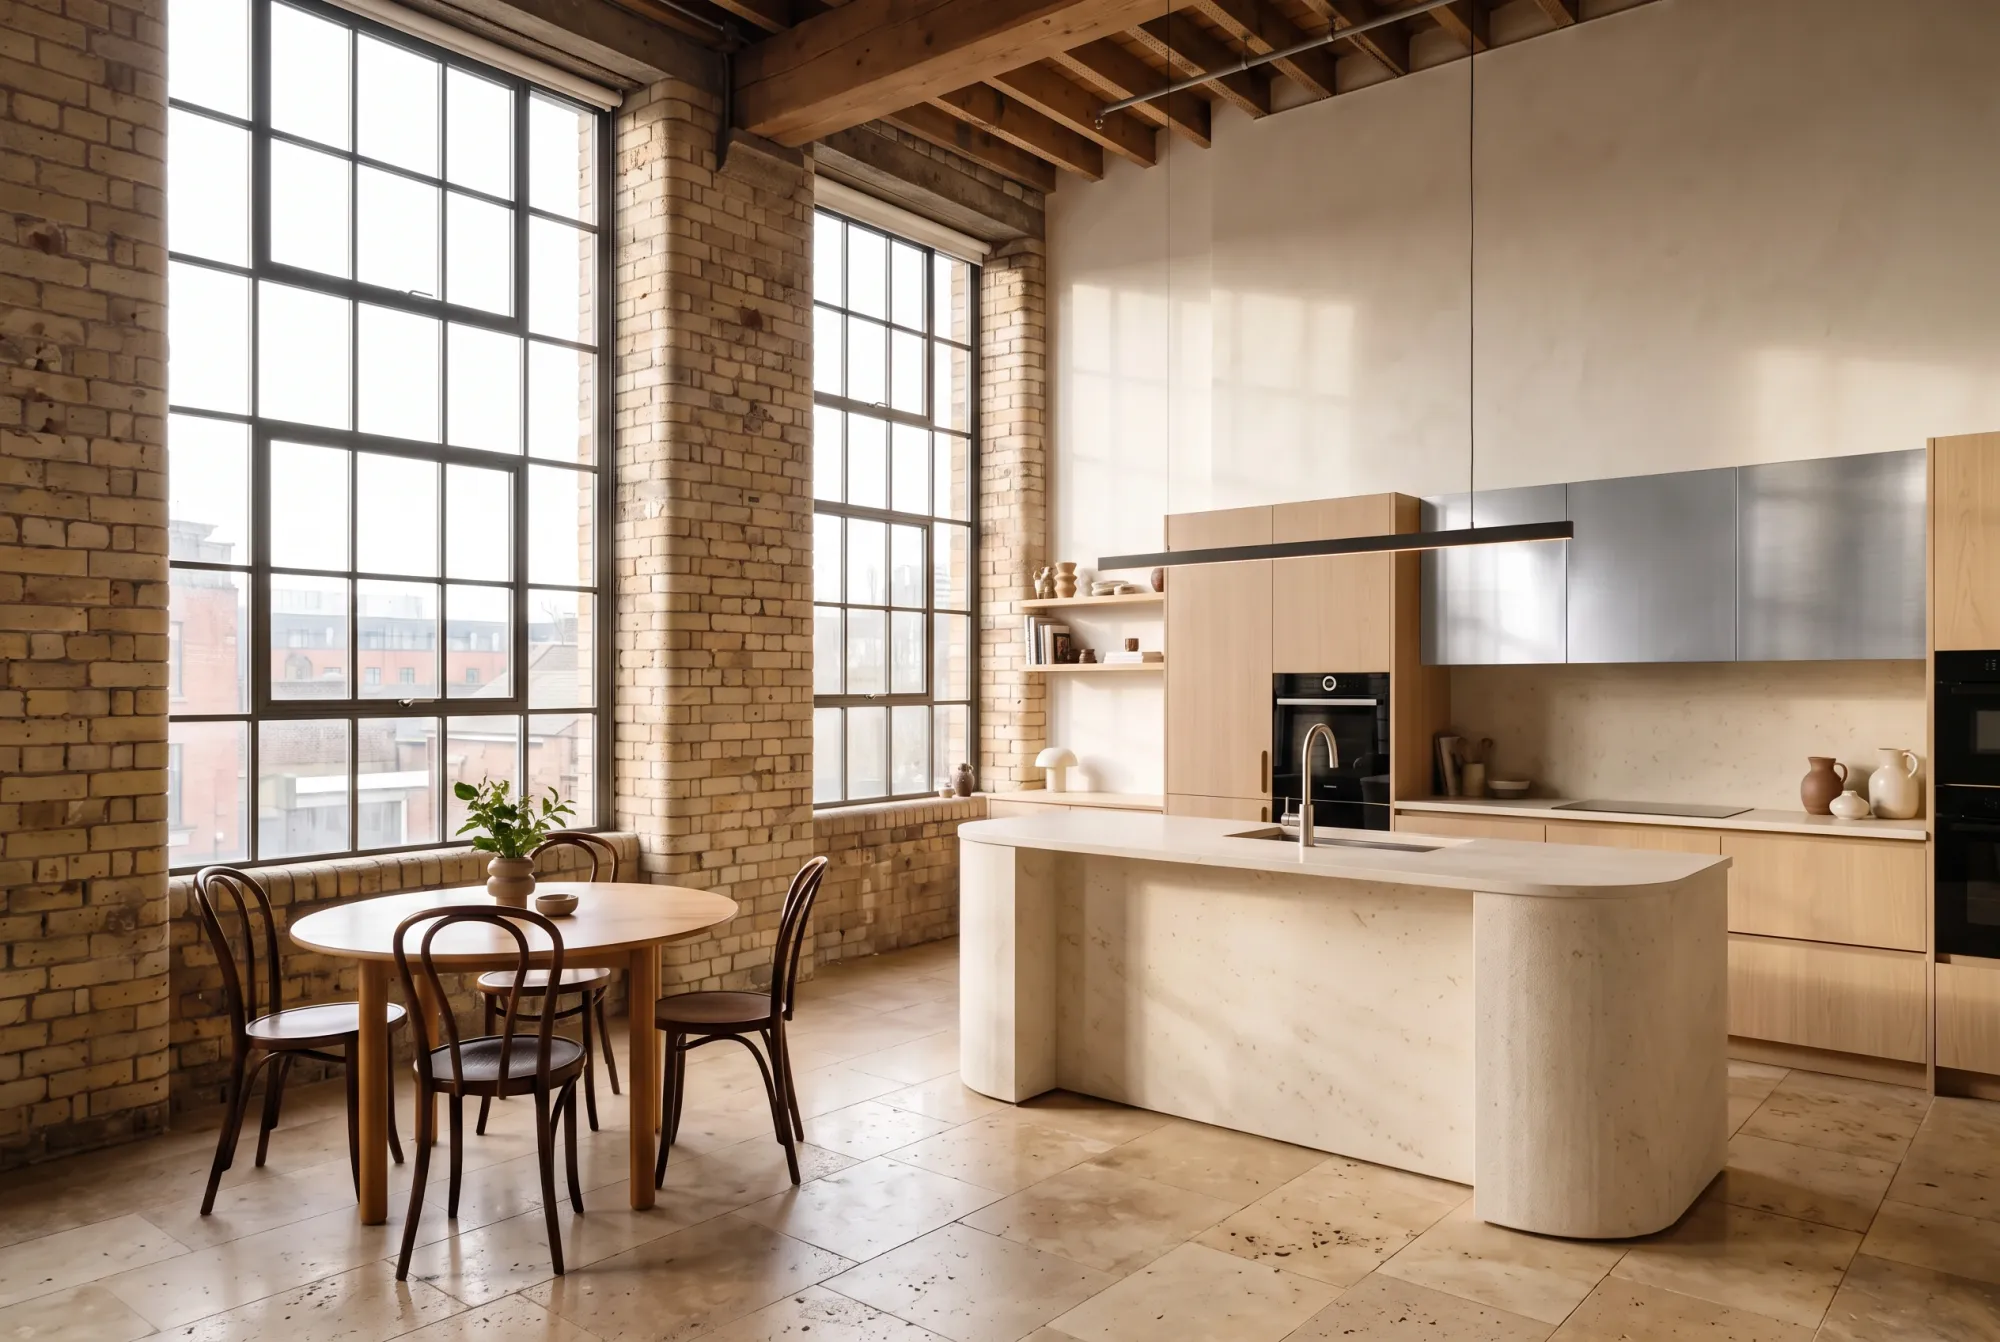
Edit Image 1. Change the surface finish of the upper cabinet doors labelled EDIT FRONTS, inside the purple outline, to brushed stainless steel.
Use the cropped steel surface in Image 2 only for the fine horizontal brushed grain, satin silver tone and soft reflections. Apply that finish to the marked door faces in Image 1. Keep their original flat flush surfaces, door dimensions, joints and edge profiles, with the original concealed opening mechanism.
Retain the pale oak finish on all unmarked base cabinets, tall units and end panels. Preserve the stone island, worktops and backsplash, appliances, tap, pendant light, shelves, ceramics, dining furniture, brick walls, ceiling beams, windows and floor. Keep the pendant in front of the cabinet doors with its original shape and position.
Use the original camera, crop, daylight and room reflections from Image 1. Return a clean interior photograph with the steel confined to the marked upper doors. Restore the original brick texture in the upper-left corner where the IMAGE 1 label sits, and remove every image label, the EDIT FRONTS label and the purple outline.
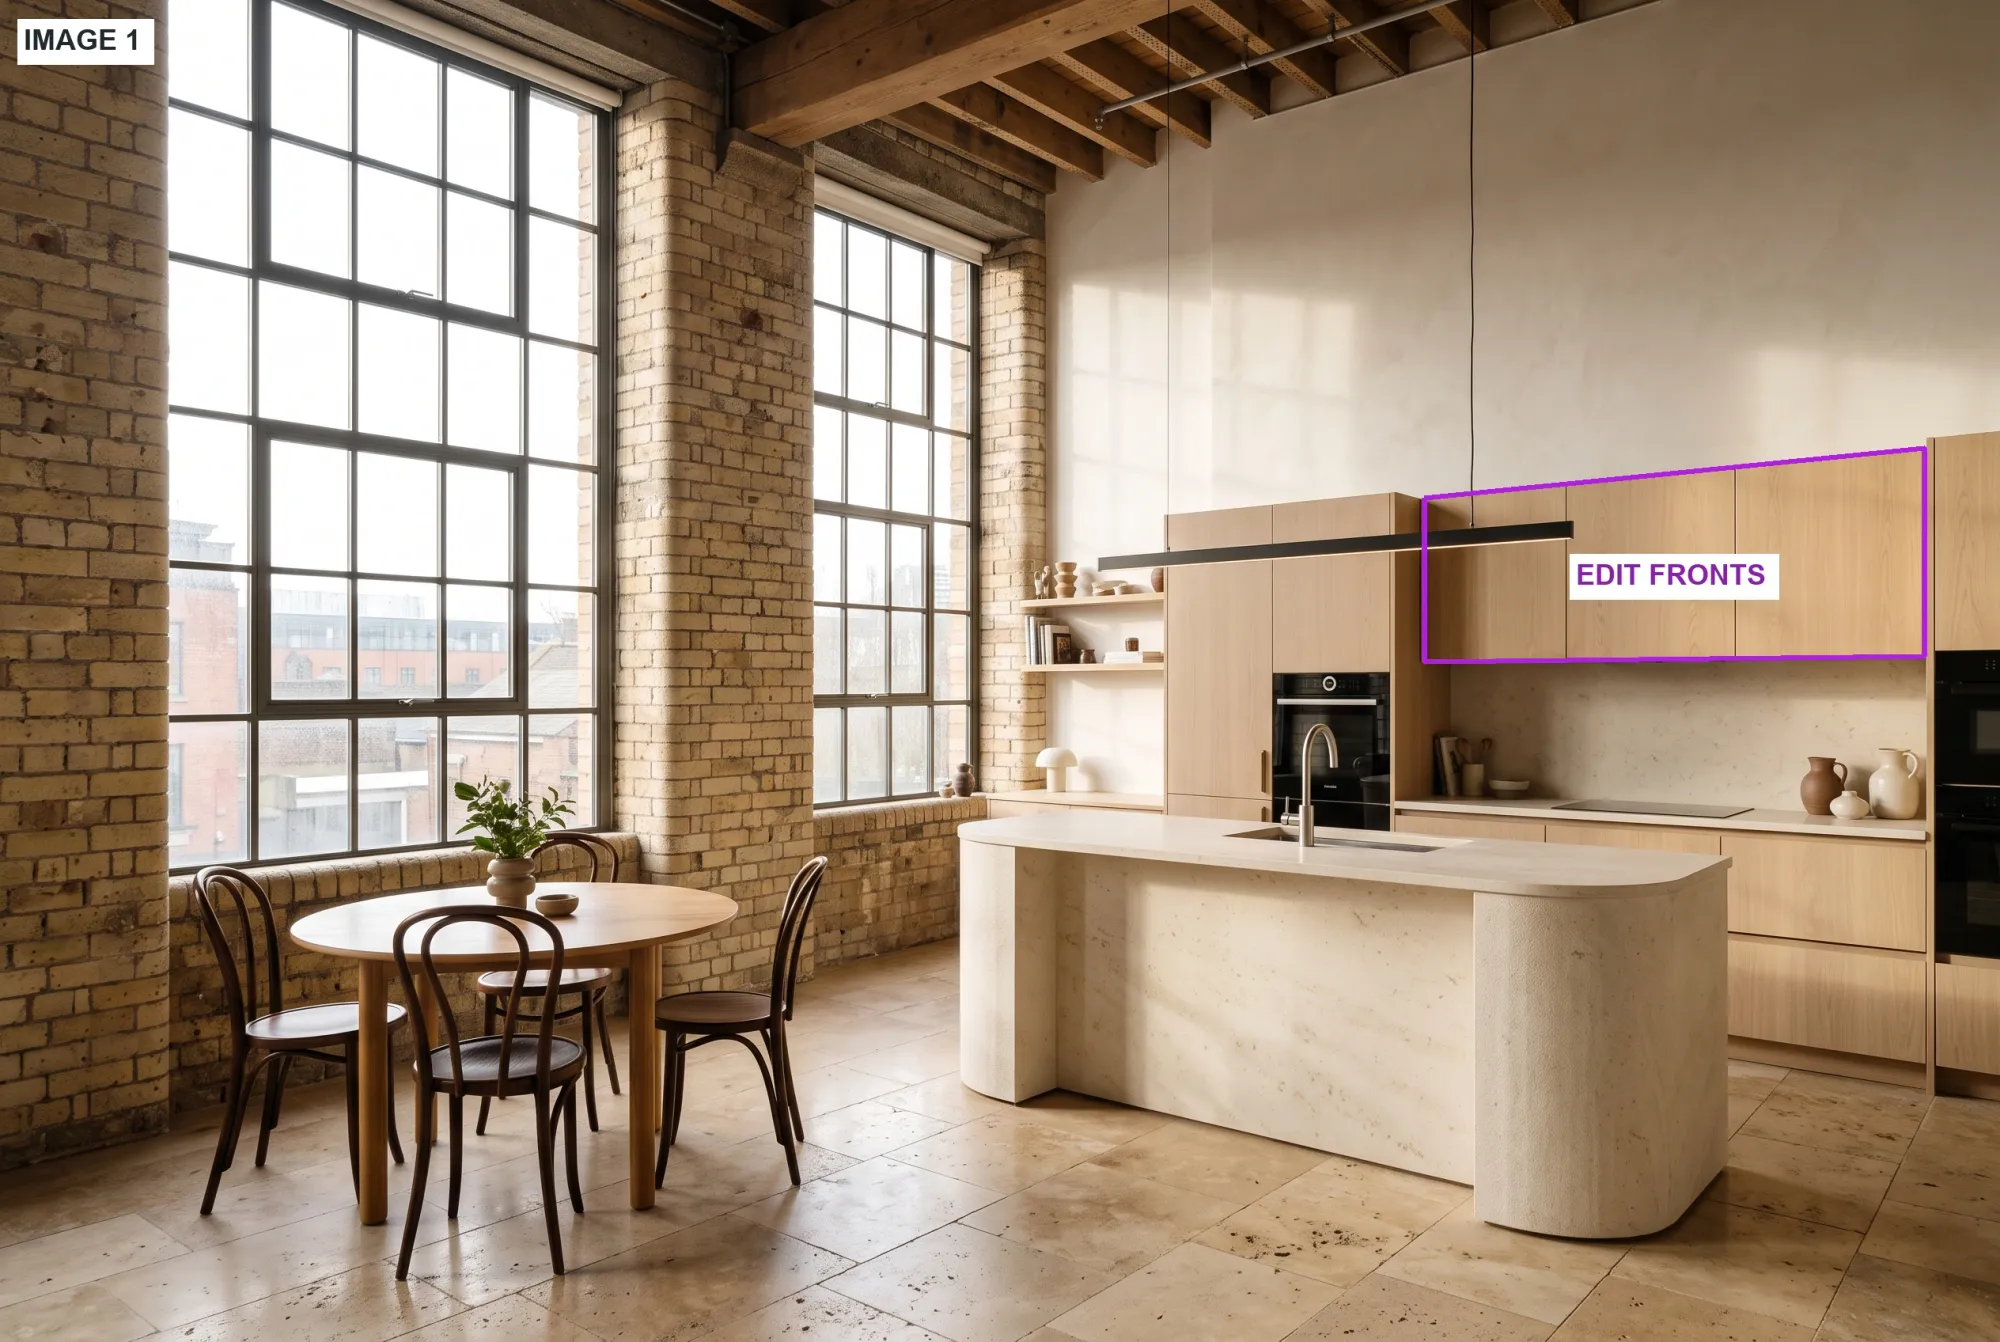
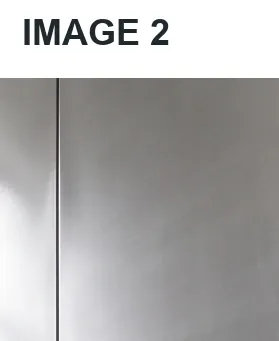
Image 1: marked project. Image 2: cropped reference.
4.5. A Railing Reference for One Balcony
Crop the top rail, pickets and a corner connection. Mark the guard to edit in purple and the nearby glass opening to preserve in green.
Edit prompt
Edit Image 1. Replace the glass guard on the single upper-storey balcony labelled EDIT GUARD, inside the purple outline, with a tubular steel railing.
Use the close crop in Image 2 for the pale butter-yellow powder coating, rounded tubular top rail, slender round vertical pickets and curved end connections. Fit those details to the exact front edge and existing guard height of the marked balcony in Image 1. Keep the original balcony footprint and the opening between its concrete side walls.
Preserve the side-wall opening labelled KEEP GLASS, inside the green outline, with its original bronze frame, clear glazing and concrete reveal. Keep the transparent glass guards on the other three balconies. Retain the concrete balcony slabs, soffits and surrounds, recessed walls, doors, windows, building volumes, entrance, paving, trees, planting, stairs and retaining walls. Use the original camera, crop, morning light, shadows and reflections from Image 1.
Return a clean architectural photograph with the yellow railing confined to the front edge of the marked balcony. Remove all image labels, the EDIT GUARD and KEEP GLASS labels, and both colored outlines.
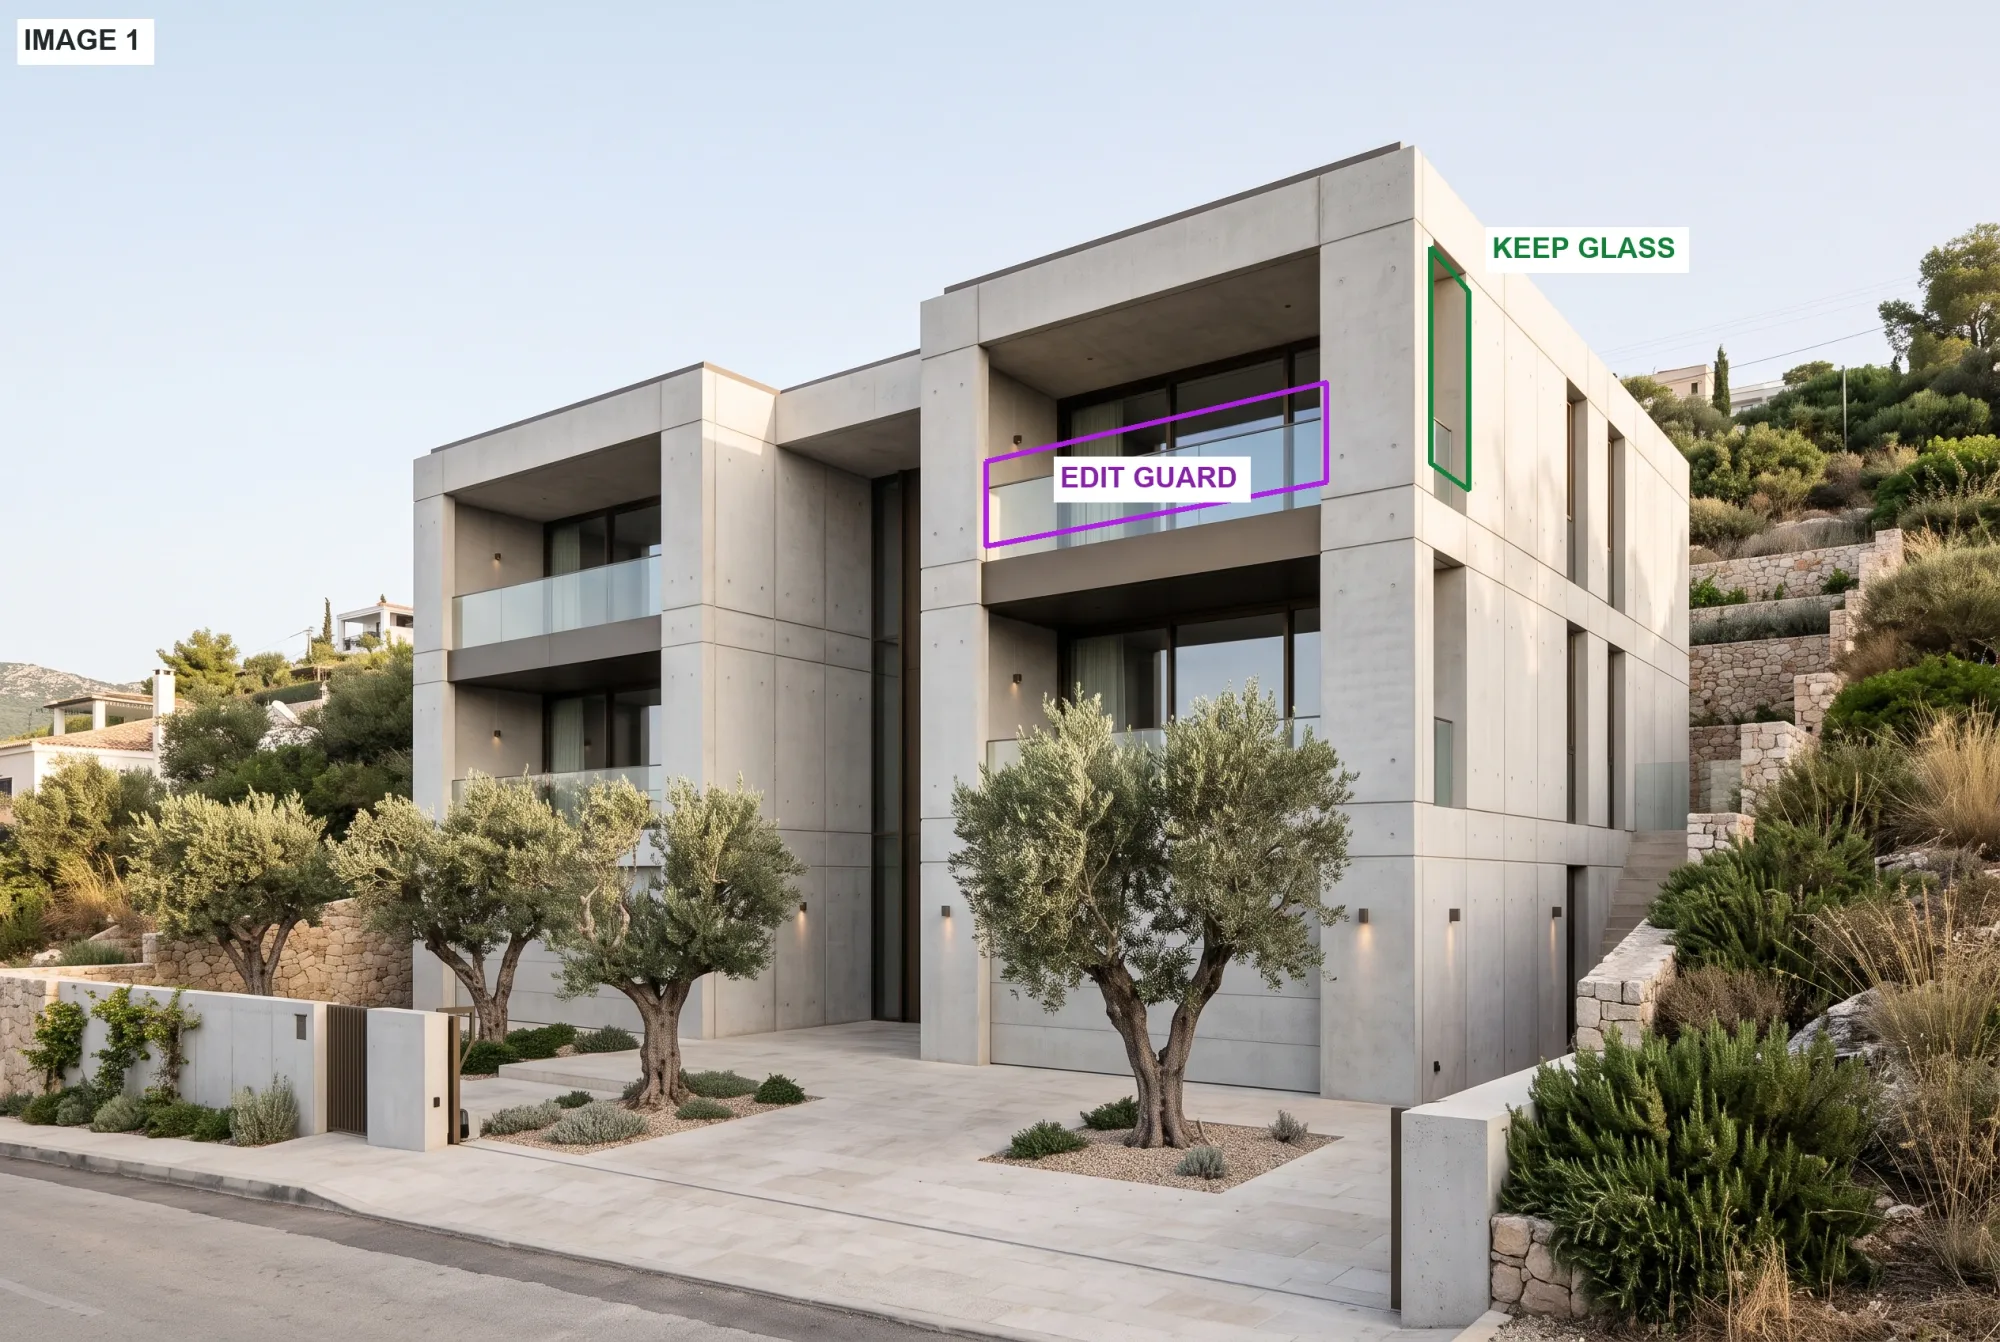
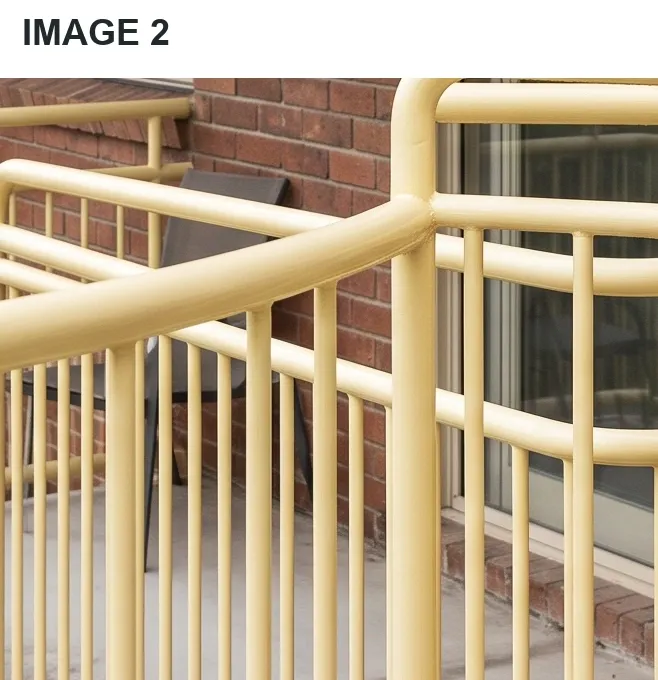
Image 1: marked project. Image 2: cropped reference.
5. Materials, Lighting and Atmosphere
Describe the visible surface qualities: ribbed glazed ceramic with narrow joints, satin enamelled steel with folded edges, square ceramic tiles with fine grout lines, or tightly woven wool with a matte finish. Use the details that affect the design decision.
For a lighting study, identify a time of day and the sources visible in the image. “Early blue hour with warm light through the windows” establishes a useful relationship between exterior and interior light.
Keep the camera stable when comparing finishes. A change of viewpoint can alter the apparent scale, texture and color of the same material. A new viewpoint should be treated as a separate design request and checked against project drawings.
6. Build the Image in Focused Passes
A practical sequence is to settle the major geometry, compare facade or joinery finishes, refine landscape or furnishings, then prepare the presentation lighting. Review the image between passes.
For alternative options, return to the same original. For a cumulative design, upload the last accepted result and write the next change in full. Save versions with names that identify the decision, such as the ceramic facade option or the chartreuse upholstery option.
If a pass changes an important opening, room boundary or piece of furniture, return to the last reliable image and narrow the next request. Repeated edits can accumulate small deviations.
7. Brief Examples for Gaming and Fashion
These two examples use the same target, change and preservation structure.
7.1. Gaming: Weather Variant
Create a weather variant of an established environment concept.
Edit prompt
Using Image 1, change the fortress courtyard to a rainy evening with wet stone paving, shallow puddles and cool overcast light. Keep the gateway, stairs, walls, navigable route, camera view and stylized rendering style unchanged.
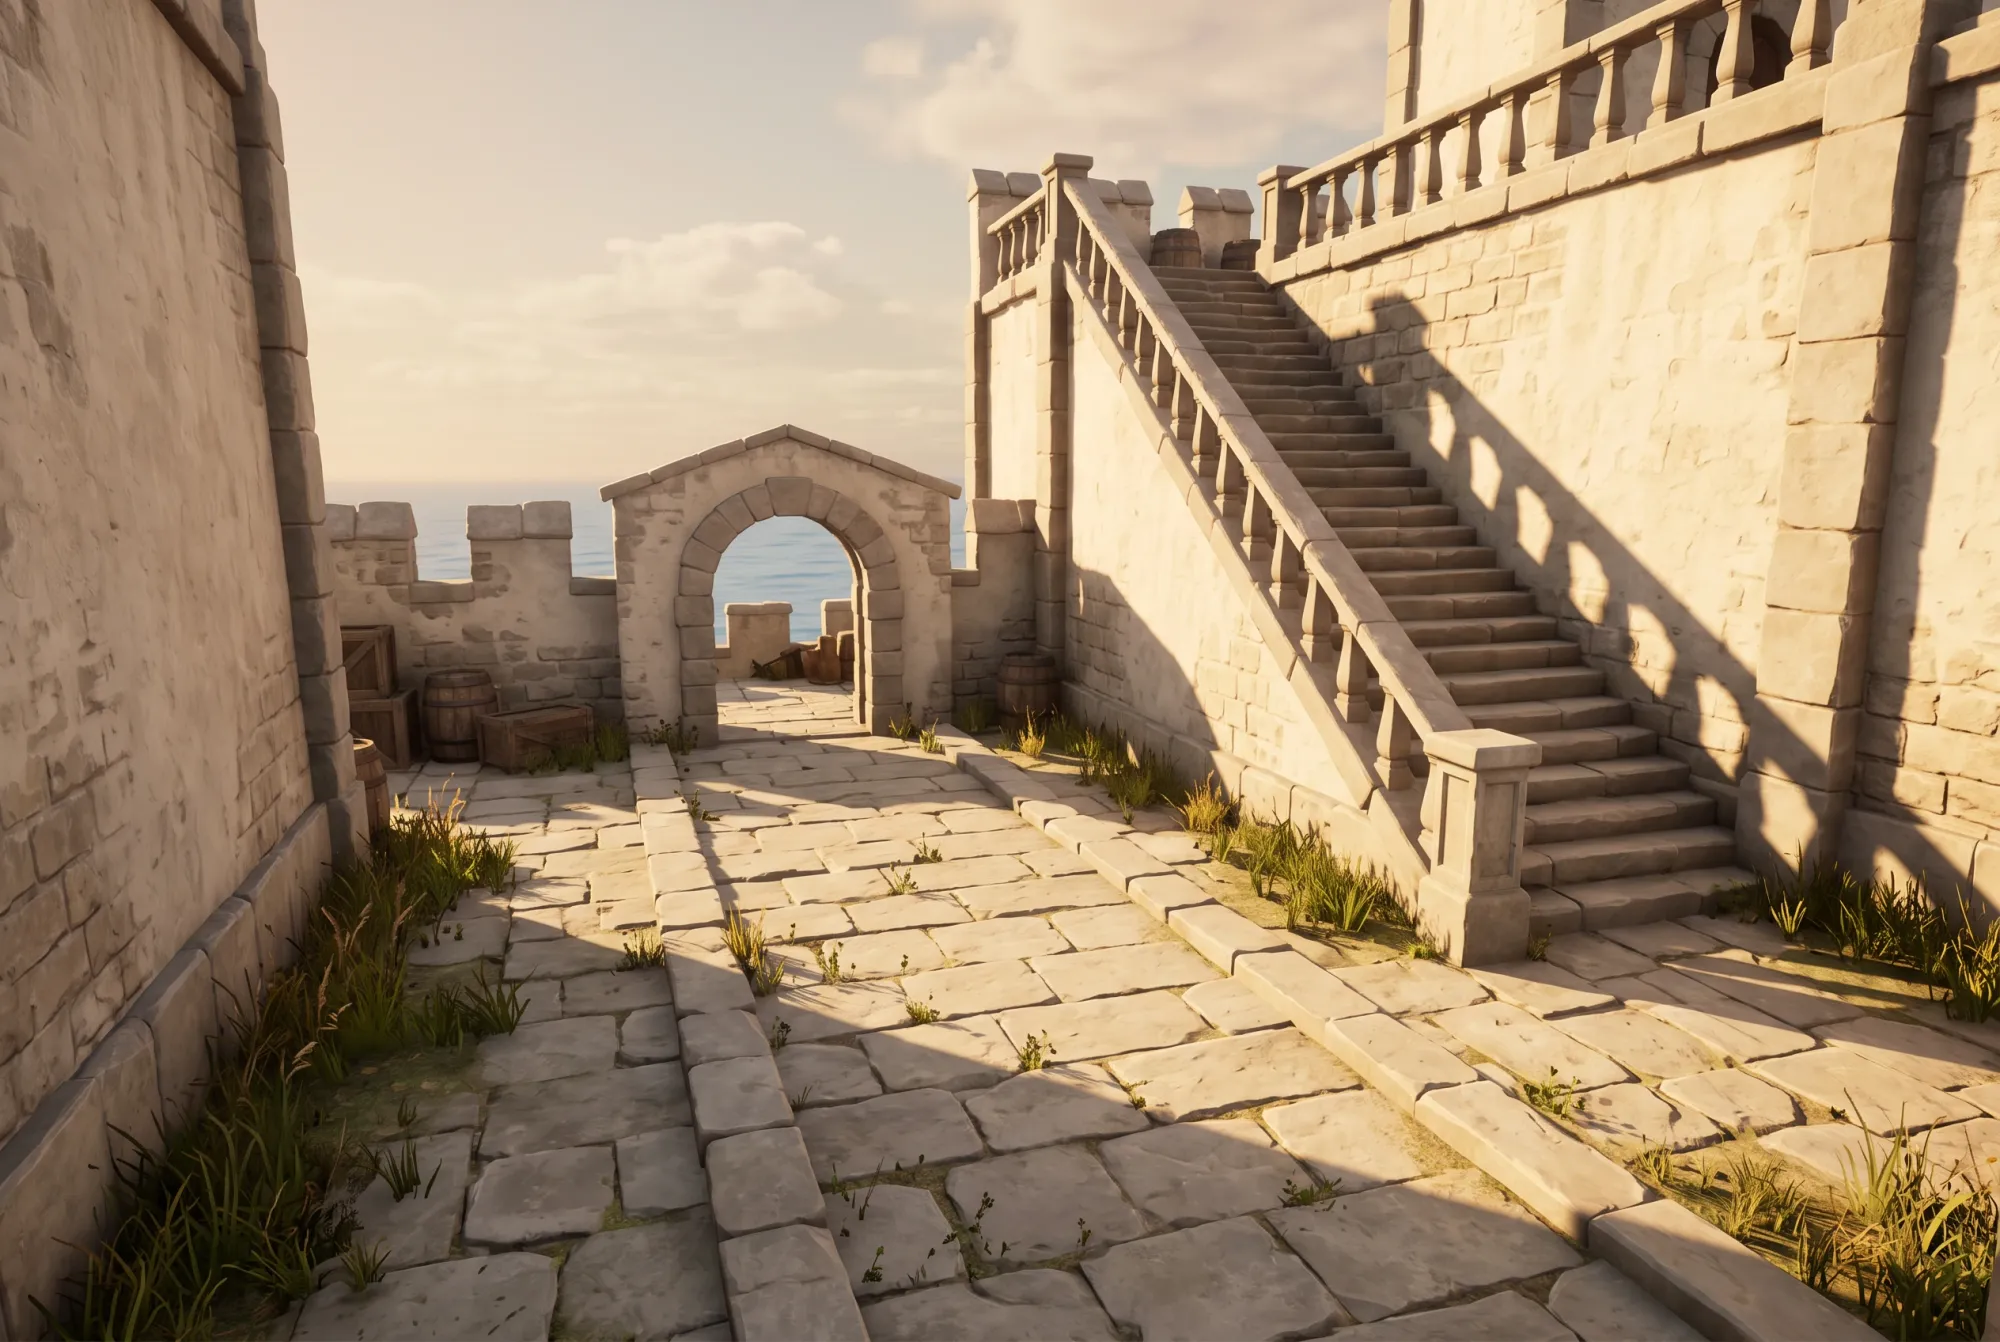
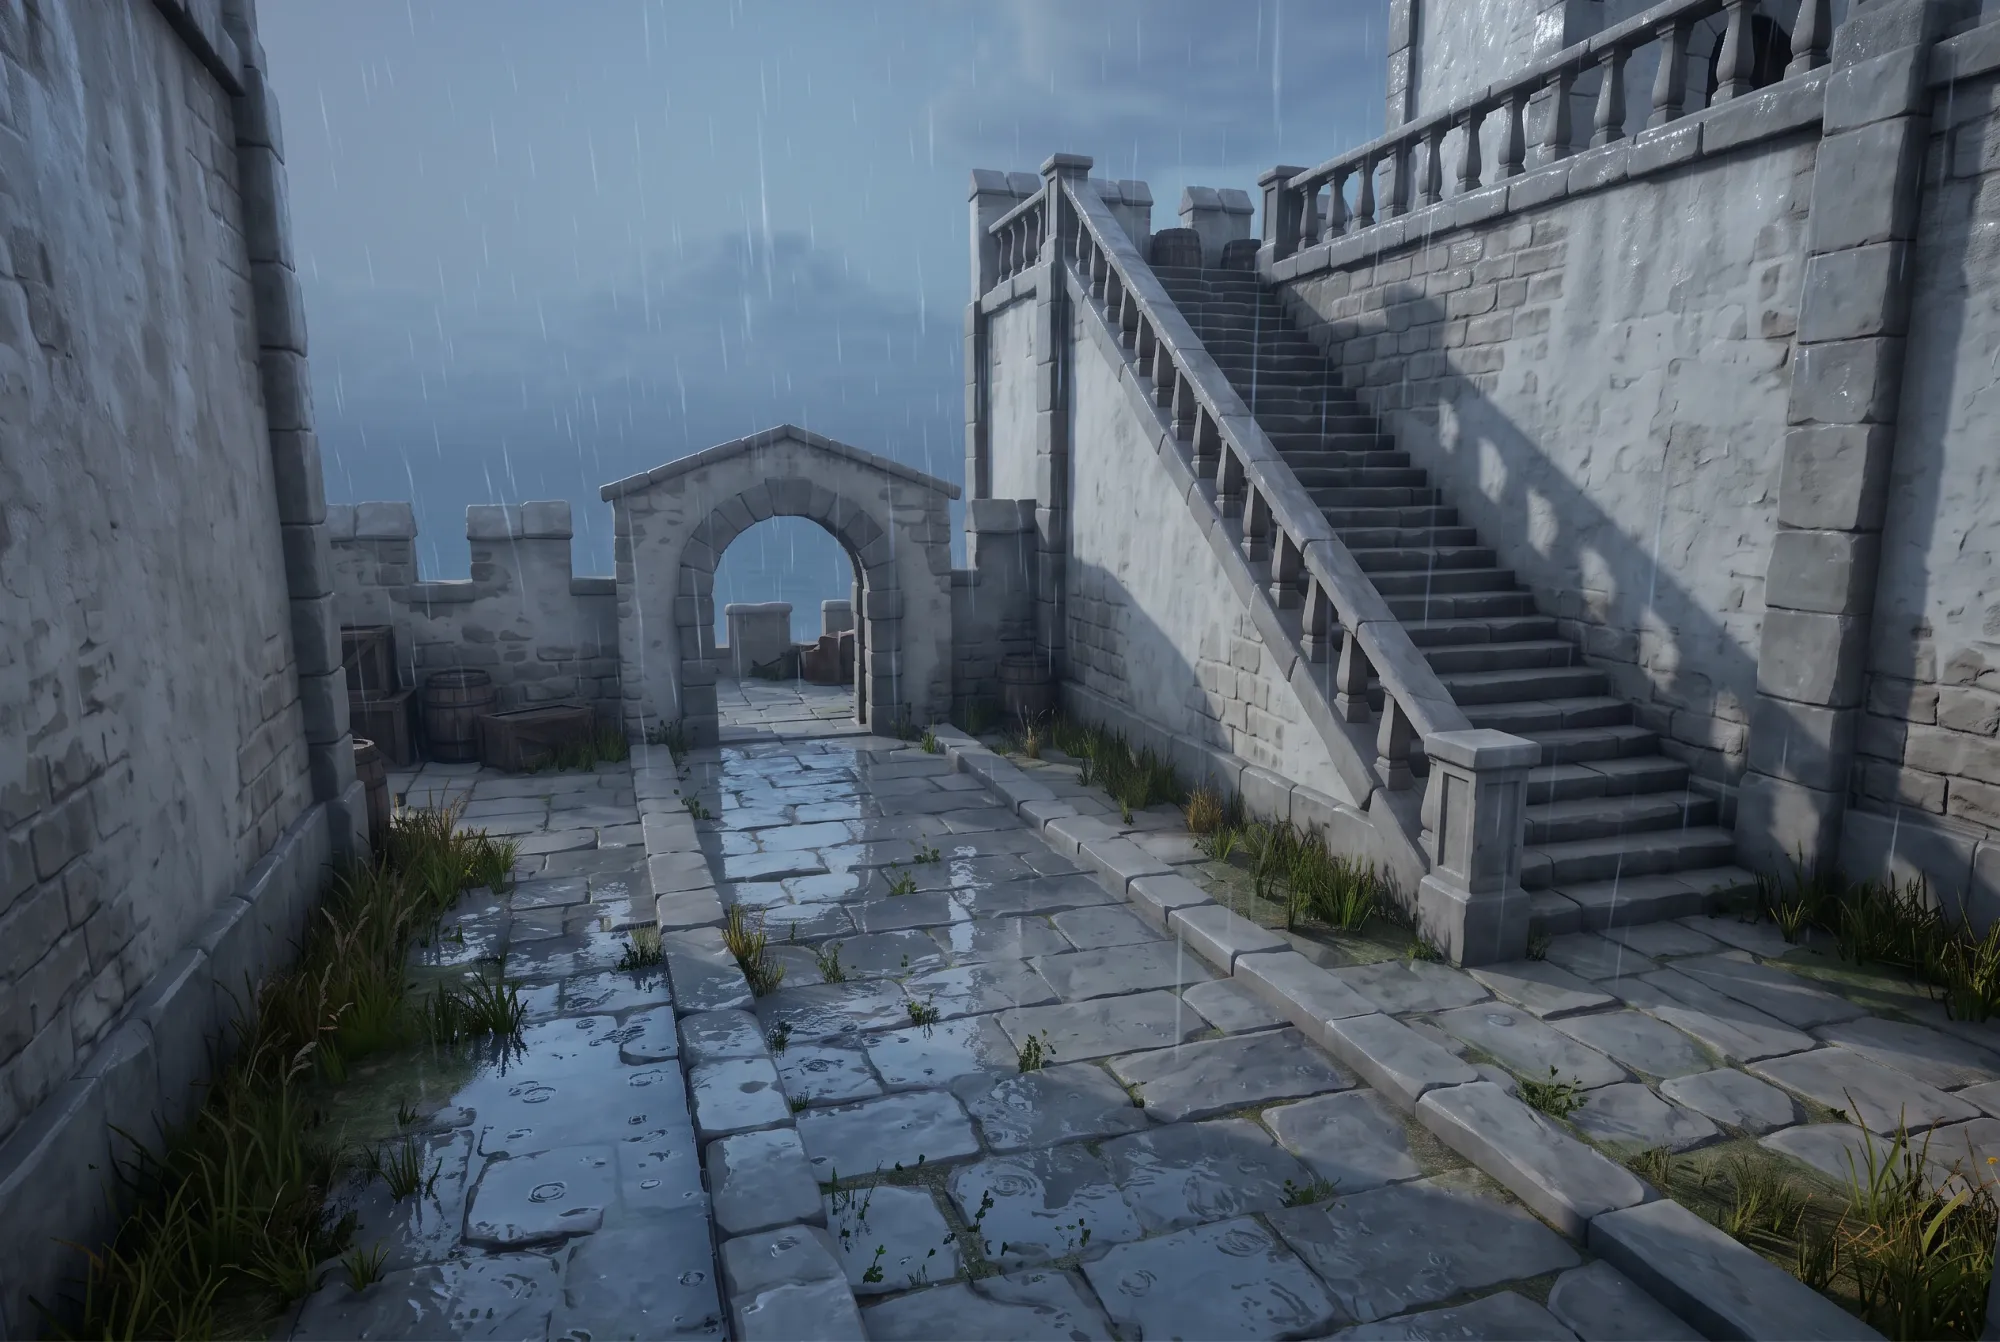
Image 1 · Generated starting image Generated with Nano Banana 2.1. Edited result Gaming: Weather Variant.
Result and review: Check the gateway, stairs and clear route through the courtyard. Use the result as a visual direction for the environment team.
7.2. Fashion: Coat Colourway
Compare a single garment color while retaining its tailoring and the model’s pose.
Edit prompt
Using Image 1, change only the camel wool coat to deep burgundy wool. Keep the coat's cut, lapels, belt, hem length and wool texture, along with the model's face, pose, trousers, boots, background and lighting unchanged.
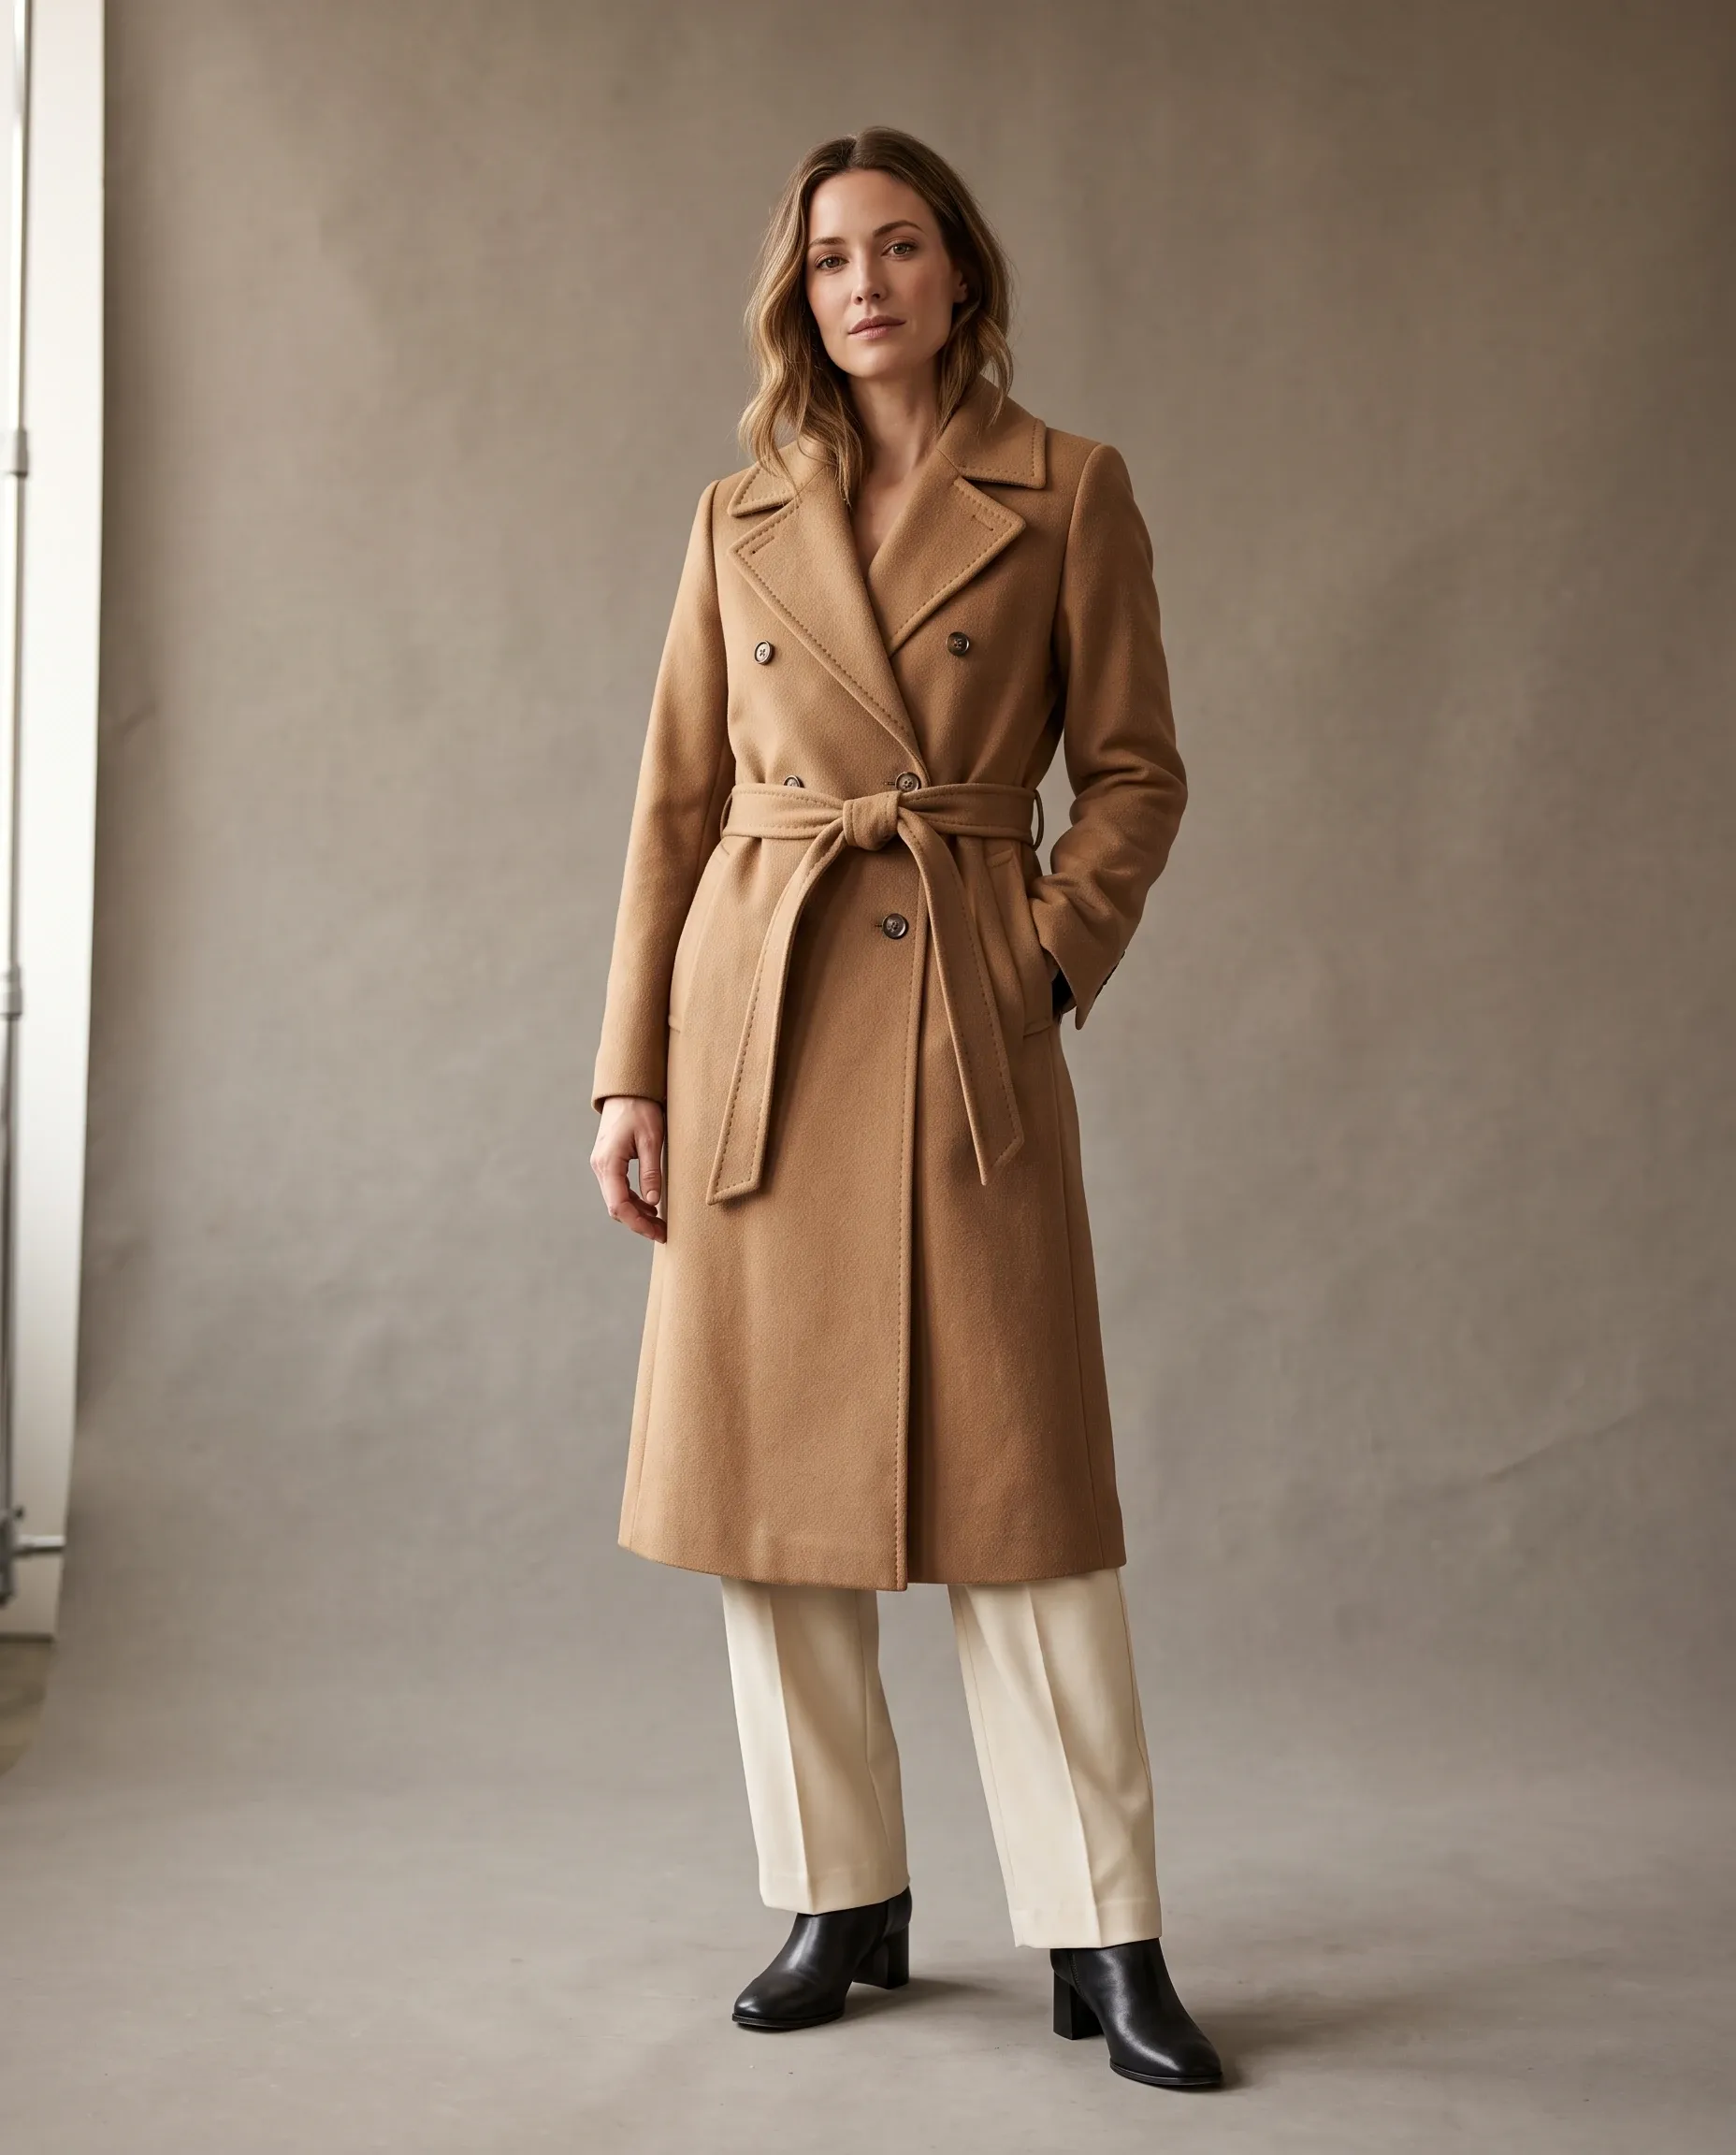
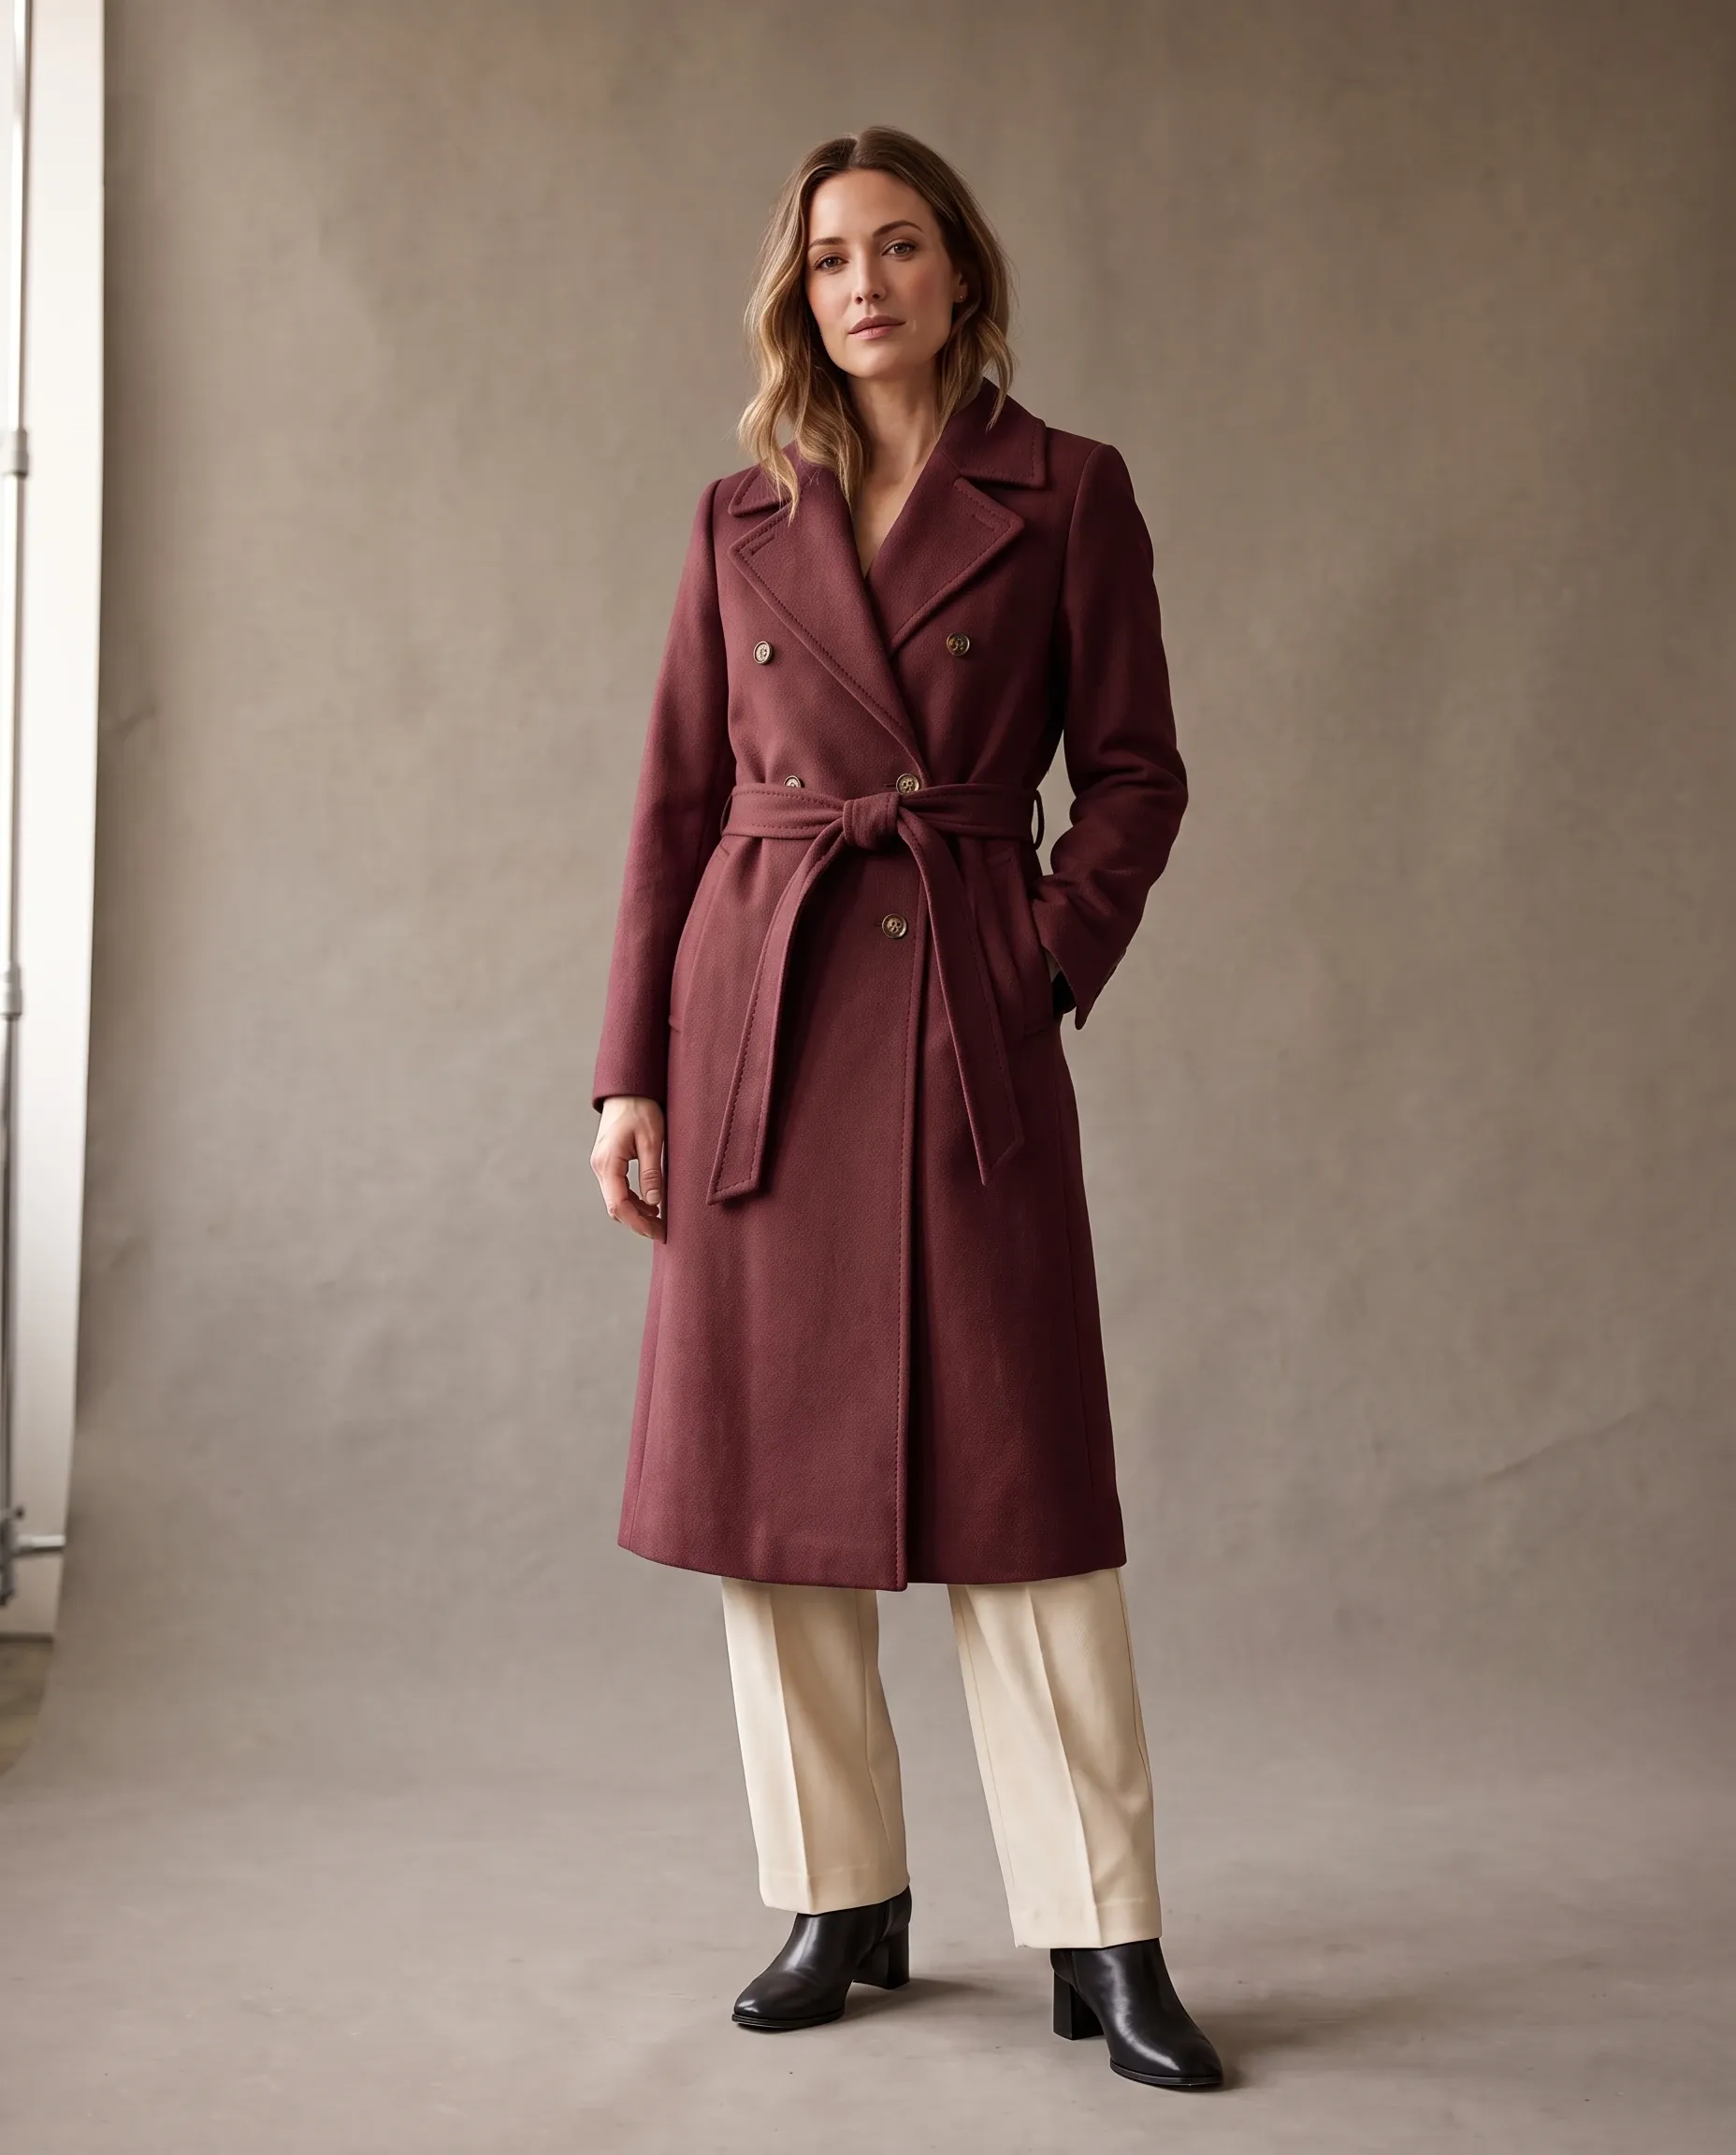
Image 1 · Generated starting image Generated with Nano Banana 2.1. Edited result Fashion: Coat Colourway.
Result and review: Inspect the lapels, belt and hem, then compare the face, hands and boots with the source.
8. Common Failures and Fixes
The wrong surface changes. Locate the target more precisely: “the cabinet fronts along the back wall” or “the wall immediately beside the entrance.”
Windows or building edges shift. Return to the source. Reduce the change and name the affected geometry in the preservation sentence.
A material looks flat or oversized. Specify finish, grain or joint spacing using a clear reference where available.
The reference replaces too much of the scene. Assign each image a role and name the one object or surface to transfer.
The result is difficult to compare. Use the same source view and framing for each option.
Signage is misspelled or poorly arranged. Use short quoted text, specify its location and alignment, then inspect the full-size output.
9. Reusable Architecture Prompt Patterns
Use these patterns to write a project-specific prompt. The illustrated examples above demonstrate surface changes, reference details and atmosphere studies.
Material Change
Identify the surface, then describe the replacement material, color, finish and visible detail. Name the geometry, openings, adjacent finishes, camera view and lighting that should remain consistent.
Reference-Based Detail Transfer
Label the project and reference images. Identify the detail to transfer, mark its destination and describe how it should fit the existing design. Specify the surrounding features to preserve.
Atmosphere Study
Specify the time of day or weather and the visible lighting or surface condition. Preserve the building geometry, materials, landscape layout and camera view.
Sketch to Architectural Visualization
Use the sketch as the geometry reference. Describe the facade materials, landscape and lighting, while preserving the massing, rooflines, openings, proportions and perspective.
10. Generate a Starting Image When Needed
For a new starting image, describe the subject, setting, lighting, camera angle and lens. Include the style and composition needed for the design study.
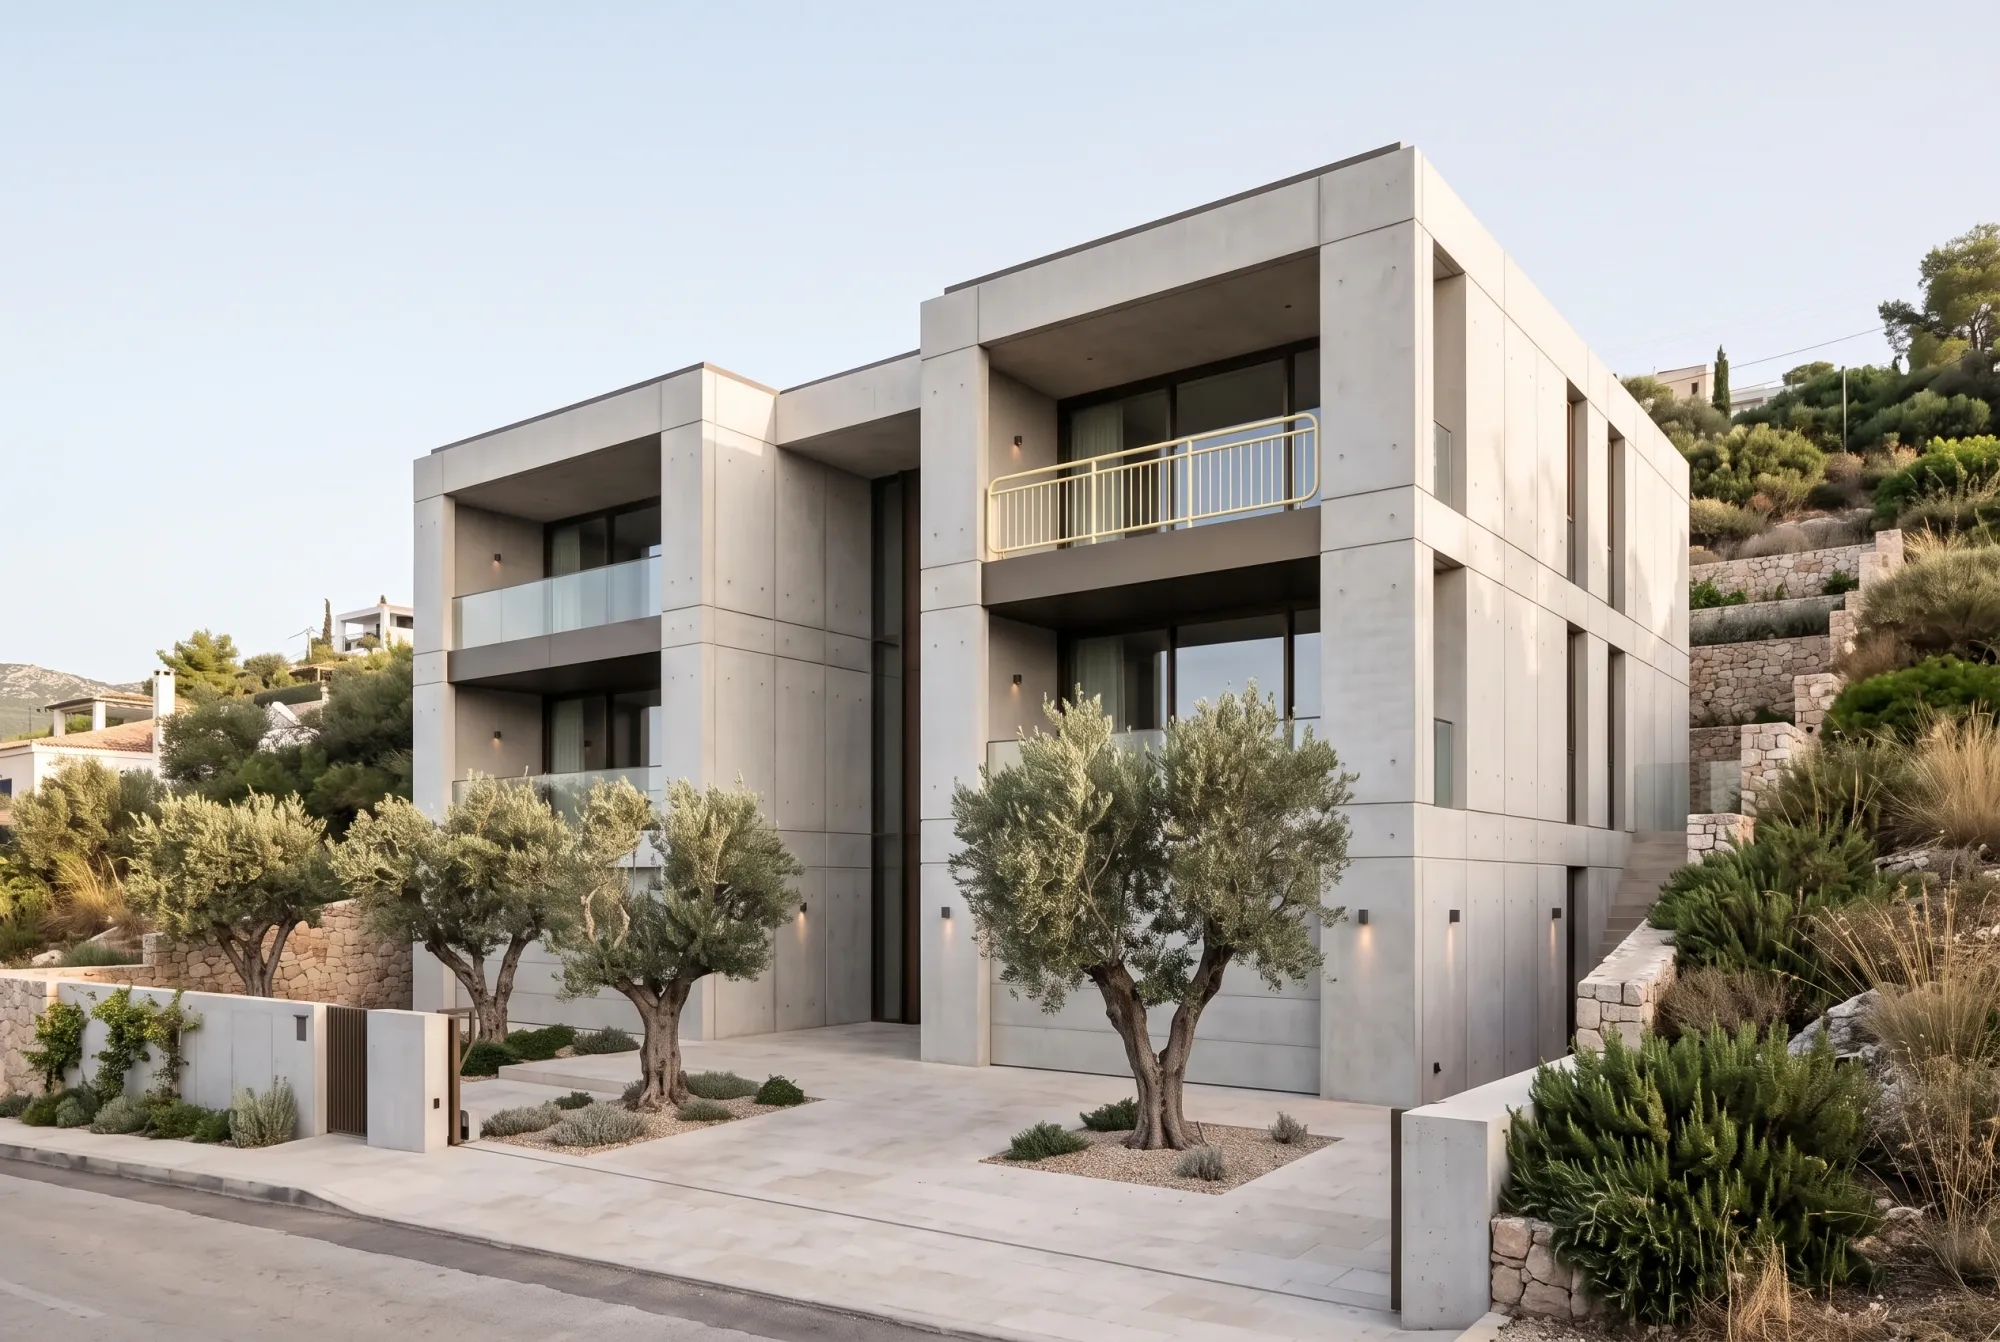
For architecture, add the visible form, material hierarchy and site relationship. The following prompts produced two of the source images used above. The output controls were set to 3:2 at 2K.
Residential Exterior Generation Prompt
Architectural photograph of a three-storey courtyard residence on a compact Mediterranean hillside site. Two offset rectangular volumes frame a tall recessed entrance, with pale grey precast concrete panels, deep shaded balconies, slim bronze window frames and a flat roof. A broad paved forecourt has low gravel planting beds and three mature olive trees. View from the street at eye level, showing the front and right elevation, soft morning light, 35mm lens, vertical lines parallel. Detailed contemporary residential architecture, restrained materials, realistic construction joints.
Interior Generation Prompt
Interior design photograph of an apartment kitchen and dining space in a converted textile mill. Tall steel-framed windows occupy the left wall, with exposed buff brick piers and a high ceiling. A curved cream stone kitchen island stands in the foreground. Flat-front pale oak cabinets line the back wall. A slim black linear pendant hangs centrally above the island. A round oak dining table and four bentwood chairs sit beside the windows. Honed travertine flooring, warm white walls, soft natural morning light, eye-level corner view with a 28mm lens, believable proportions and clear material detail.
For an existing project, use its photograph or render as the source whenever the goal is to retain its design. A generated starting image provides a concept to develop; it does not establish verified project geometry.
11. FAQ
How long should an edit prompt be?
Use enough detail to identify the target and describe its replacement. Several edits fit into two or three sentences: the change, its visual details and a short preservation instruction.
Should every edit preserve everything?
Specify the features that matter. For a cabinet finish study, preserve the room layout and other surfaces. For a lighting study, preserve geometry and materials while allowing the lighting to change.
Can a reference image control a material or fixture?
A cropped reference supplies a visible target. State its role, identify where it applies and compare the result with both the reference and the original project. The ceramic, steel cabinet and upholstery examples demonstrate this approach.
Will the building remain exactly the same?
Preservation instructions express the intended continuity. Check the output against the source, particularly openings, rooflines, railings, edges and repeated details. Use project drawings and the original model to verify dimensions.
Should the next edit start from the original or the edited result?
Use the original for an independent option. Use the accepted result when the next edit should include the changes already made.
Does a higher resolution fix a weak edit?
Review the design change first. Higher resolution provides more pixels to inspect, but it does not establish accurate geometry or make an ambiguous instruction precise.
Create Your Next Design Option on RunDiffusion
Upload your facade, courtyard or interior view to RunDiffusion and test the next design decision. Choose a prompt from this guide, adapt it to your project, and compare a new material, planting scheme or finish. Review the result against your original before continuing with the next edit.
Related reading: The Complete Nano Banana Pro Prompt Guide.
