


Automatic1111 and ComfyUI are more than visual interfaces. When you enable API Mode on RunDiffusion, your code can communicate directly with the running application to submit generations, inspect available resources, monitor work, and retrieve outputs.
This guide is the technical reference for using the Automatic1111 and ComfyUI APIs on RunDiffusion. It covers the core endpoints, request patterns, Python examples, session behavior, and the differences between the two APIs.
You can use these APIs to:
- automate repeatable generation tasks
- process batches of prompts
- connect image generation to an existing application
- build a custom interface
- test workflow and parameter variations
- incorporate generation into a larger creative pipeline
Each API belongs to an active RunDiffusion session. The API URL only works while that server is running.
Use the API with an AI agent
An AI agent with permission to call external APIs can work with a running ComfyUI or Automatic1111 session. It may be able to inspect runtime capabilities, prepare workflow JSON, submit approved tests, monitor execution, and retrieve results.
The complete connection process, screenshots, security guidance, and example prompts are covered in Connect ComfyUI to AI Agents with RunDiffusion. Use that tutorial when your goal is agent-assisted workflow building rather than direct API development. For other applications follow the guide below.
Before you begin
You will need:
- A RunDiffusion account. Sign up
https://www.rundiffusion.com/
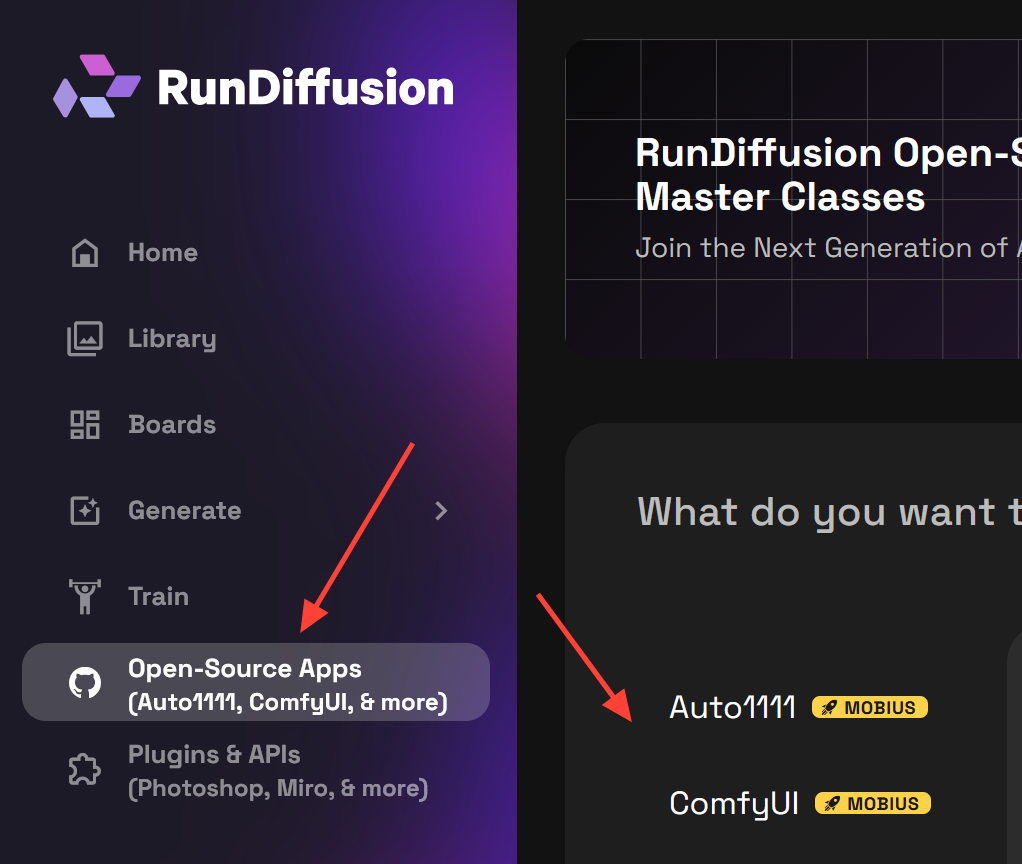
- An active Automatic1111 or ComfyUI session. Click on Open
- Before Launching the session. On the Setup Session screen. Make sure you scroll down and toggle Turn on API Mode.

- The API URL for the running session will appear in the top right. Use that with your application or agent.
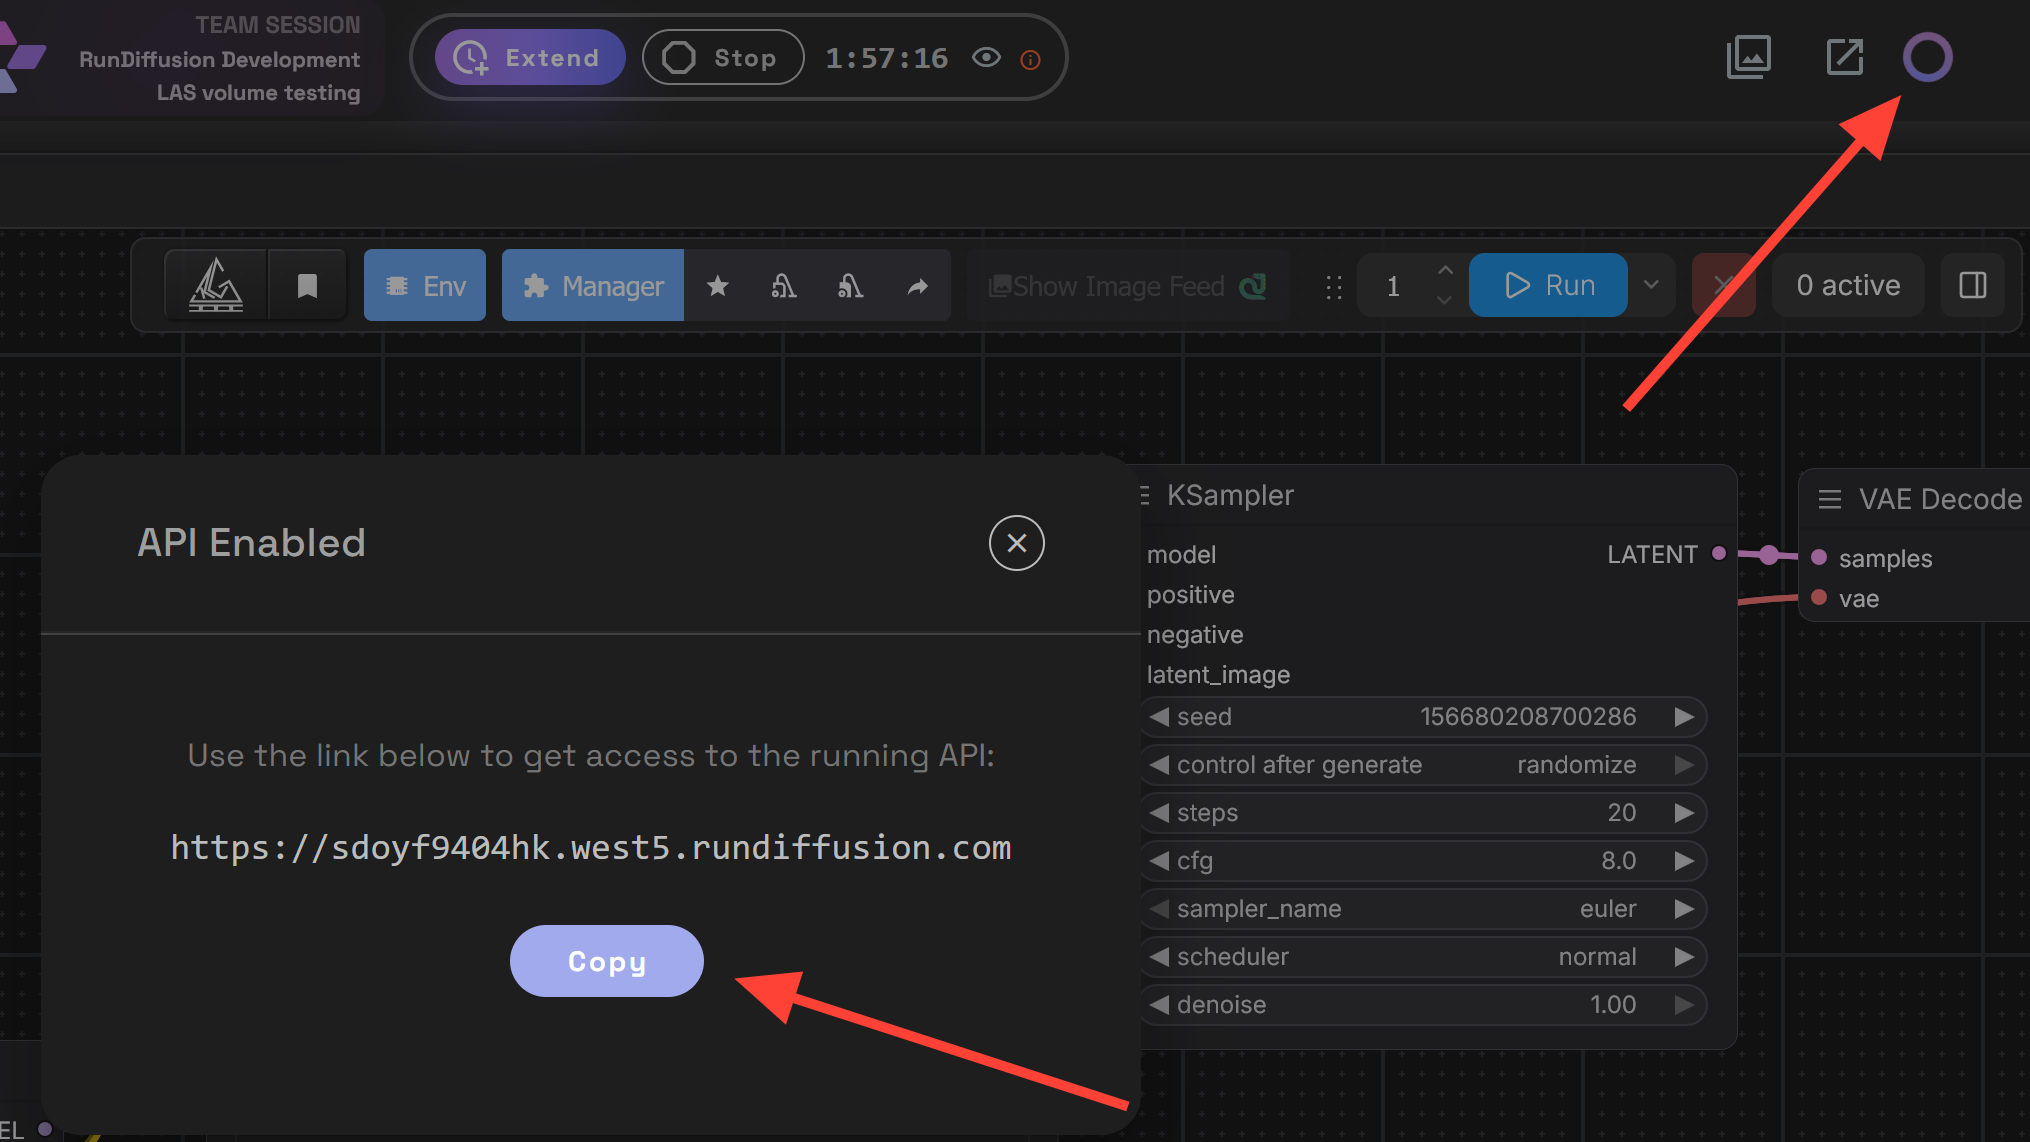
The URL changes each time you boot the server. Treat it as temporary access to a live GPU-backed application, and do not place it in a public repository, screenshot, or shared document. As agents and applications are 3rd party we are not able to offer additional support for them.
Automatic1111 REST API
Automatic1111 provides fixed REST endpoints for operations such as text-to-image, image-to-image, model discovery, sampler discovery, progress monitoring, and application settings.
Use Automatic1111 when your automation fits a conventional request-and-response pattern: send generation parameters as JSON and receive generated images in the response.
Important Automatic1111 endpoints
| Endpoint | Method | Purpose |
|---|---|---|
/sdapi/v1/txt2img |
POST | Generate images from text |
/sdapi/v1/img2img |
POST | Generate or edit images using an input image |
/sdapi/v1/progress |
GET | Read current generation progress |
/sdapi/v1/samplers |
GET | List available samplers |
/sdapi/v1/sd-models |
GET | List available checkpoints |
/sdapi/v1/options |
GET or POST | Read or change application options |
/docs |
GET | Open the interactive API reference |
The exact endpoints and fields available can vary with the installed Automatic1111 build and extensions.
Authentication for Automatic1111
For supported Automatic1111 builds created after June 28, 2024, RunDiffusion documents the following API authentication:
Username: rduser
Password: rdpass
The Python examples below use HTTP Basic authentication. Keep access information in environment variables or another secure credential store when building a longer-lived integration.
Generate an image with txt2img
This example submits a text-to-image request and saves every image returned by Automatic1111:
import base64
from pathlib import Path

import requests

SESSION_URL = "https://your-session-url"
AUTH = ("rduser", "rdpass")

payload = {
    "prompt": "A cinematic photograph of a greenhouse on Mars",
    "negative_prompt": "blurry, distorted, low quality",
    "steps": 25,
    "width": 768,
    "height": 768,
    "cfg_scale": 7,
    "sampler_name": "DPM++ 2M"
}

response = requests.post(
    f"{SESSION_URL.rstrip('/')}/sdapi/v1/txt2img",
    auth=AUTH,
    json=payload,
    timeout=600
)
response.raise_for_status()

result = response.json()

for index, encoded_image in enumerate(result["images"]):
    image_data = encoded_image.split(",", 1)[-1]
    output_path = Path(f"automatic1111-output-{index}.png")
    output_path.write_bytes(base64.b64decode(image_data))
    print(f"Saved {output_path}")
Automatic1111 returns images as base64-encoded data inside the JSON response. Your integration must decode that data before saving or displaying the image.
Discover the checkpoints in your session
Do not assume that every session contains the same models. Query the running server before submitting a batch:
import requests

SESSION_URL = "https://your-session-url"
AUTH = ("rduser", "rdpass")

response = requests.get(
    f"{SESSION_URL.rstrip('/')}/sdapi/v1/sd-models",
    auth=AUTH,
    timeout=60
)
response.raise_for_status()

for model in response.json():
    print(model.get("title"))
You can follow the same pattern with /sdapi/v1/samplers to discover the samplers available in the current build.
Use the interactive Automatic1111 reference
Open the following address while your session is running:
https://your-session-url/docs
This opens the Swagger reference generated by the running application. Because it reflects the active build, it is the best place to inspect the complete request schema for your session.
For additional upstream details, refer to the Automatic1111 API documentation.
ComfyUI node-graph API
ComfyUI uses a workflow-oriented API. Instead of sending only a prompt and a short list of generation settings, you submit an executable node graph in API-format JSON.
This approach is well suited to processes that include multiple models, LoRAs, ControlNet, image inputs, upscaling, video, custom nodes, or several processing stages.
How a ComfyUI API request works
A typical request follows this sequence:
- Build and test a workflow in ComfyUI.
- Export the workflow in API format.
- Send the graph to
/prompt. - Receive a
prompt_id. - Monitor the request through
/historyor/ws. - Retrieve generated files through
/view.
The nodes and models referenced by the workflow must be available in the active session.
Important ComfyUI endpoints
| Endpoint | Method | Purpose |
|---|---|---|
/prompt |
POST | Validate and queue a workflow |
/history/{prompt_id} |
GET | Retrieve the result of one queued workflow |
/view |
GET | Download an output file |
/ws |
WebSocket | Receive live execution events |
/object_info |
GET | Discover available nodes and their schemas |
/queue |
GET | Inspect the current execution queue |
/interrupt |
POST | Stop the current execution |
/upload/image |
POST | Upload an input image |
For the complete upstream route reference, see the ComfyUI server API documentation.
Export a workflow for API use
Create and test the workflow in ComfyUI first, then save or export it using the API-format option. The API-format file is different from the normal editable workflow file. It represents executable nodes through node IDs, class_type values, and inputs.
Save the exported graph as workflow_api.json for the examples below.
Queue a ComfyUI workflow
import json
import uuid
from pathlib import Path

import requests

SESSION_URL = "https://your-session-url"
CLIENT_ID = str(uuid.uuid4())

workflow = json.loads(
    Path("workflow_api.json").read_text(encoding="utf-8")
)

payload = {
    "prompt": workflow,
    "client_id": CLIENT_ID
}

response = requests.post(
    f"{SESSION_URL.rstrip('/')}/prompt",
    json=payload,
    timeout=60
)
response.raise_for_status()

result = response.json()
prompt_id = result["prompt_id"]

print(f"Queued workflow: {prompt_id}")
A successful response means the workflow entered the queue. It does not mean execution has finished. If validation fails, ComfyUI can return information about invalid inputs, missing nodes, and other node-specific errors.
Poll for completion
import time

import requests

SESSION_URL = "https://your-session-url"
prompt_id = "replace-with-your-prompt-id"

while True:
    response = requests.get(
        f"{SESSION_URL.rstrip('/')}/history/{prompt_id}",
        timeout=60
    )
    response.raise_for_status()

    history = response.json()

    if prompt_id in history:
        completed_job = history[prompt_id]
        break

    time.sleep(2)

print("Workflow completed")
For larger integrations, consider the /ws WebSocket endpoint instead of frequent polling. WebSocket events can report execution start, cached nodes, progress, completed nodes, and errors.
Download ComfyUI output images
The history response includes output filenames and their storage locations:
from pathlib import Path

import requests

SESSION_URL = "https://your-session-url"

for node_output in completed_job.get("outputs", {}).values():
    for image in node_output.get("images", []):
        params = {
            "filename": image["filename"],
            "subfolder": image.get("subfolder", ""),
            "type": image.get("type", "output")
        }

        response = requests.get(
            f"{SESSION_URL.rstrip('/')}/view",
            params=params,
            timeout=120
        )
        response.raise_for_status()

        output_path = Path(image["filename"]).name
        Path(output_path).write_bytes(response.content)
        print(f"Saved {output_path}")
A workflow can produce output from multiple nodes. Inspect every entry in the outputs object rather than assuming only one image will be returned.
Discover the nodes available in a session
ComfyUI installations can contain different core versions and custom nodes. Use /object_info to inspect the current runtime:
import requests

SESSION_URL = "https://your-session-url"

response = requests.get(
    f"{SESSION_URL.rstrip('/')}/object_info",
    timeout=120
)
response.raise_for_status()

nodes = response.json()

print(f"Available node types: {len(nodes)}")

for node_name in sorted(nodes)[:20]:
    print(node_name)
Runtime discovery is especially useful when your code needs to work with more than one ComfyUI configuration.
Automatic1111 or ComfyUI: which API should you use?
Use Automatic1111 when you want a straightforward REST request built around familiar text-to-image or image-to-image parameters. Use ComfyUI when the generation process is better represented as a graph or contains multiple stages.
| Requirement | Suggested application |
|---|---|
| Simple text-to-image request | Automatic1111 |
| Simple image-to-image request | Automatic1111 |
| Fixed REST request structure | Automatic1111 |
| Complex multi-stage workflow | ComfyUI |
| Custom node graph | ComfyUI |
| Runtime node discovery | ComfyUI |
| Live graph-execution events | ComfyUI |
Neither option is universally better. Choose the application whose execution model most closely matches the pipeline you are building.
Launch RunDiffusion and enable API Mode for your open source application.
Connect external creative applications
API Mode can also connect supported creative tools to an open source application running on RunDiffusion. For Automatic1111 integrations involving Photoshop or Blender, follow API and the Photoshop Plugin.
That dedicated article owns the plugin-specific setup. This guide remains focused on direct HTTP automation and API behavior.
Session, scaling, and security considerations
Sessions are temporary
The API is tied to a running application session. Requests stop working when the session ends, restarts, or receives a new URL. Your integration should handle connection failures and expired sessions gracefully.
Protect API access
Treat the session URL and any authentication details as credentials. Do not expose them in frontend JavaScript, public repositories, screenshots, or shared workflow files. Where practical, send requests through your own secured backend or automation environment.
Persist Extensions
Checkpoints, LoRAs, extensions, samplers, and custom nodes can differ between sessions. Query the runtime before starting a batch, and validate that required resources are present. One way to ensure a session maintains the nodes you want is to turn on Persistent Extensions.

Use the API for the right scale
RunDiffusion describes these application APIs as suited to a single user and single GPU. They are useful for prototyping, experimentation, connecting tools, and personal automation, but are not intended to serve as a horizontally scalable application backend.
Review component licenses
Automatic1111 is distributed under the AGPL-3.0 license, and ComfyUI is distributed under the GPL-3.0 license. Models, extensions, custom nodes, and third-party services can have their own terms. Review the license for every component used in your workflow.
Start your first API workflow
Begin with one tested generation. Confirm that your session URL, authentication, model, nodes, and request format are correct before adding batch processing or autonomous execution.
Once that first request works reliably, add progress tracking, structured error handling, secure credential management, and output organization.
