


A clear prompt is the foundation of a strong image edit, but not every problem needs to be solved inside a single generation. When you need to preserve several successful changes, isolate a difficult detail, or control exactly where an object appears, a few simple image editing techniques can give the model much clearer visual direction.
Affinity Photo, Adobe Photoshop, and Krita can all support this workflow. You do not need advanced retouching skills. Basic layers, masks, cropping, and perspective tools are enough to prepare cleaner inputs and build stronger base images for your next generation on RunDiffusion.
These techniques are especially useful with Nano Banana Pro and other image edit models when a scene becomes too complex for one prompt.
What Is an AI Image Edit Model?
An AI image edit model creates a new image from an existing image and a written instruction. Unlike a standard image generation model that starts from a prompt alone, an edit model uses your uploaded image as part of the instruction. It can change selected objects, materials, colors, text, lighting, landscaping, or design details while preserving the parts of the original image that should remain unchanged.
You can also upload reference images to show the model an object, material, texture, color palette, design feature, or visual direction you want applied to the primary image. The quality of the result depends on how clearly you identify the primary image, explain each reference image's role, describe the requested change, and protect everything that should remain unchanged.
Examples of AI image edit models and model families include Nano Banana Pro, Nano Banana 2, Nano Banana 2 Lite, ChatGPT Image 2.0, Seedream, and Qwen Image Edit. Their strengths, supported inputs, and editing behavior vary, but the preparation techniques in this article apply broadly: start with a clear primary image, give each reference one role, state the requested change, and protect what should remain unchanged.
Why External Image Editing Helps
An edit model must interpret the primary image, reference images, annotations, and prompt at the same time. A busy reference may contain the right material but also show unrelated furniture, architecture, landscaping, lighting, and people. A generated result may contain one excellent change while altering another part of the scene that was already correct.
External image editing gives you more control over what the model sees and what you carry forward.
On RunDiffusion, each generation begins as a fresh call. The model does not retain a conversation or remember the previous edit. For every new generation, upload the strongest current image as Image 1 and restate the required changes, reference roles, and preservation instructions.
The goal is not to replace prompting. It is to prepare a clearer visual brief for the next prompt.
1. Build More Complex Edits Through Layering
Layering allows you to keep only the successful part of a generation.
Open the current base image and the newly generated image in Affinity Photo, Adobe Photoshop, or Krita. Place the generated image on a layer above the original. Make sure both images have the same dimensions and are aligned exactly.
Erase or mask everything on the upper layer except the area that was successfully edited. The original image remains visible underneath, while the improved area from the new generation appears above it.
A basic layering workflow looks like this:
Step 1: Open the current base image.
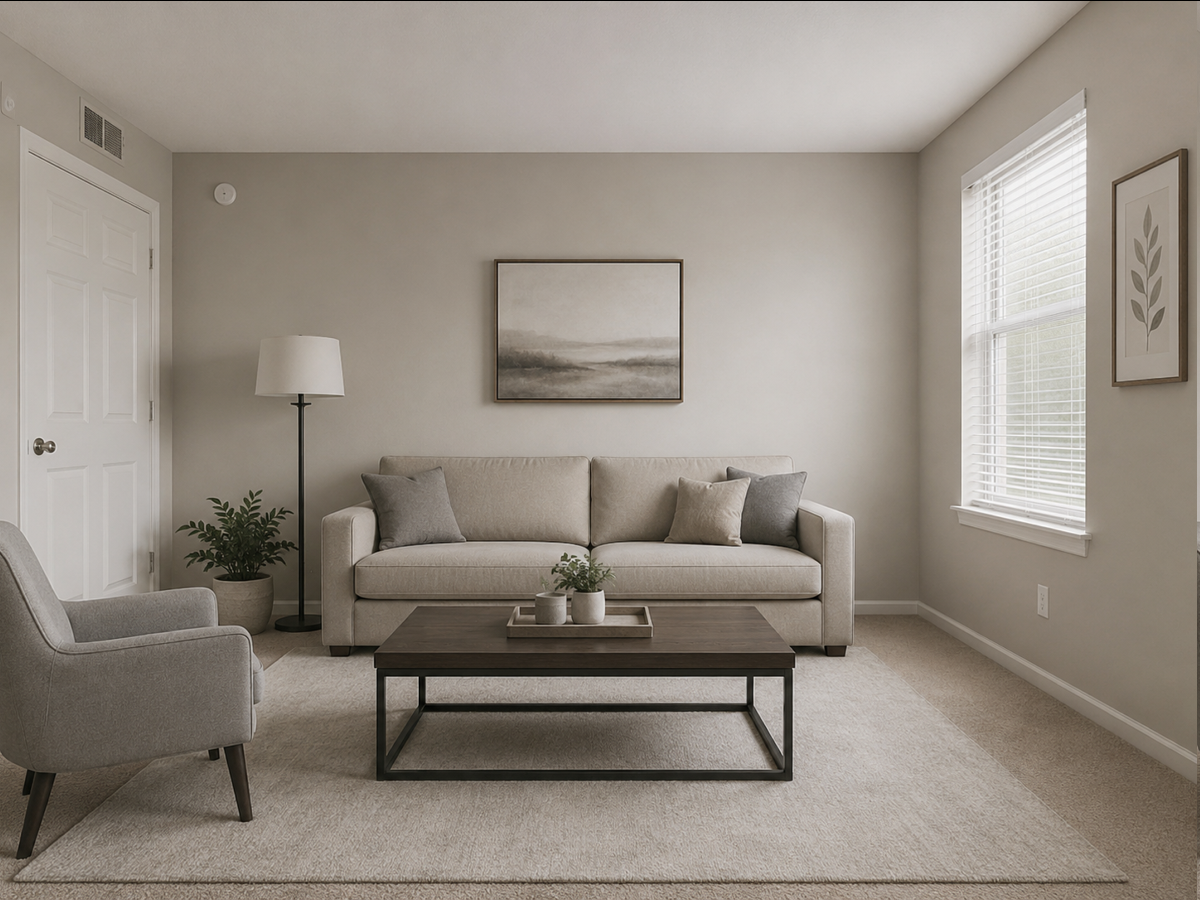
Step 2: Place the new generation on a layer above it. Make sure both images have the same pixel dimensions so they align quickly and accurately.
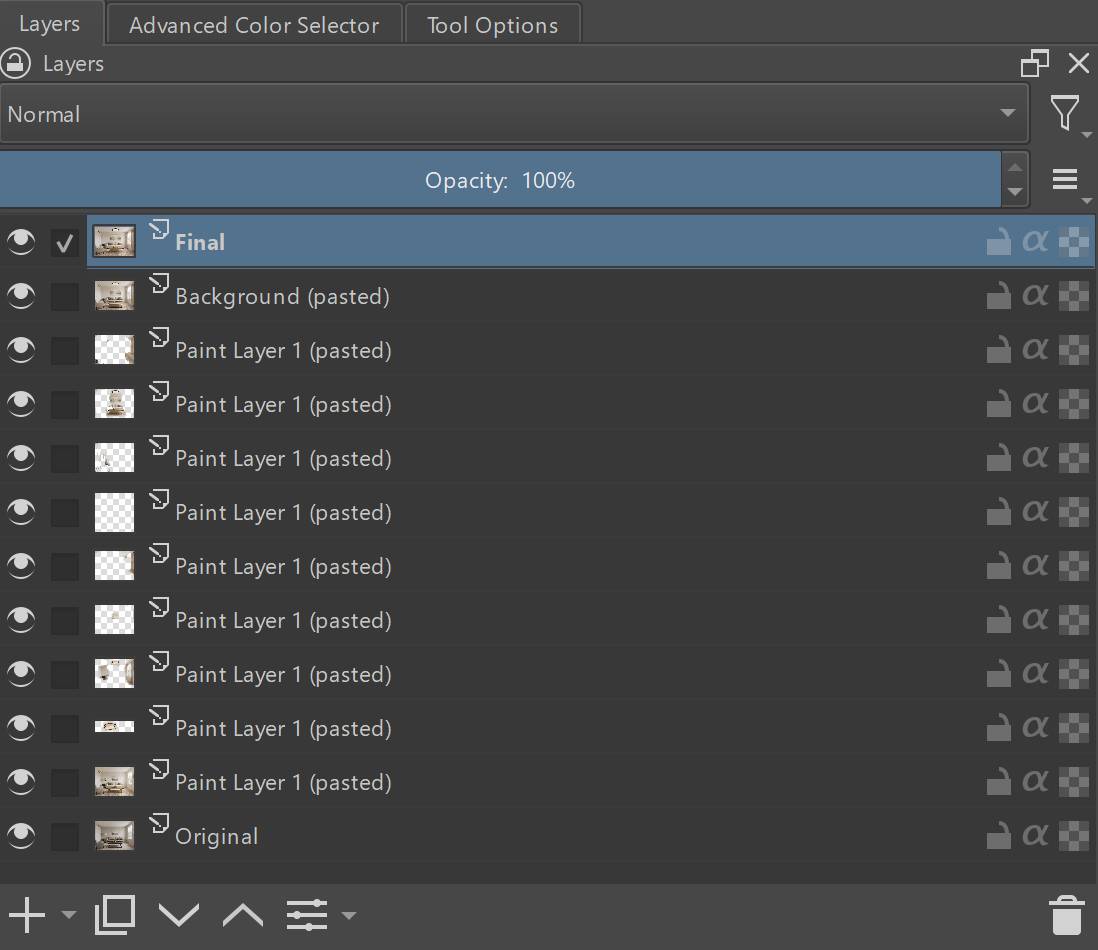
Step 3: Erase or mask the unchanged portions of the upper image, keeping only the successful edits.
Step 4: Export the combined image as a PNG, use it as your new base image, and repeat the process until you are satisfied.
Step 5: Use an image edit model on RunDiffusion for a final pass that blends any visible seams.
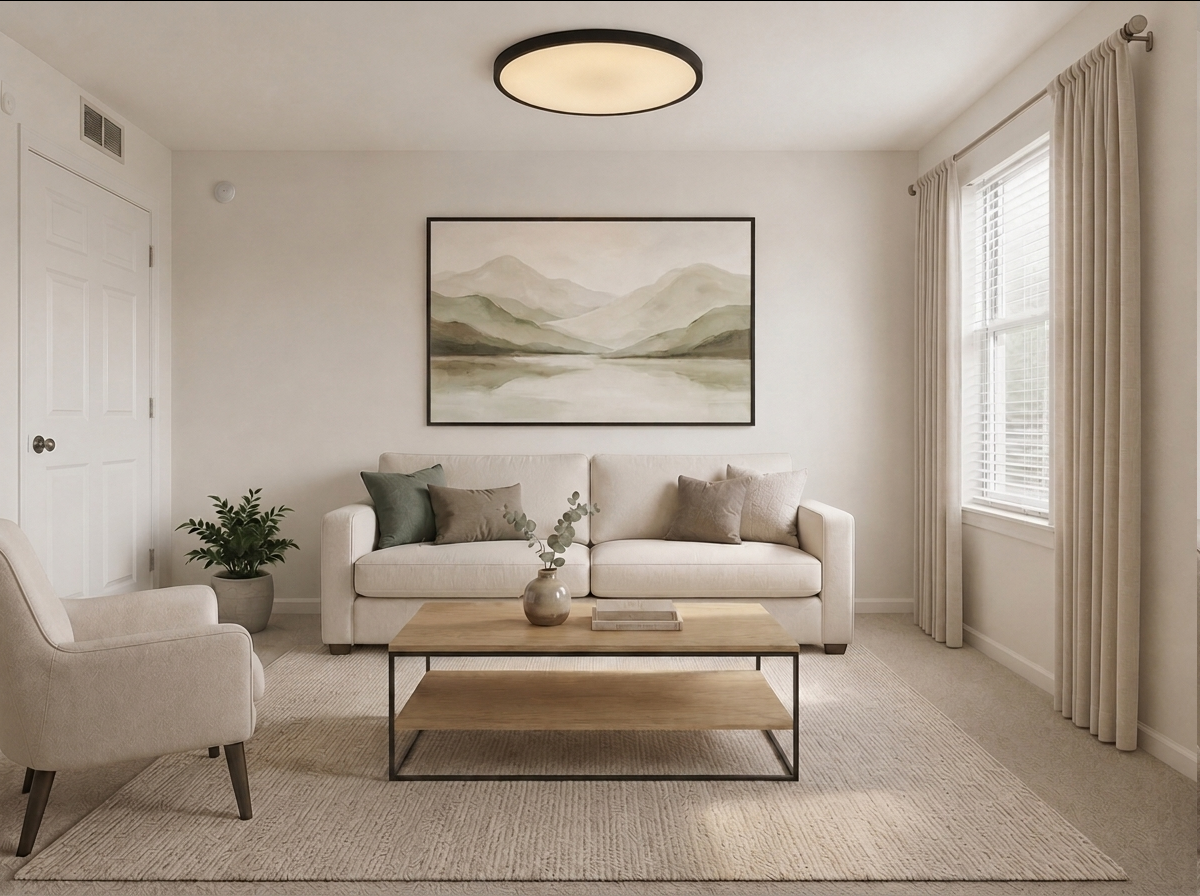
Using a layer mask is usually more flexible than permanently erasing pixels because you can restore areas later. Either method works as long as the final composite is clean.
This technique is useful when a generation successfully changes a facade material but alters the roof, adds the correct furniture but changes the room shell, or improves planting while introducing unwanted changes elsewhere. Instead of generating the entire image again, keep the successful edit and protect everything that was already working.
Over several generations, the exported PNG becomes a progressively stronger base image.
2. Zoom In to Isolate Important Details
Zooming in or cropping an image reduces surrounding visual noise and helps the model focus on the specific information you want it to use.
This technique can be applied to both the primary image and supporting reference images.
Zoom In on the Area You Want to Edit
Small details can be difficult for an edit model to interpret inside a wide scene. A close crop can make it easier to change:
- A sign or text element
- A window, door, or facade feature
- A piece of furniture
- A product component
- A planting area
- A construction detail
- A small object or decorative element
- A localized material transition
Keep enough surrounding context to communicate the target's scale, orientation, and boundaries. A crop that is too tight may remove information the model needs to understand how the detail connects to the rest of the image.
After completing the close edit, layer the successful area back into the complete image. Export the result as a PNG and use it as the next Image 1.
Zoom In on a Reference Image
A cropped reference image can also clarify exactly what the reference should contribute.
If the full reference contains the desired object, material, shape, pattern, color palette, furniture, planting, sign, logo, or architectural feature, crop closely around that element before uploading it. Removing unrelated content helps prevent the model from copying unwanted backgrounds, people, buildings, lighting, or composition.
The crop should isolate the important information without removing the context needed to understand it. For example, a material reference may need to show its texture, joints, pattern scale, color variation, and weathering rather than a tiny patch of color.
Your prompt should still define the role of each image:
Image 1 is the primary image and controls the complete architecture, geometry, camera, composition, and unmarked areas. Image 2 is a close reference for the sculptural bench only. Add that bench to the area marked by the green arrow on Image 1. Use its curved form, proportions, pale stone color, and smooth finish. Do not copy the background, paving, planting, lighting, or camera position from Image 2.
Cropping the reference and defining its role work together. The crop reduces visual noise, while the prompt explains what the remaining information should control.
Example: Use Zoomed Texture and Color References
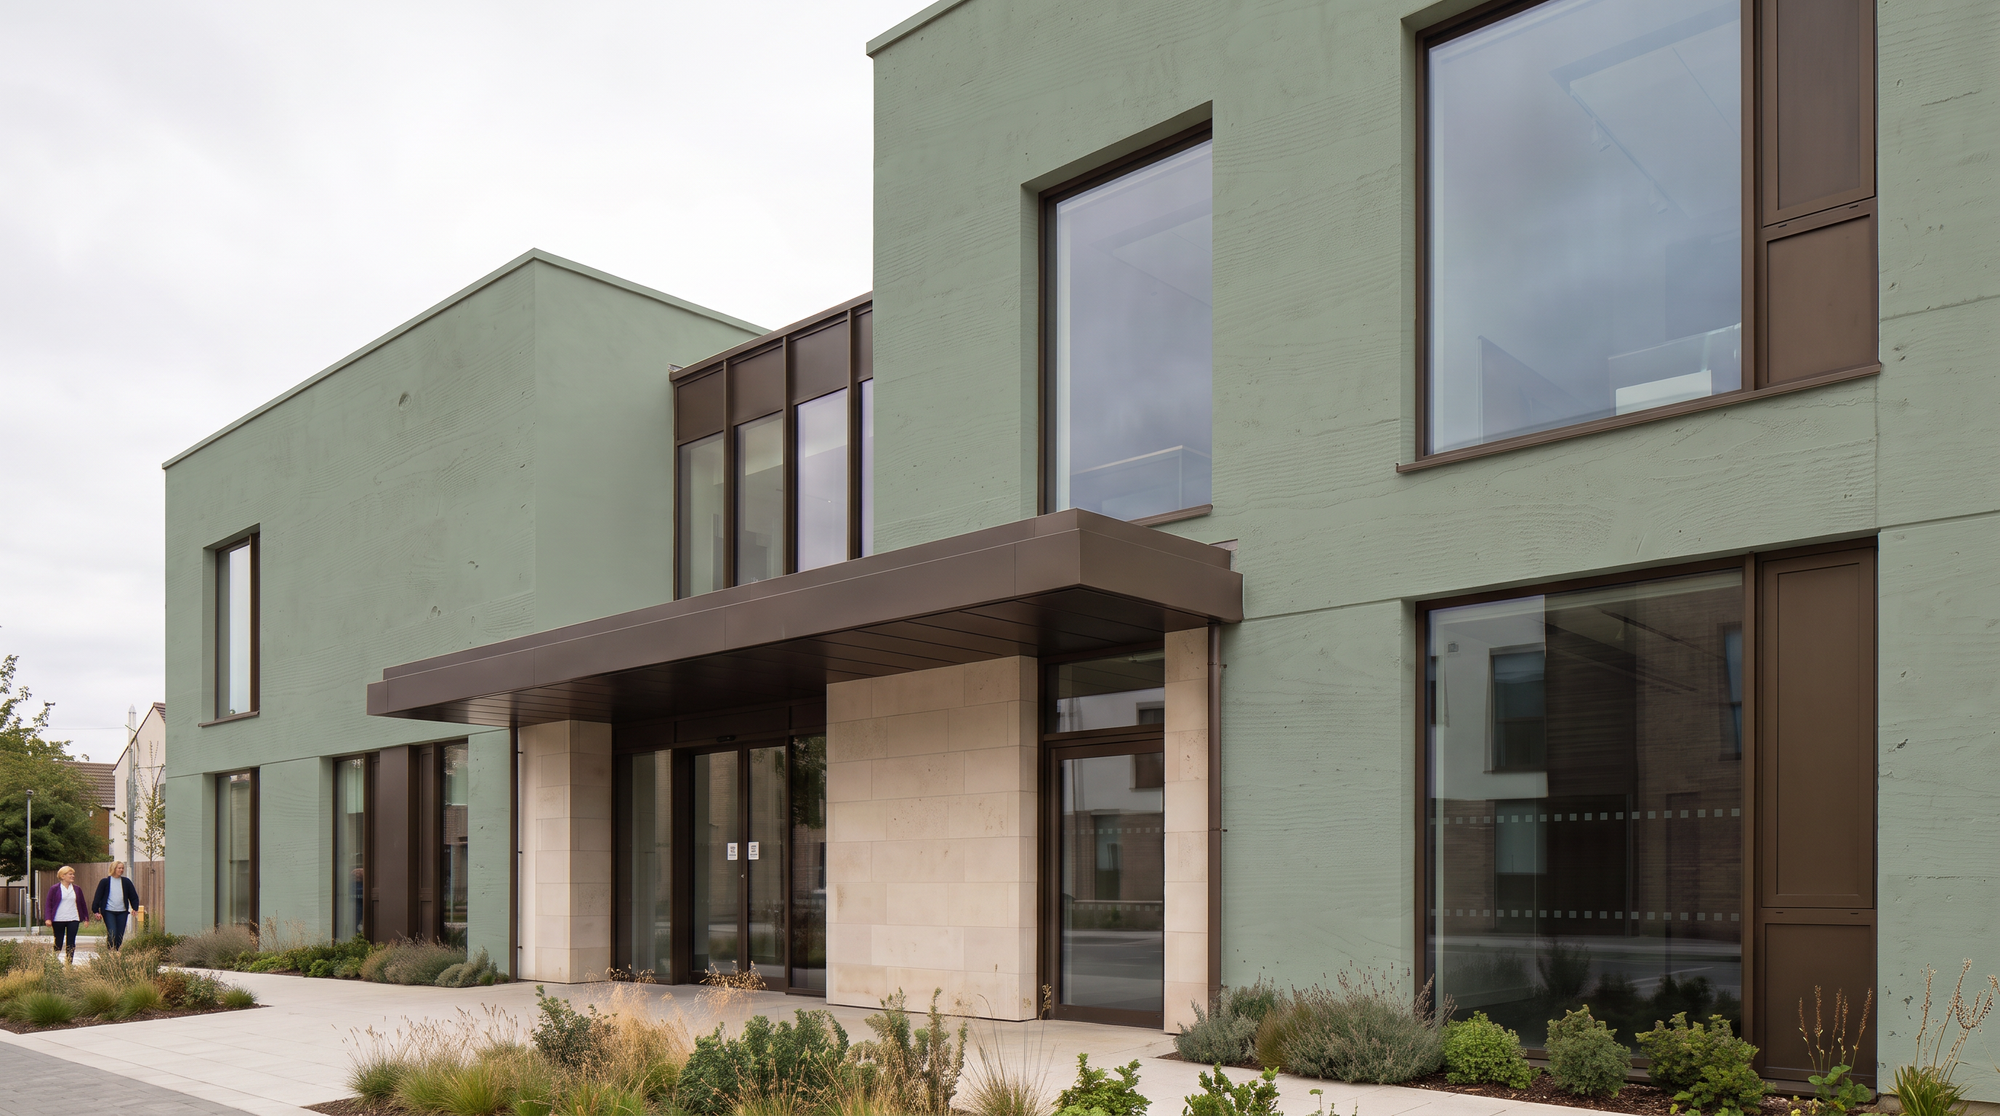
This example follows the RunDiffusion annotation workflow. Every uploaded image has a visible Image number. Purple arrows on Image 1 identify the facade material zones to change. Images 2 and 3 are tightly focused so each reference contributes only one kind of information.
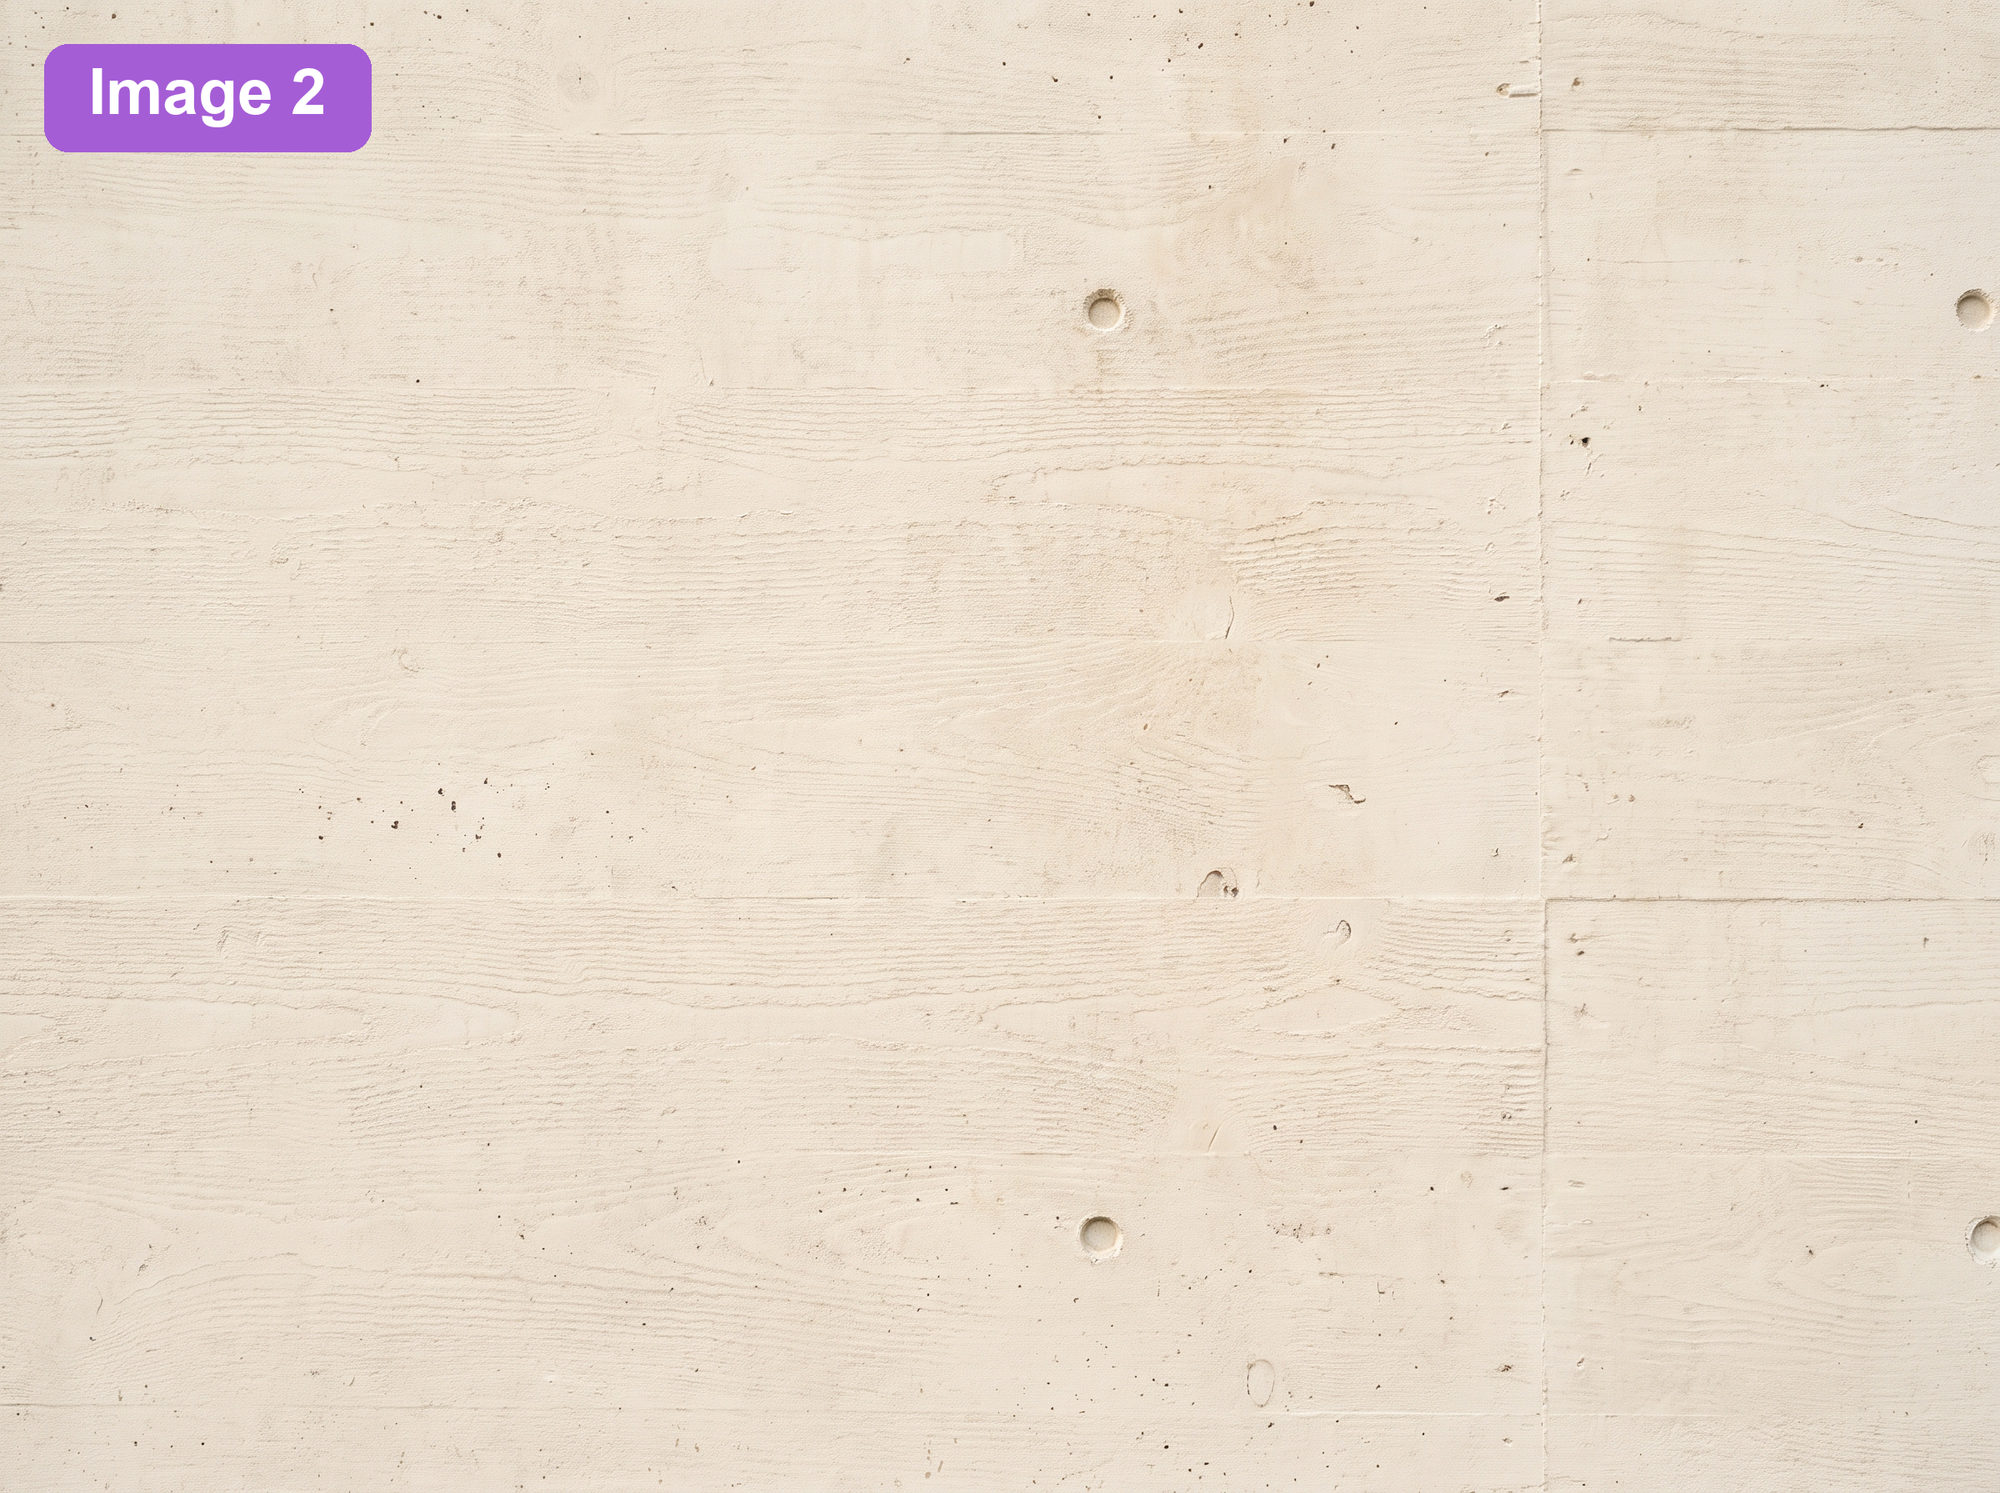
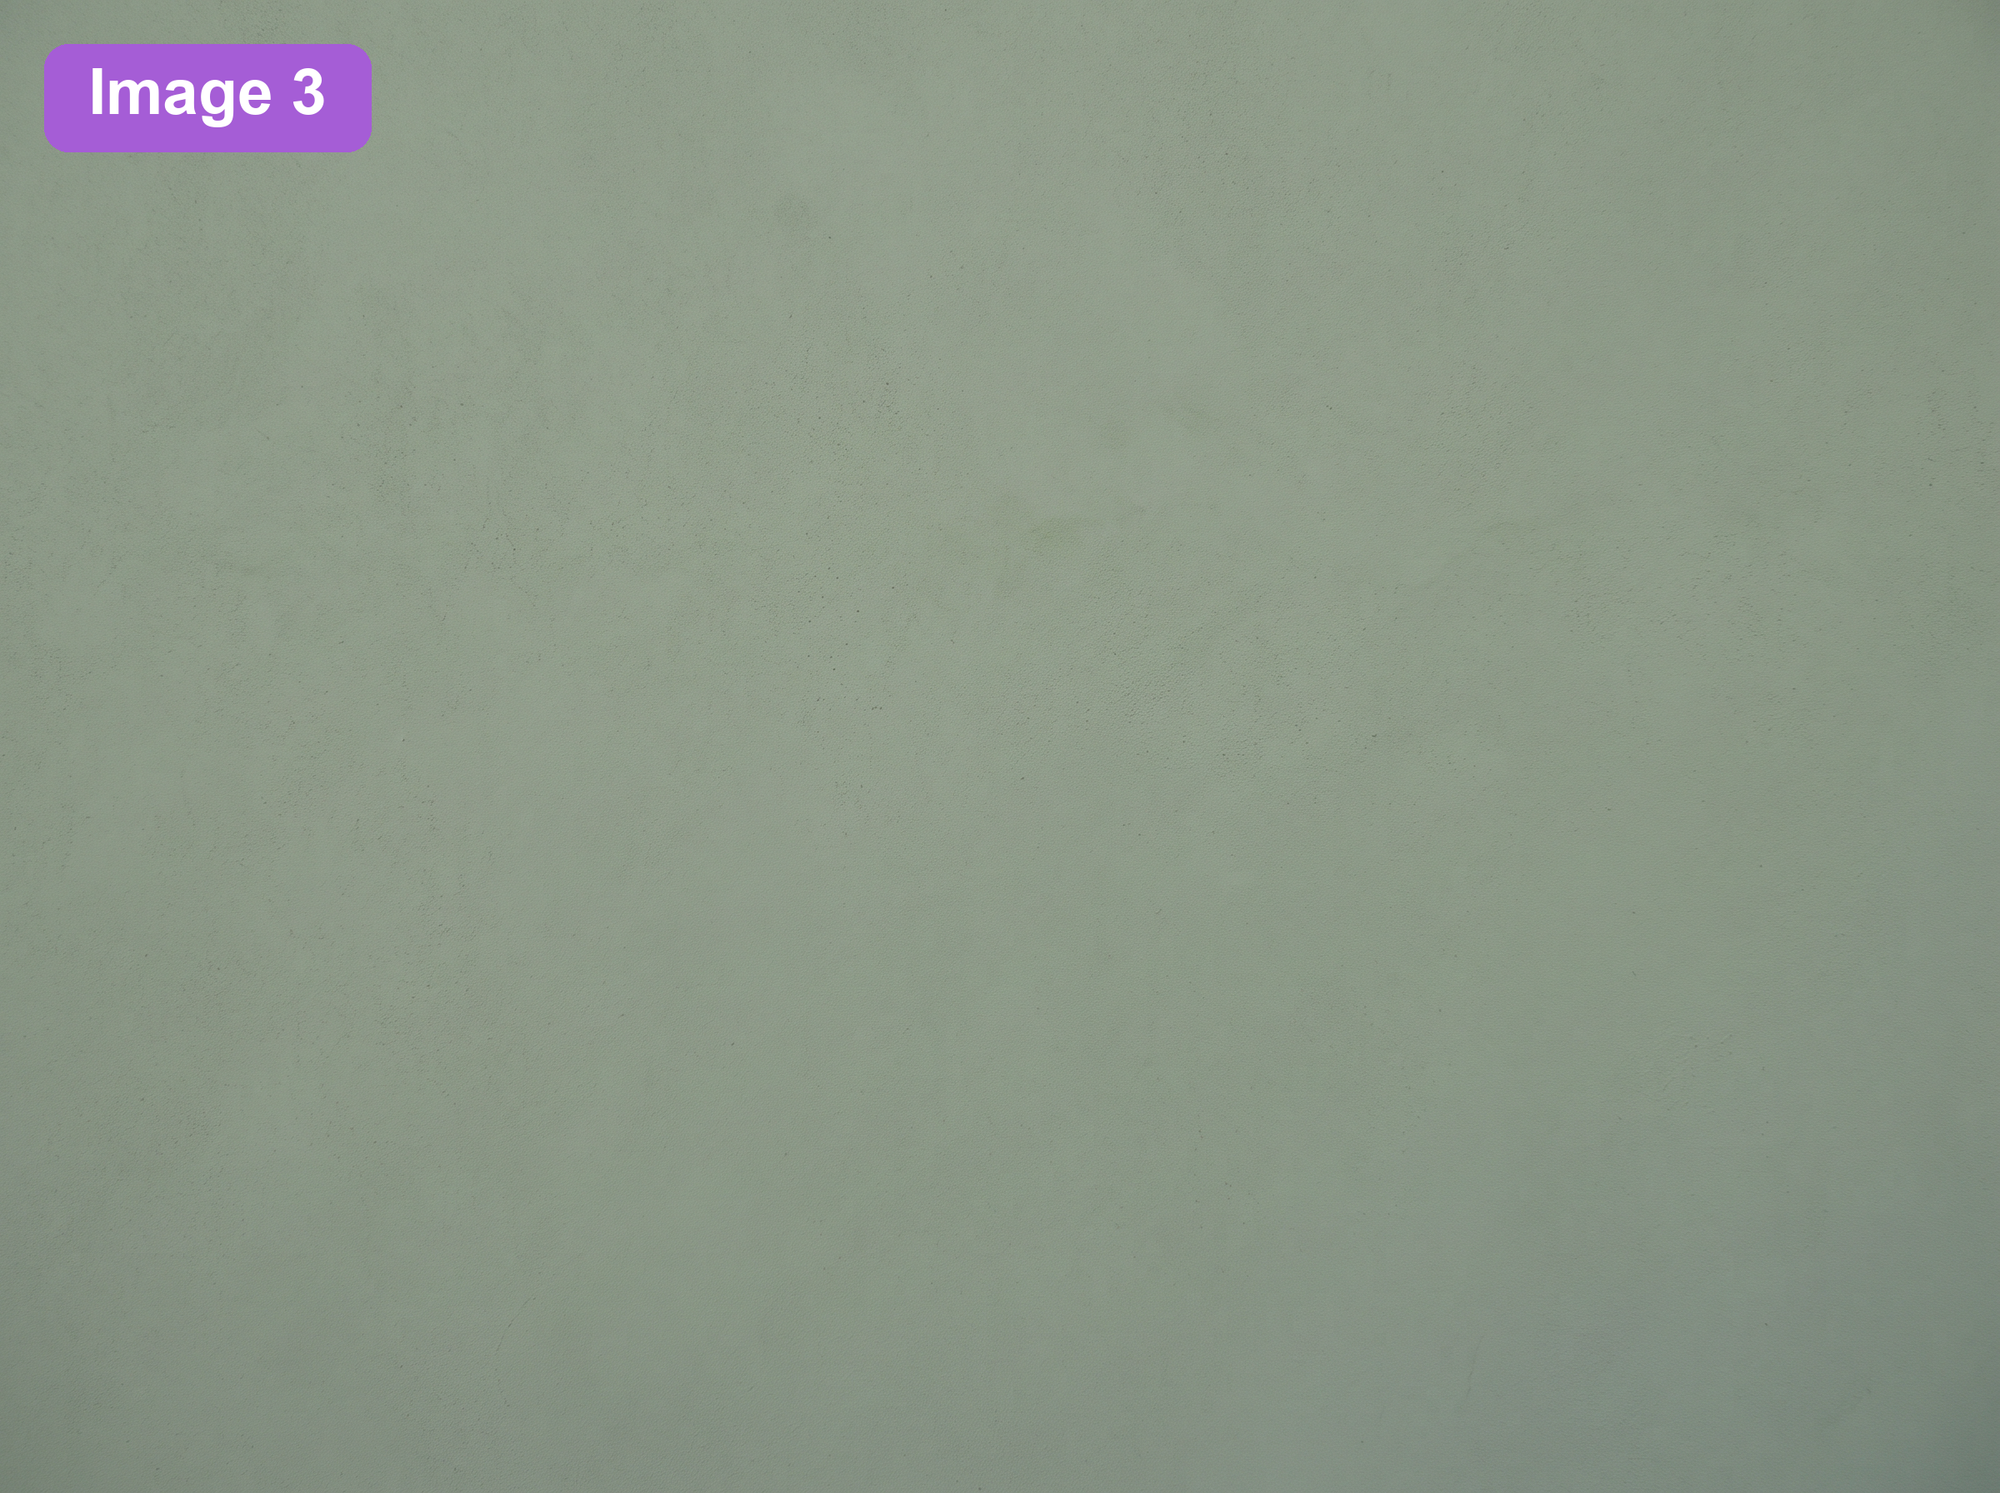
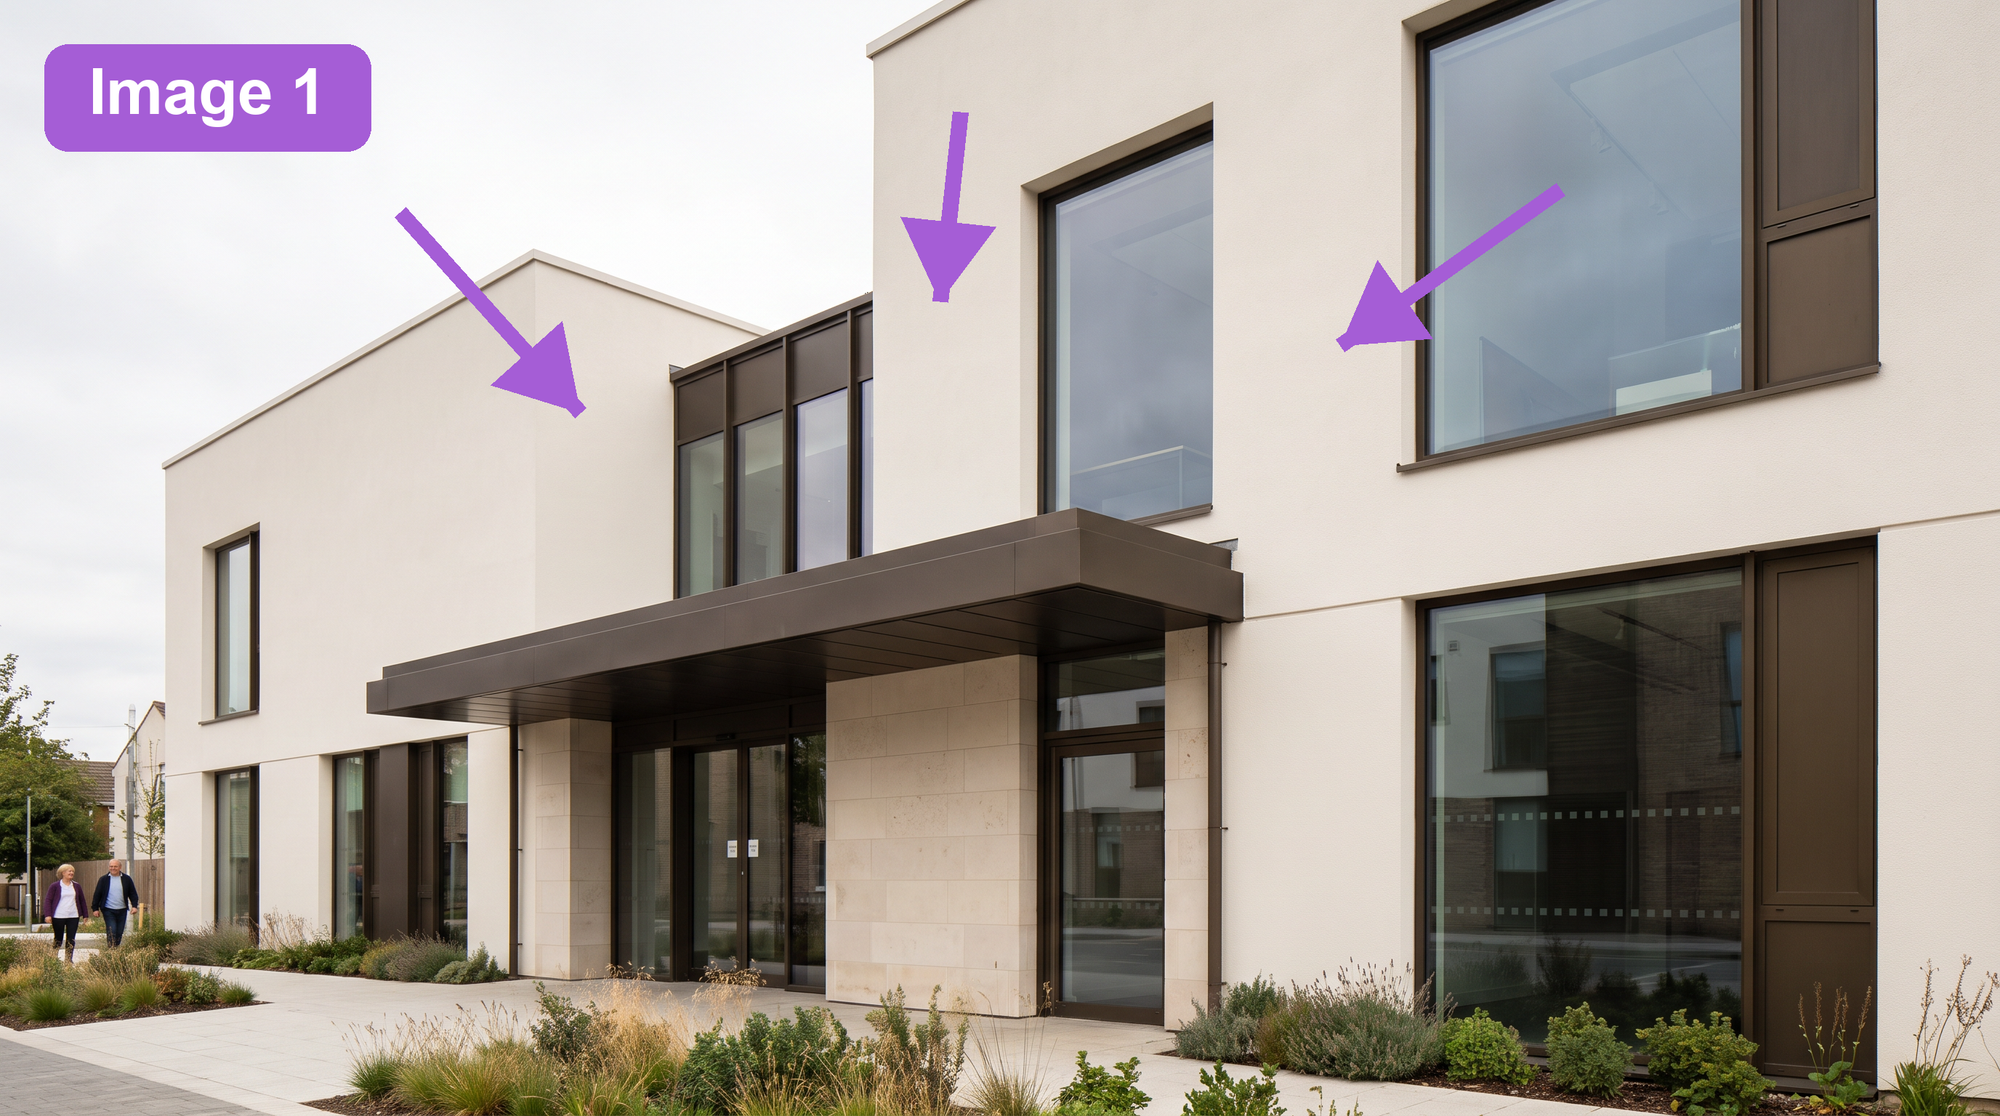
Top: Image 2, the board formed concrete texture, and Image 3, the muted sage green color. Bottom: Image 1, the primary architecture image with arrows marking the edit areas.
Prompt:
Create a photorealistic exterior architectural image of the contemporary two story community arts building shown in Image 1. Image 1 is the primary image and controls the complete building design, geometry, camera view, composition, lighting, landscape, and surrounding site. The purple arrows on Image 1 mark the warm white facade surfaces that should be changed. Use Image 2 only for the board formed concrete texture, including its horizontal grain, formwork impressions, tie holes, construction seams, and subtle surface variation. Use Image 3 only for the muted sage green color. Replace the warm white facade surfaces marked by the purple arrows on Image 1 with muted sage green board formed concrete. Combine the texture from Image 2 with the color from Image 3. Keep the texture correctly scaled to the building and aligned naturally across each facade plane. Preserve the exact building massing, rooflines, openings, entrance, pale limestone entrance surround, dark bronze canopy, window frames, glazing, doors, paving, planting, people, camera position, perspective, crop, lighting, shadows, and reflections from Image 1. Follow the image labels and arrows as instructions. Remove the Image 1, Image 2, and Image 3 labels, the purple arrows, and every other annotation from the final image. Do not copy architecture, composition, or objects from Images 2 or 3. Do not add or remove architectural features, people, objects, signs, text, logos, or watermarks.
The final image follows the arrows on Image 1, combines the texture from Image 2 with the color from Image 3, preserves the protected building and site elements, and removes the Image labels and purple arrows.
3. Use Perspective to Position Objects
Perspective tools in Krita, Adobe Photoshop, and Affinity Photo can help place furniture, signs, landscape elements, facade features, product components, and other objects more accurately within a scene.
The object does not need to look perfectly integrated before generation. It needs to communicate the intended position, scale, orientation, and approximate perspective.
Place the Object Before Generation
If a prompt cannot add an object cleanly, create a rough composite before uploading the image.
Place the object on a new layer and use the perspective or transform tools to align it with the scene. Compare the horizon, viewing height, vertical lines, direction of depth, and nearby architectural edges. Adjust the object's scale and orientation until its intended placement is clear.
This approach is useful when the model repeatedly places an object in the wrong location, changes its orientation, or misunderstands its relationship to the surrounding scene.
Adjust the Object After Generation
Perspective can also be corrected after generation.
If the generated object is visually correct but its placement, size, or angle feels unnatural, move and transform it in Affinity Photo, Adobe Photoshop, or Krita. The adjusted image may be sufficient as the final result, or it can become the next Image 1 for another edit call.
In the next prompt, ask the model to preserve the corrected placement while improving integration with the scene. This can help resolve ground contact, shadows, reflections, overlapping objects, material response, and edge transitions.
Step 1: Add the new object image to your current scene.
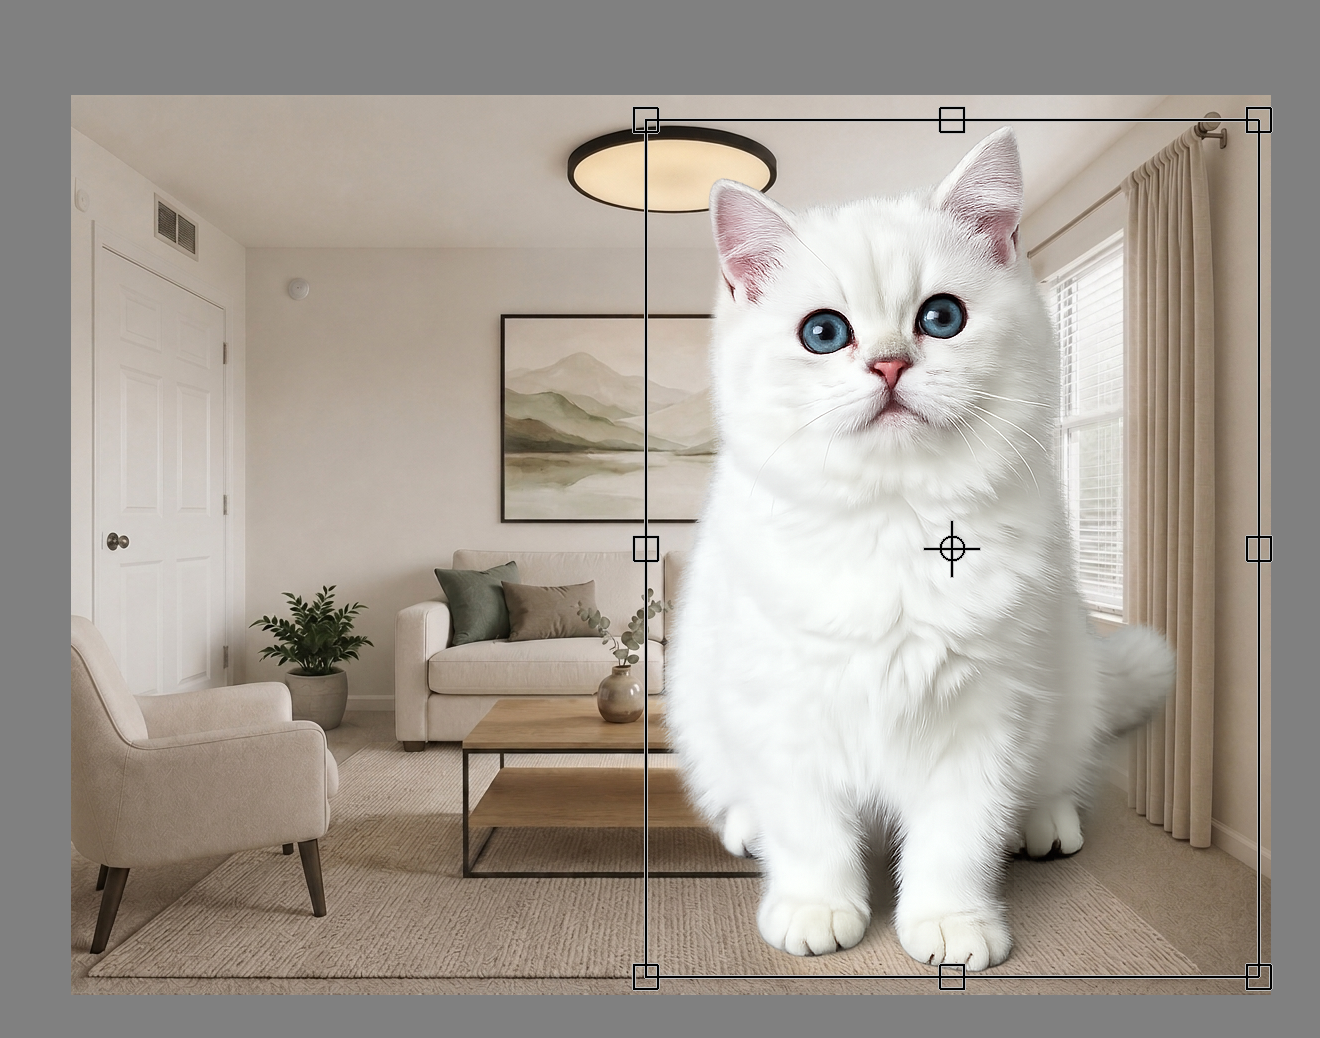
Step 2: Select the Perspective or Transform tool. Each image editor provides a different way to access this setting.
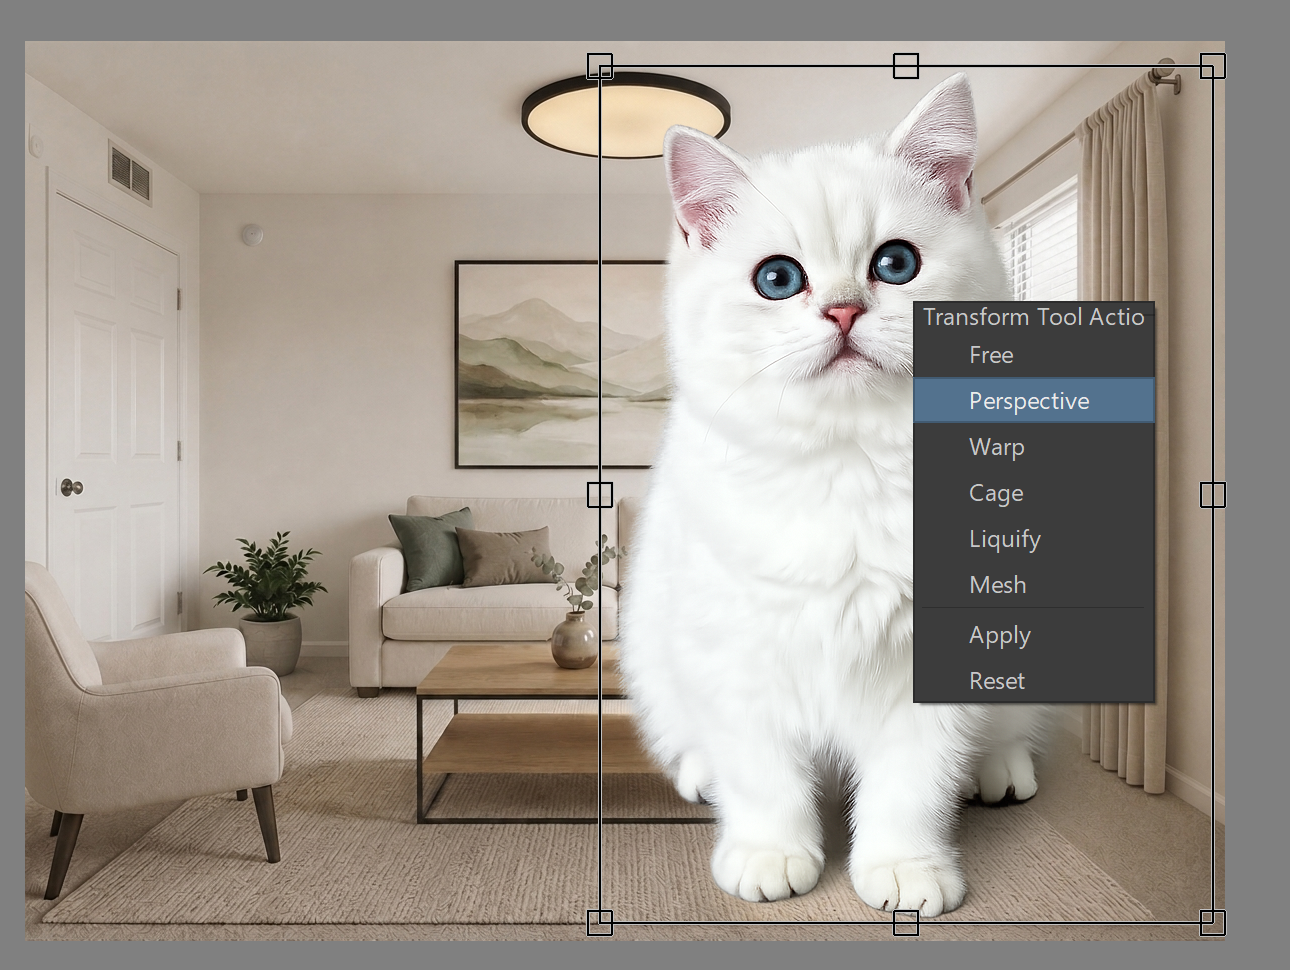
Step 3: Move the image's corner handles until its angle matches the scene, then position the object where you want it. Save the merged image and use it as your new base image on RunDiffusion. You can do this through the RunDiffusion Photoshop Plugin or save the image manually and upload it to the platform.
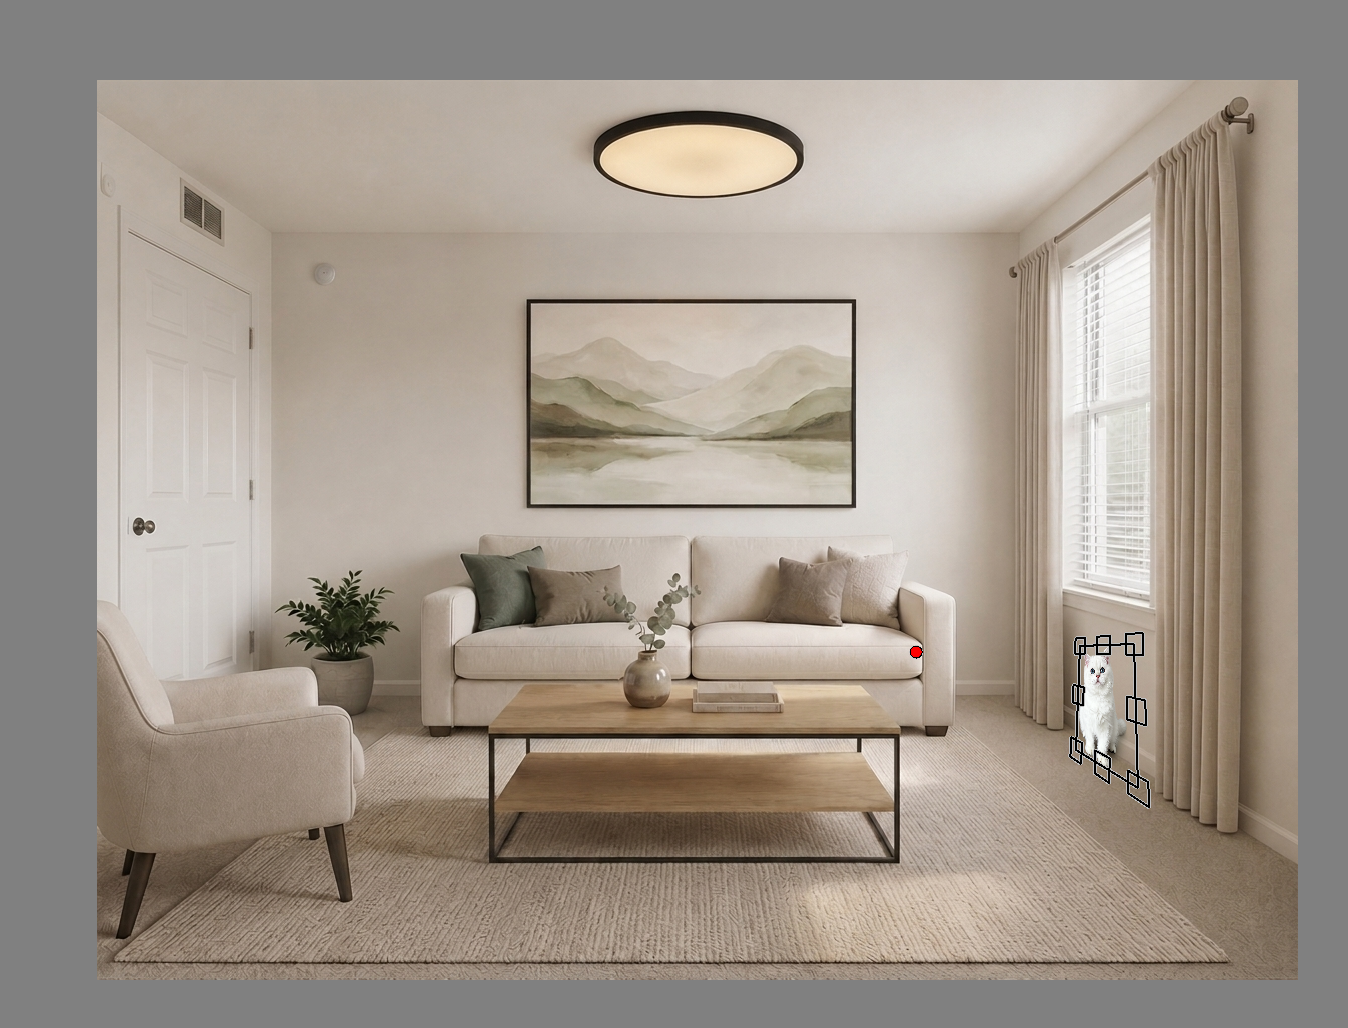
Step 4: Use the image containing the perspective adjusted object as the base image for the next generation.
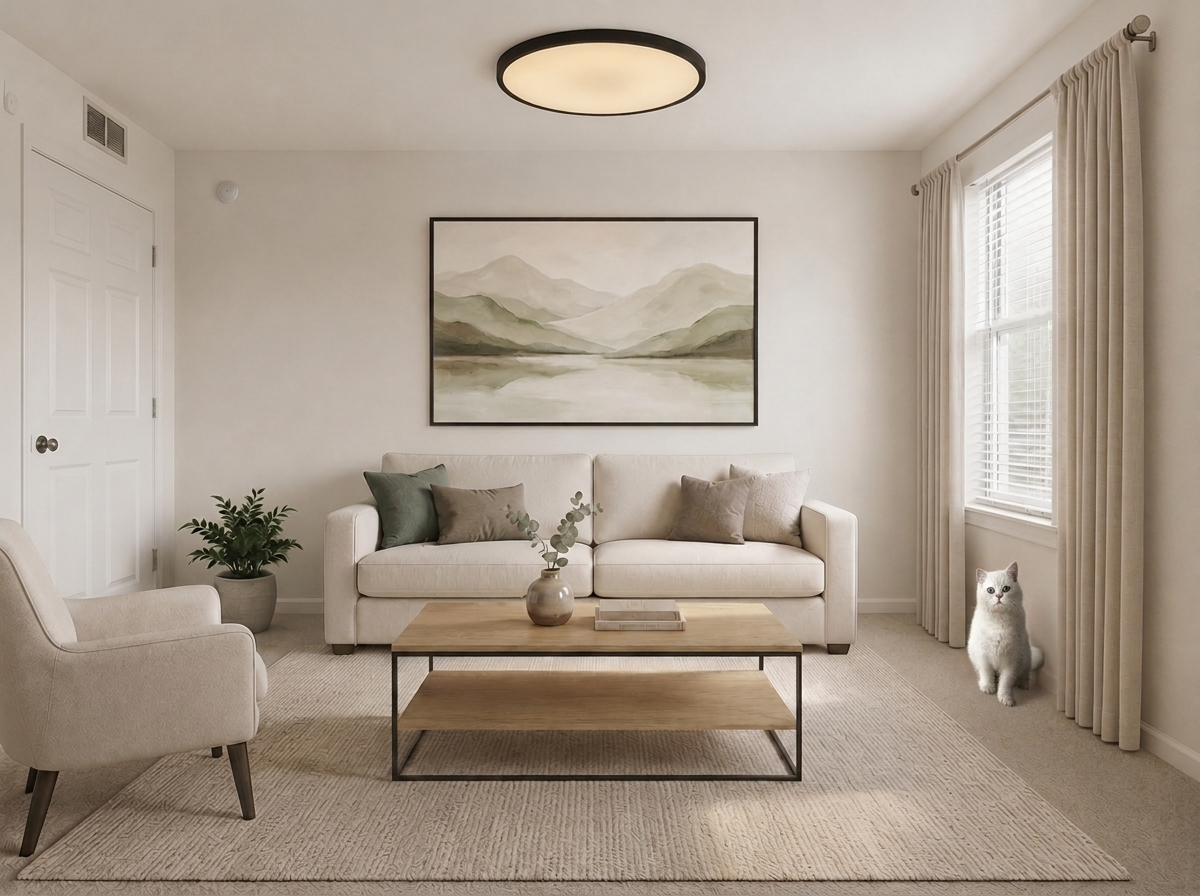
Combine the Three Techniques
Layering, zooming, and perspective are most useful when they operate as one repeatable workflow:
- Choose the strongest current image as your base.
- Zoom in or crop references to isolate the information you want to use.
- Roughly place difficult objects with perspective tools when necessary.
- Upload the prepared composite as Image 1.
- Add the required references and write a complete prompt for the current generation.
- Review the result and identify the successful changes.
- Layer those successful changes over the previous base image.
- Export the combined image as a PNG.
- Use the exported PNG as Image 1 for the next edit until complete.
This workflow lets you accumulate controlled changes without repeatedly regenerating the complete image, which can introduce artifacts and gradually degrade important details.
Common Mistakes to Avoid
Flattening Without Keeping a Working File
Keep the layered Affinity Photo, Photoshop, or Krita file in addition to the exported PNG. If a later edit introduces a problem, the layered file makes it easier to return to an earlier version.
Misaligning the Base and Generated Image
Confirm that the images share the same pixel dimensions and align before masking. Even a small offset can create doubled edges, soft details, or visible seams.
Cropping Too Tightly
Remove distractions, but keep enough context to communicate scale, orientation, boundaries, joints, and relationships.
Letting a Reference Control Too Much
A close crop makes a reference clearer, but the prompt must still state exactly what it contributes and what it must not change.
Ignoring Perspective
An object can have the correct design and still look wrong if its scale, angle, horizon, or ground contact does not match the scene.
Reusing a Weakened Base Image
Do not automatically use the latest generation as the next base. Use the strongest current composite. If a result improves one area but damages three others, keep only the successful area through layering.
Which Image Editor Should You Use?
Affinity Photo, Adobe Photoshop, and Krita can all handle the core techniques in this workflow. As long as y our editing software allows layering and perspective they will work with these techniques.
- Layers and masks
- Cropping and resizing
- Perspective and transform adjustments
- Basic color and edge corrections
- PNG export
Use the application that fits your existing workflow. The technique matters more than the specific software.
Keep the Model Focused
Better image editing is often less about asking the model to do more and more about removing ambiguity.
Layering protects successful work. Zooming isolates the information that matters. Perspective communicates where an object belongs. Exporting the result as a new PNG gives the next generation a stronger Image 1.
For a complete framework for writing generation and edit prompts, read The Complete Nano Banana Pro Prompt Guide. For more help assigning clear roles to several uploaded images, continue with the RunDiffusion Multi Image Prompt Guide.
Which Models Should I Try?
No single edit model is best for every image. If an important edit is not working, try the same prepared Image 1, references, annotations, and prompt in another model. Comparing the outputs can show which model best preserves structure, places objects, or interprets your visual direction.
Nano Banana Pro
Nano Banana Pro is a good choice for detailed briefs that combine multiple references, annotations, text, or several compatible edits. Use it when the prompt must coordinate design changes with explicit preservation instructions.
Open Nano Banana Pro on RunDiffusion
Nano Banana 2
Nano Banana 2 is built for fast generation and editing with strong prompt control. It is a useful choice for campaign creative, visual prototyping, product imagery, and production edits where speed and consistency both matter.
Open Nano Banana 2 on RunDiffusion
Nano Banana 2 Lite
Nano Banana 2 Lite is the lightweight option for quick concepts, prompt tests, visual variations, and early editing passes. Use it when you want to explore more directions before investing in deeper refinement.
Open Nano Banana 2 Lite on RunDiffusion
ChatGPT Image 2.0
ChatGPT Image 2.0 is a flexible option for instruction driven edits, object changes, visual ideation, and broader scene revisions. Try it when you want a different interpretation of a complex edit or need to explore several visual directions.
Open ChatGPT Image 2.0 on RunDiffusion
Seedream 4.5 Edit
Seedream 4.5 Edit is useful for polished visual refinements, material changes, atmosphere, styling, and design variations. It is worth comparing when visual finish and overall presentation are important.
Open Seedream 4.5 Edit on RunDiffusion
Qwen Image Edit
Qwen Image Edit gives you another option for targeted modifications, object placement, style changes, and exploratory variations. Try it when another model changes too much of the image or interprets the requested placement differently.
